Introduction to Linux interfaces for virtual networking_error creating macvtap interface-程序员宅基地
Introduction to Linux interfaces for virtual networking
Linux has rich virtual networking capabilities that are used as basis for hosting VMs and containers, as well as cloud environments. In this post, I will give a brief introduction to all commonly used virtual network interface types. There is no code analysis, only a brief introduction to the interfaces and their usage on Linux. Anyone with a network background might be interested in this blog post. A list of interfaces can be obtained using the command ip link help.
This post covers the following frequently used interfaces and some interfaces that can be easily confused with one another:
- Bridge
- Bonded interface
- Team device
- VLAN (Virtual LAN)
- VXLAN (Virtual eXtensible Local Area Network)
- MACVLAN
- IPVLAN
- MACVTAP/IPVTAP
- MACsec (Media Access Control Security)
- VETH (Virtual Ethernet)
- VCAN (Virtual CAN)
- VXCAN (Virtual CAN tunnel)
- IPOIB (IP-over-InfiniBand)
- NLMON (NetLink MONitor)
- Dummy interface
- IFB (Intermediate Functional Block)
- netdevsim
After reading this article, you will know what these interfaces are, what’s the difference between them, when to use them, and how to create them.
For other interfaces like tunnel, please see An introduction to Linux virtual interfaces: Tunnels
Bridge
A Linux bridge behaves like a network switch. It forwards packets between interfaces that are connected to it. It’s usually used for forwarding packets on routers, on gateways, or between VMs and network namespaces on a host. It also supports STP, VLAN filter, and multicast snooping.
Use a bridge when you want to establish communication channels between VMs, containers, and your hosts.
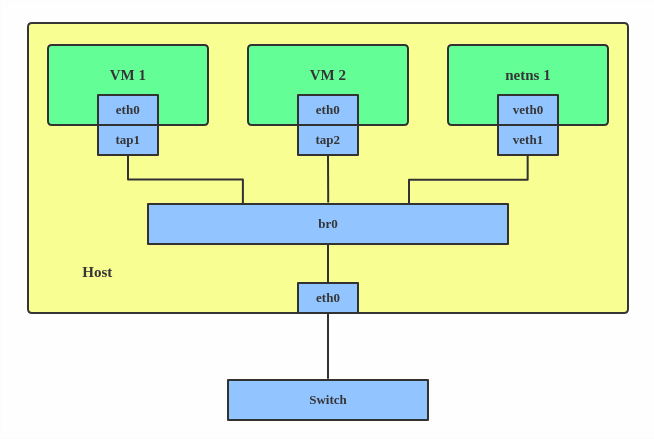
Here’s how to create a bridge:
# ip link add br0 type bridge
# ip link set eth0 master br0
# ip link set tap1 master br0
# ip link set tap2 master br0
# ip link set veth1 master br0
This creates a bridge device named br0 and sets two TAP devices (tap1, tap2), a VETH device (veth1), and a physical device (eth0) as its slaves, as shown in the diagram above.
Everything you need to grow your career.
With your free Red Hat Developer program membership, unlock our library of cheat sheets and ebooks on next-generation application development.
Bonded interface
The Linux bonding driver provides a method for aggregating multiple network interfaces into a single logical “bonded” interface. The behavior of the bonded interface depends on the mode; generally speaking, modes provide either hot standby or load balancing services.
Use a bonded interface when you want to increase your link speed or do a failover on your server.
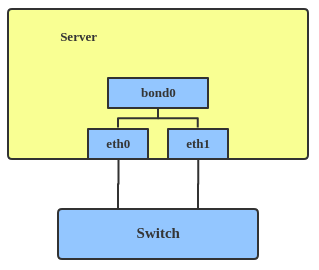
Here’s how to create a bonded interface:
ip link add bond1 type bond miimon 100 mode active-backup
ip link set eth0 master bond1
ip link set eth1 master bond1
This creates a bonded interface named bond1 with mode active-backup. For other modes, please see the kernel documentation.
Team device
Similar a bonded interface, the purpose of a team device is to provide a mechanism to group multiple NICs (ports) into one logical one (teamdev) at the L2 layer.

The main thing to realize is that a team device is not trying to replicate or mimic a bonded interface. What it does is to solve the same problem using a different approach, using, for example, a lockless (RCU) TX/RX path and modular design.
But there are also some functional differences between a bonded interface and a team. For example, a team supports LACP load-balancing, NS/NA (IPV6) link monitoring, D-Bus interface, etc., which are absent in bonding. For further details about the differences between bonding and team, see Bonding vs. Team features.
Use a team when you want to use some features that bonding doesn’t provide.
Here’s how to create a team:
# teamd -o -n -U -d -t team0 -c '{"runner": {"name": "activebackup"},"link_watch": {"name": "ethtool"}}'
# ip link set eth0 down
# ip link set eth1 down
# teamdctl team0 port add eth0
# teamdctl team0 port add eth1
This creates a team interface named team0 with mode active-backup, and it adds eth0 and eth1 as team0‘s sub-interfaces.
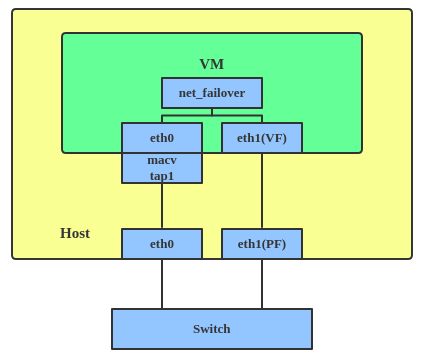
A new driver called net_failover has been added to Linux recently. It’s another failover master net device for virtualization and manages a primary (passthru/VF [Virtual Function] device) slave net device and a standby (the original paravirtual interface) slave net device.
VLAN
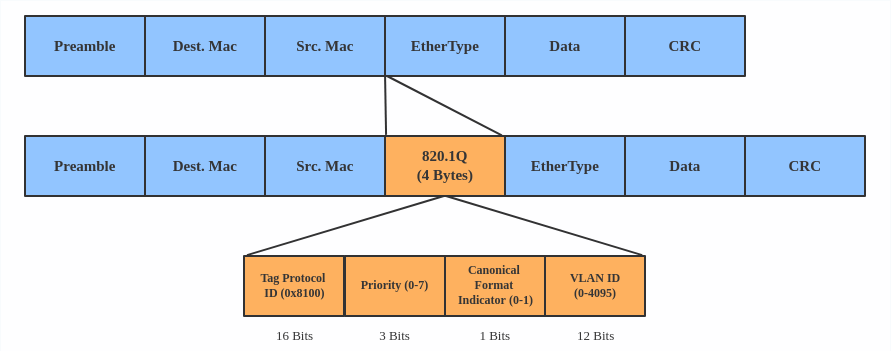
A VLAN, aka virtual LAN, separates broadcast domains by adding tags to network packets. VLANs allow network administrators to group hosts under the same switch or between different switches.
The VLAN header looks like:
Use a VLAN when you want to separate subnet in VMs, namespaces, or hosts.
Here’s how to create a VLAN:
# ip link add link eth0 name eth0.2 type vlan id 2
# ip link add link eth0 name eth0.3 type vlan id 3
This adds VLAN 2 with name eth0.2 and VLAN 3 with name eth0.3. The topology looks like this:
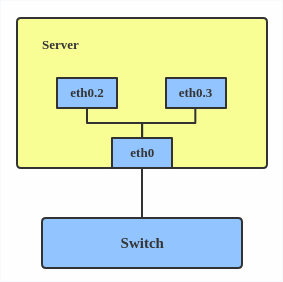
Note: When configuring a VLAN, you need to make sure the switch connected to the host is able to handle VLAN tags, for example, by setting the switch port to trunk mode.
VXLAN
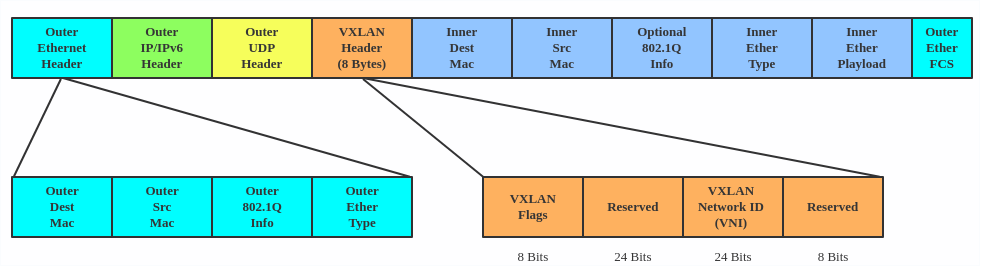
VXLAN (Virtual eXtensible Local Area Network) is a tunneling protocol designed to solve the problem of limited VLAN IDs (4,096) in IEEE 802.1q. It is described by IETF RFC 7348.
With a 24-bit segment ID, aka VXLAN Network Identifier (VNI), VXLAN allows up to 2^24 (16,777,216) virtual LANs, which is 4,096 times the VLAN capacity.
VXLAN encapsulates Layer 2 frames with a VXLAN header into a UDP-IP packet, which looks like this:
VXLAN is typically deployed in data centers on virtualized hosts, which may be spread across multiple racks.
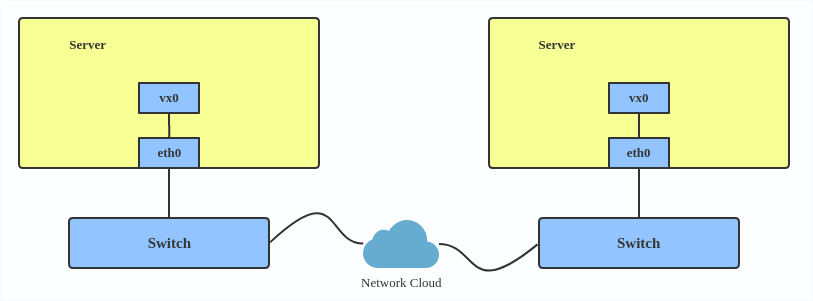
Here’s how to use VXLAN:
# ip link add vx0 type vxlan id 100 local 1.1.1.1 remote 2.2.2.2 dev eth0 dstport 4789
For reference, you can read the VXLAN kernel documentation or this VXLAN introduction.
MACVLAN
With VLAN, you can create multiple interfaces on top of a single one and filter packages based on a VLAN tag. With MACVLAN, you can create multiple interfaces with different Layer 2 (that is, Ethernet MAC) addresses on top of a single one.
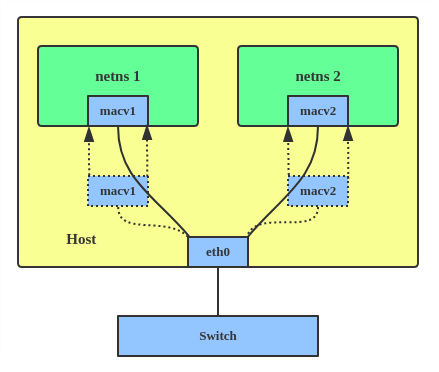
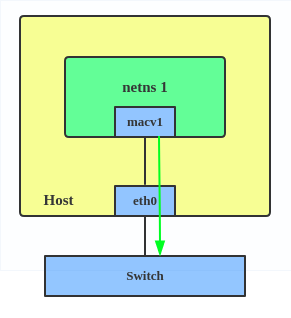
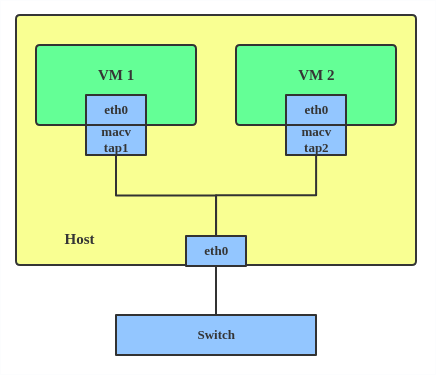
Before MACVLAN, if you wanted to connect to physical network from a VM or namespace, you would have needed to create TAP/VETH devices and attach one side to a bridge and attach a physical interface to the bridge on the host at the same time, as shown below.
Now, with MACVLAN, you can bind a physical interface that is associated with a MACVLAN directly to namespaces, without the need for a bridge.
There are five MACVLAN types:
1. Private: doesn’t allow communication between MACVLAN instances on the same physical interface, even if the external switch supports hairpin mode.
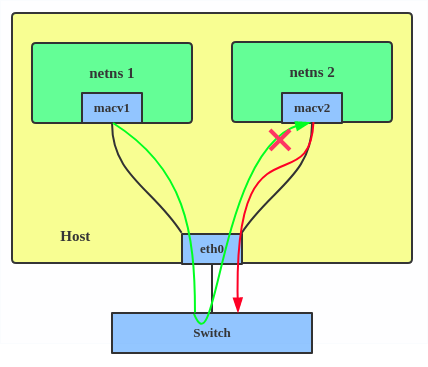
2. VEPA: data from one MACVLAN instance to the other on the same physical interface is transmitted over the physical interface. Either the attached switch needs to support hairpin mode or there must be a TCP/IP router forwarding the packets in order to allow communication.
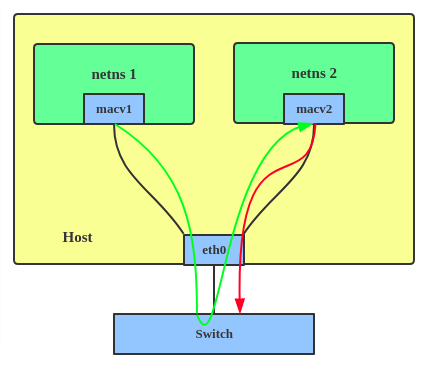
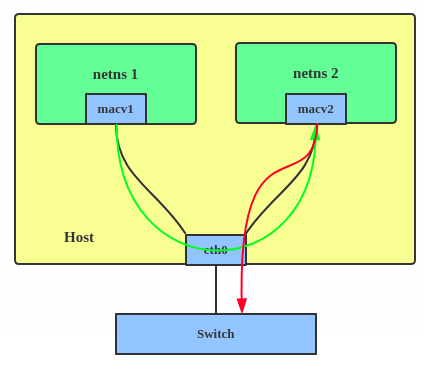
3. Bridge: all endpoints are directly connected to each other with a simple bridge via the physical interface.
4. Passthru: allows a single VM to be connected directly to the physical interface.
5. Source: the source mode is used to filter traffic based on a list of allowed source MAC addresses to create MAC-based VLAN associations. Please see the commit message.
The type is chosen according to different needs. Bridge mode is the most commonly used.
Use a MACVLAN when you want to connect directly to a physical network from containers.
Here’s how to set up a MACVLAN:
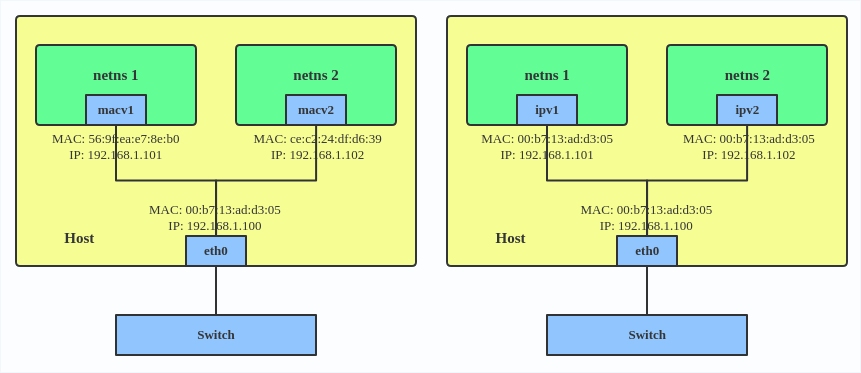
# ip link add macvlan1 link eth0 type macvlan mode bridge
# ip link add macvlan2 link eth0 type macvlan mode bridge
# ip netns add net1
# ip netns add net2
# ip link set macvlan1 netns net1
# ip link set macvlan2 netns net2
This creates two new MACVLAN devices in bridge mode and assigns these two devices to two different namespaces.
IPVLAN
IPVLAN is similar to MACVLAN with the difference being that the endpoints have the same MAC address.
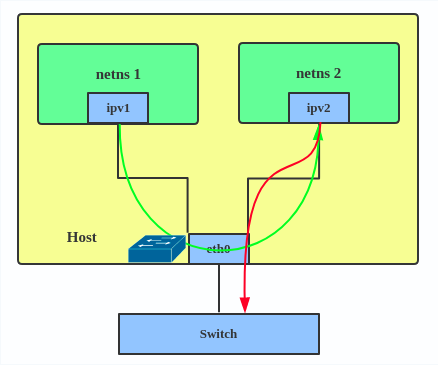
IPVLAN supports L2 and L3 mode. IPVLAN L2 mode acts like a MACVLAN in bridge mode. The parent interface looks like a bridge or switch.
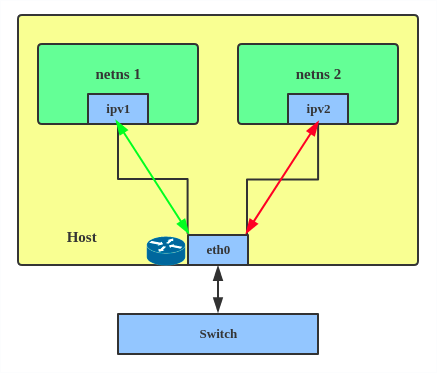
In IPVLAN L3 mode, the parent interface acts like a router and packets are routed between endpoints, which gives better scalability.
Regarding when to use an IPVLAN, the IPVLAN kernel documentation says that MACVLAN and IPVLAN “are very similar in many regards and the specific use case could very well define which device to choose. if one of the following situations defines your use case then you can choose to use ipvlan –
(a) The Linux host that is connected to the external switch / router has policy configured that allows only one mac per port.
(b) No of virtual devices created on a master exceed the mac capacity and puts the NIC in promiscuous mode and degraded performance is a concern.
(c) If the slave device is to be put into the hostile / untrusted network namespace where L2 on the slave could be changed / misused.”
Here’s how to set up an IPVLAN instance:
# ip netns add ns0
# ip link add name ipvl0 link eth0 type ipvlan mode l2
# ip link set dev ipvl0 netns ns0
This creates an IPVLAN device named ipvl0 with mode L2, assigned to namespace ns0.
MACVTAP/IPVTAP
MACVTAP/IPVTAP is a new device driver meant to simplify virtualized bridged networking. When a MACVTAP/IPVTAP instance is created on top of a physical interface, the kernel also creates a character device/dev/tapX to be used just like a TUN/TAP device, which can be directly used by KVM/QEMU.
With MACVTAP/IPVTAP, you can replace the combination of TUN/TAP and bridge drivers with a single module:
Typically, MACVLAN/IPVLAN is used to make both the guest and the host show up directly on the switch to which the host is connected. The difference between MACVTAP and IPVTAP is same as with MACVLAN/IPVLAN.
Here’s how to create a MACVTAP instance:
# ip link add link eth0 name macvtap0 type macvtap
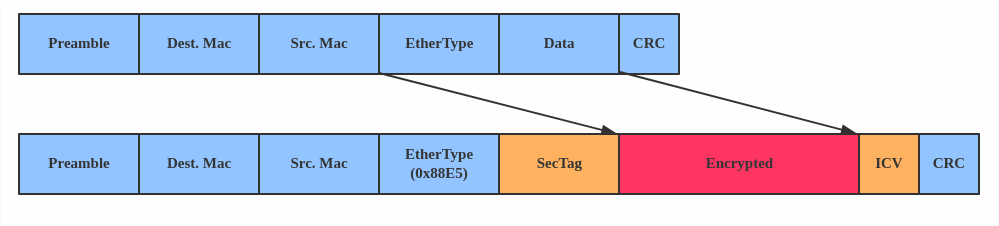
MACsec
MACsec (Media Access Control Security) is an IEEE standard for security in wired Ethernet LANs. Similar to IPsec, as a layer 2 specification, MACsec can protect not only IP traffic but also ARP, neighbor discovery, and DHCP. The MACsec headers look like this:
The main use case for MACsec is to secure all messages on a standard LAN including ARP, NS, and DHCP messages.

Here’s how to set up a MACsec configuration:
# ip link add macsec0 link eth1 type macsec
Note: This only adds a MACsec device called macsec0 on interface eth1. For more detailed configurations, please see the “Configuration example” section in this MACsec introduction by Sabrina Dubroca.
VETH
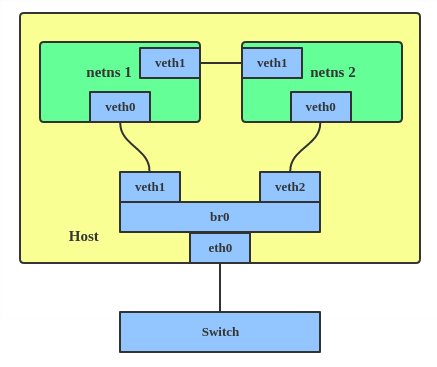
The VETH (virtual Ethernet) device is a local Ethernet tunnel. Devices are created in pairs, as shown in the diagram below.
Packets transmitted on one device in the pair are immediately received on the other device. When either device is down, the link state of the pair is down.
Use a VETH configuration when namespaces need to communicate to the main host namespace or between each other.
Here’s how to set up a VETH configuration:
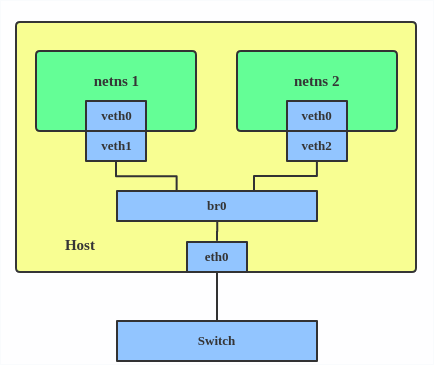
# ip netns add net1
# ip netns add net2
# ip link add veth1 netns net1 type veth peer name veth2 netns net2
This creates two namespaces, net1 and net2, and a pair of VETH devices, and it assigns veth1 to namespace net1 and veth2 to namespace net2. These two namespaces are connected with this VETH pair. Assign a pair of IP addresses, and you can ping and communicate between the two namespaces.
VCAN
Similar to the network loopback devices, the VCAN (virtual CAN) driver offers a virtual local CAN (Controller Area Network) interface, so users can send/receive CAN messages via a VCAN interface. CAN is mostly used in the automotive field nowadays.
For more CAN protocol information, please refer to the kernel CAN documentation.
Use a VCAN when you want to test a CAN protocol implementation on the local host.
Here’s how to create a VCAN:
# ip link add dev vcan1 type vcan
VXCAN
Similar to the VETH driver, a VXCAN (Virtual CAN tunnel) implements a local CAN traffic tunnel between two VCAN network devices. When you create a VXCAN instance, two VXCAN devices are created as a pair. When one end receives the packet, the packet appears on the device’s pair and vice versa. VXCAN can be used for cross-namespace communication.
Use a VXCAN configuration when you want to send CAN message across namespaces.
Here’s how to set up a VXCAN instance:
# ip netns add net1
# ip netns add net2
# ip link add vxcan1 netns net1 type vxcan peer name vxcan2 netns net2
Note: VXCAN is not yet supported in Red Hat Enterprise Linux.
IPOIB
An IPOIB device supports the IP-over-InfiniBand protocol. This transports IP packets over InfiniBand (IB) so you can use your IB device as a fast NIC.
The IPoIB driver supports two modes of operation: datagram and connected. In datagram mode, the IB UD (Unreliable Datagram) transport is used. In connected mode, the IB RC (Reliable Connected) transport is used. The connected mode takes advantage of the connected nature of the IB transport and allows an MTU up to the maximal IP packet size of 64K.
For more details, please see the IPOIB kernel documentation.
Use an IPOIB device when you have an IB device and want to communicate with a remote host via IP.
Here’s how to create an IPOIB device:
# ip link add ib0 name ipoib0 type ipoib pkey IB_PKEY mode connected
NLMON
NLMON is a Netlink monitor device.
Use an NLMON device when you want to monitor system Netlink messages.
Here’s how to create an NLMON device:
# ip link add nlmon0 type nlmon
# ip link set nlmon0 up
# tcpdump -i nlmon0 -w nlmsg.pcap
This creates an NLMON device named nlmon0 and sets it up. Use a packet sniffer (for example, tcpdump) to capture Netlink messages. Recent versions of Wireshark feature decoding of Netlink messages.
Dummy interface
A dummy interface is entirely virtual like, for example, the loopback interface. The purpose of a dummy interface is to provide a device to route packets through without actually transmitting them.
Use a dummy interface to make an inactive SLIP (Serial Line Internet Protocol) address look like a real address for local programs. Nowadays, a dummy interface is mostly used for testing and debugging.
Here’s how to create a dummy interface:
# ip link add dummy1 type dummy
# ip addr add 1.1.1.1/24 dev dummy1
# ip link set dummy1 up
IFB
The IFB (Intermediate Functional Block) driver supplies a device that allows the concentration of traffic from several sources and the shaping incoming traffic instead of dropping it.
Use an IFB interface when you want to queue and shape incoming traffic.
Here’s how to create an IFB interface:
# ip link add ifb0 type ifb
# ip link set ifb0 up
# tc qdisc add dev ifb0 root sfq
# tc qdisc add dev eth0 handle ffff: ingress
# tc filter add dev eth0 parent ffff: u32 match u32 0 0 action mirred egress redirect dev ifb0
This creates an IFB device named ifb0 and replaces the root qdisc scheduler with SFQ (Stochastic Fairness Queueing), which is a classless queueing scheduler. Then it adds an ingress qdisc scheduler on eth0 and redirects all ingress traffic to ifb0.
For more IFB qdisc use cases, please refer to this Linux Foundation wiki on IFB.
Additional resources
- Virtual networking articles on the Red Hat Developer blog
- Dynamic IP Address Management in Open Virtual Network (OVN)
- Non-root Open vSwitch in Red Hat Enterprise Linux
- Open vSwitch articles on the Red hat Developer Blog
netdevsim interface
netdevsim is a simulated networking device which is used for testing various networking APIs. At this time it is particularly focused on testing hardware
offloading, tc/XDP BPF and SR-IOV.
A netdevsim device can be created as follows
# ip link add dev sim0 type netdevsim
# ip link set dev sim0 up
To enable tc offload:
# ethtool -K sim0 hw-tc-offload on
To load XDP BPF or tc BPF programs:
# ip link set dev sim0 xdpoffload obj prog.o
To add VFs for SR-IOV testing:
# echo 3 > /sys/class/net/sim0/device/sriov_numvfs
# ip link set sim0 vf 0 mac
To change the vf numbers, you need to disable them completely first:
# echo 0 > /sys/class/net/sim0/device/sriov_numvfs
# echo 5 > /sys/class/net/sim0/device/sriov_numvfs
智能推荐
解决win10/win8/8.1 64位操作系统MT65xx preloader线刷驱动无法安装_mt65驱动-程序员宅基地
文章浏览阅读1.3w次。转载自 http://www.miui.com/thread-2003672-1-1.html 当手机在刷错包或者误修改删除系统文件后会出现无法开机或者是移动定制(联通合约机)版想刷标准版,这时就会用到线刷,首先就是安装线刷驱动。 在XP和win7上线刷是比较方便的,用那个驱动自动安装版,直接就可以安装好,完成线刷。不过现在也有好多机友换成了win8/8.1系统,再使用这个_mt65驱动
SonarQube简介及客户端集成_sonar的客户端区别-程序员宅基地
文章浏览阅读1k次。SonarQube是一个代码质量管理平台,可以扫描监测代码并给出质量评价及修改建议,通过插件机制支持25+中开发语言,可以很容易与gradle\maven\jenkins等工具进行集成,是非常流行的代码质量管控平台。通CheckStyle、findbugs等工具定位不同,SonarQube定位于平台,有完善的管理机制及强大的管理页面,并通过插件支持checkstyle及findbugs等既有的流..._sonar的客户端区别
元学习系列(六):神经图灵机详细分析_神经图灵机方法改进-程序员宅基地
文章浏览阅读3.4k次,点赞2次,收藏27次。神经图灵机是LSTM、GRU的改进版本,本质上依然包含一个外部记忆结构、可对记忆进行读写操作,主要针对读写操作进行了改进,或者说提出了一种新的读写操作思路。神经图灵机之所以叫这个名字是因为它通过深度学习模型模拟了图灵机,但是我觉得如果先去介绍图灵机的概念,就会搞得很混乱,所以这里主要从神经图灵机改进了LSTM的哪些方面入手进行讲解,同时,由于模型的结构比较复杂,为了让思路更清晰,这次也会分开几..._神经图灵机方法改进
【机器学习】机器学习模型迭代方法(Python)-程序员宅基地
文章浏览阅读2.8k次。一、模型迭代方法机器学习模型在实际应用的场景,通常要根据新增的数据下进行模型的迭代,常见的模型迭代方法有以下几种:1、全量数据重新训练一个模型,直接合并历史训练数据与新增的数据,模型直接离线学习全量数据,学习得到一个全新的模型。优缺点:这也是实际最为常见的模型迭代方式,通常模型效果也是最好的,但这样模型迭代比较耗时,资源耗费比较多,实时性较差,特别是在大数据场景更为困难;2、模型融合的方法,将旧模..._模型迭代
base64图片打成Zip包上传,以及服务端解压的简单实现_base64可以装换zip吗-程序员宅基地
文章浏览阅读2.3k次。1、前言上传图片一般采用异步上传的方式,但是异步上传带来不好的地方,就如果图片有改变或者删除,图片服务器端就会造成浪费。所以有时候就会和参数同步提交。笔者喜欢base64图片一起上传,但是图片过多时就会出现数据丢失等异常。因为tomcat的post请求默认是2M的长度限制。2、解决办法有两种:① 修改tomcat的servel.xml的配置文件,设置 maxPostSize=..._base64可以装换zip吗
Opencv自然场景文本识别系统(源码&教程)_opencv自然场景实时识别文字-程序员宅基地
文章浏览阅读1k次,点赞17次,收藏22次。Opencv自然场景文本识别系统(源码&教程)_opencv自然场景实时识别文字
随便推点
ESXi 快速复制虚拟机脚本_exsi6.7快速克隆centos-程序员宅基地
文章浏览阅读1.3k次。拷贝虚拟机文件时间比较长,因为虚拟机 flat 文件很大,所以要等。脚本完成后,以复制虚拟机文件夹。将以下脚本内容写入文件。_exsi6.7快速克隆centos
好友推荐—基于关系的java和spark代码实现_本关任务:使用 spark core 知识完成 " 好友推荐 " 的程序。-程序员宅基地
文章浏览阅读2k次。本文主要实现基于二度好友的推荐。数学公式参考于:http://blog.csdn.net/qq_14950717/article/details/52197565测试数据为自己随手画的关系图把图片整理成文本信息如下:a b c d e f yb c a f gc a b dd c a e h q re f h d af e a b gg h f bh e g i di j m n ..._本关任务:使用 spark core 知识完成 " 好友推荐 " 的程序。
南京大学-高级程序设计复习总结_南京大学高级程序设计-程序员宅基地
文章浏览阅读367次。南京大学高级程序设计期末复习总结,c++面向对象编程_南京大学高级程序设计
4.朴素贝叶斯分类器实现-matlab_朴素贝叶斯 matlab训练和测试输出-程序员宅基地
文章浏览阅读3.1k次,点赞2次,收藏12次。实现朴素贝叶斯分类器,并且根据李航《统计机器学习》第四章提供的数据训练与测试,结果与书中一致分别实现了朴素贝叶斯以及带有laplace平滑的朴素贝叶斯%书中例题实现朴素贝叶斯%特征1的取值集合A1=[1;2;3];%特征2的取值集合A2=[4;5;6];%S M LAValues={A1;A2};%Y的取值集合YValue=[-1;1];%数据集和T=[ 1,4,-1;..._朴素贝叶斯 matlab训练和测试输出
Markdown 文本换行_markdowntext 换行-程序员宅基地
文章浏览阅读1.6k次。Markdown 文本换行_markdowntext 换行
错误:0xC0000022 在运行 Microsoft Windows 非核心版本的计算机上,运行”slui.exe 0x2a 0xC0000022″以显示错误文本_错误: 0xc0000022 在运行 microsoft windows 非核心版本的计算机上,运行-程序员宅基地
文章浏览阅读6.7w次,点赞2次,收藏37次。win10 2016长期服务版激活错误解决方法:打开“注册表编辑器”;(Windows + R然后输入Regedit)修改SkipRearm的值为1:(在HKEY_LOCAL_MACHINE–》SOFTWARE–》Microsoft–》Windows NT–》CurrentVersion–》SoftwareProtectionPlatform里面,将SkipRearm的值修改为1)重..._错误: 0xc0000022 在运行 microsoft windows 非核心版本的计算机上,运行“slui.ex