HarmonyOS-实战-06_harmony 打印当前线程是否是主线程-程序员宅基地
技术标签: ️HarmonyOS-The Dragon Boat 华为 harmonyos
第六章:线程开发概述
6.1、线程管理开发概述
不同应用在各自独立的进程中运行。当应用以任何形式启动时,系统为其创建进程,该进程将持续运行。当进程完成当前任务处于等待状态,且系统资源不足时,系统自动回收。
在启动应用时,系统会为该应用创建一个称为“主线程”的执行线程。该线程随着应用创建或消失,是应用的核心线程。UI界面的显示和更新等操作,都是在主线程上进行。主线程又称UI线程,默认情况下,所有的操作都是在主线程上执行。如果需要执行比较耗时的任务(如下载文件、查询数据库),可创建其他线程来处理。
如果应用的业务逻辑比较复杂,可能需要创建多个线程来执行多个任务,这种情况下,代码复杂难以维护,任务与线程的交互也会更加复繁杂,要解决此问题,开发者可以使用“TaskDispatcher”来分发不同的任务。
TaskDispatcher是一个任务分发器,它是Ability分发任务的基本接口,隐藏任务所在线程的实现细节。
为保证应用有更好的响应性,我们需要设计任务的优先级。在UI线程上运行的任务默认以高优先级运行,如果某个任务无需等待结果,则可以用低优先级。
6.2、线程接口的说明
| 优先级 | 详细描述 |
|---|---|
| HIGH | 最高任务优先级,比默认优先级、低优先级的任务有更高的几率得到执行。 |
| DEFAULT | 默认任务优先级, 比低优先级的任务有更高的几率得到执行。 |
| LOW | 低任务优先级,比高优先级、默认优先级的任务有更低的几率得到执行。 |
TaskDispatcher具有多种实现,每种实现对应不同的任务分发器。在分发任务时可以指定任务的优先级,由同一个任务分发器分发出的任务具有相同的优先级。系统提供的任务分发器有GlobalTaskDispatcher、ParallelTaskDispatcher、SerialTaskDispatcher 、SpecTaskDispatcher。
-
GlobalTaskDispatcher
全局并发任务分发器,由Ability执行getGlobalTaskDispatcher()获取。适用于任务之间没有联系的情况。一个应用只有一个GlobalTaskDispatcher,它在程序结束时才被销毁。
TaskDispatcher globalTaskDispatcher = getGlobalTaskDispatcher(TaskPriority.DEFAULT); -
ParallelTaskDispatcher
并发任务分发器,由Ability执行createParallelTaskDispatcher()创建并返回。与GlobalTaskDispatcher不同的是,ParallelTaskDispatcher不具有全局唯一性,可以创建多个。开发者在创建或销毁dispatcher时,需要持有对应的对象引用 。
String dispatcherName = "parallelTaskDispatcher";TaskDispatcher parallelTaskDispatcher = createParallelTas
-
SerialTaskDispatcher
串行任务分发器,由Ability执行createSerialTaskDispatcher()创建并返回。由该分发器分发的所有的任务都是按顺序执行,但是执行这些任务的线程并不是固定的。如果要执行并行任务,应使用ParallelTaskDispatcher或者GlobalTaskDispatcher,而不是创建多个SerialTaskDispatcher。如果任务之间没有依赖,应使用GlobalTaskDispatcher来实现。它的创建和销毁由开发者自己管理,开发者在使用期间需要持有该对象引用。
String dispatcherName = "serialTaskDispatcher";TaskDispatcher serialTaskDispatcher = createSerialTaskDispatcher(dispatcherName, TaskPriority.DEFAULT); -
SpecTaskDispatcher
专有任务分发器,绑定到专有线程上的任务分发器。目前已有的专有线程为UI线程,通过UITaskDispatcher进行任务分发。
UITaskDispatcher:绑定到应用主线程的专有任务分发器, 由Ability执行getUITaskDispatcher()创建并返回。 由该分发器分发的所有的任务都是在主线程上按顺序执行,它在应用程序结束时被销毁。
TaskDispatcher uiTaskDispatcher = getUITaskDispatcher();
6.3、线程开发实例
- GlobalTaskDispatcher
同步派发任务:派发任务并在当前线程等待任务执行完成。在返回前,当前线程会被阻塞。
package com.qf.mythread.slice;

import com.qf.mythread.ResourceTable;
import com.qf.mythread.log.LogUtils;
import ohos.aafwk.ability.AbilitySlice;
import ohos.aafwk.content.Intent;
import ohos.agp.components.Button;
import ohos.agp.components.Component;
import ohos.agp.components.Text;
import ohos.app.dispatcher.TaskDispatcher;
import ohos.app.dispatcher.task.Revocable;
import ohos.app.dispatcher.task.TaskPriority;
import ohos.eventhandler.EventHandler;
import ohos.eventhandler.EventRunner;
import ohos.hiviewdfx.HiLogLabel;

public class MainAbilitySlice extends AbilitySlice implements Component.ClickedListener {


    @Override
    public void onStart(Intent intent) {

        super.onStart(intent);
        super.setUIContent(ResourceTable.Layout_ability_main);
        ((Component)findComponentById(ResourceTable.Id_task1)).setClickedListener(this::onClick);
        ((Component)findComponentById(ResourceTable.Id_task2)).setClickedListener(this::onClick);
        ((Component)findComponentById(ResourceTable.Id_task3)).setClickedListener(this::onClick);
    }

    @Override
    public void onActive() {

        super.onActive();
    }

    @Override
    public void onForeground(Intent intent) {

        super.onForeground(intent);
    }

    @Override
    public void onClick(Component component) {

         switch (component.getId()){

             case ResourceTable.Id_task1:
                 do_globalTaskDispatcher();
                 break;
             case ResourceTable.Id_task2:
                 do_asyglobalTaskDispatcher();
                 break;
             case ResourceTable.Id_task3:
                 do_delayDispatch();
                 break;
         }
    }

    private void do_delayDispatch() {

        final long  callTime = System.currentTimeMillis();
        final long delayTime = 2000l;
        TaskDispatcher globalTaskDispatcher = getGlobalTaskDispatcher(TaskPriority.DEFAULT);
        Revocable revocable = globalTaskDispatcher.delayDispatch(new Runnable() {

            @Override
            public void run() {

                LogUtils.logInfo("delayDispatch task1 run");
                final long actualDelay = System.currentTimeMillis() - callTime;
                LogUtils.logInfo("actualDelay:"+actualDelay);
            }
        },delayTime);
        LogUtils.logInfo("after delayDispatch task1");
    }


    private void do_asyglobalTaskDispatcher() {

        TaskDispatcher globalTaskDispatcher = getGlobalTaskDispatcher(TaskPriority.DEFAULT);
        //是异步执行,根据执行的时间来决定
        globalTaskDispatcher.asyncDispatch(new Runnable() {

            @Override
            public void run() {

                LogUtils.logInfo("sync task1 run");
            }
        });
        LogUtils.logInfo("after sync task1");
    }

    private void do_globalTaskDispatcher() {

        TaskDispatcher globalTaskDispatcher = getGlobalTaskDispatcher(TaskPriority.DEFAULT);
        //同步执行,是串行执行
        globalTaskDispatcher.syncDispatch(new Runnable() {

            @Override
            public void run() {

                LogUtils.logInfo("sync task1 run");
                try {

                    Thread.sleep(2000);
                } catch (InterruptedException e) {

                    e.printStackTrace();
                }

            }
        });
        LogUtils.logInfo("after sync task1");
        globalTaskDispatcher.syncDispatch(new Runnable() {

            @Override
            public void run() {

                LogUtils.logInfo("sync task2 run");
            }
        });
        LogUtils.logInfo("after sync task2");

        globalTaskDispatcher.syncDispatch(new Runnable() {

            @Override
            public void run() {

                LogUtils.logInfo("sync task3 run");
            }
        });
        LogUtils.logInfo("after sync task3");

    }
}
说明
如果对syncDispatch使用不当, 将会导致死锁。如下情形可能导致死锁发生:
- 在专有线程上,利用该专有任务分发器进行syncDispatch。
- 在被某个串行任务分发器(dispatcher_a)派发的任务中,再次利用同一个串行任务分发器(dispatcher_a)对象派发任务。
- 在被某个串行任务分发器(dispatcher_a)派发的任务中,经过数次派发任务,最终又利用该(dispatcher_a)串行任务分发器派发任务。例如:dispatcher_a派发的任务使用dispatcher_b进行任务的派发,在dispatcher_b派发的任务中又利用dispatcher_a进行派发任务。
- 串行任务分发器(dispatcher_a)派发的任务中利用串行任务分发器(dispatcher_b)进行同步派发任务,同时dispatcher_b派发的任务中利用串行任务分发器(dispatcher_a)进行同步派发任务。在特定的线程执行顺序下将导致死锁。
- asyncDispatch
异步派发任务:派发任务,并立即返回,返回值是一个可用于取消任务的接口。
private void do_asyglobalTaskDispatcher() {

    TaskDispatcher globalTaskDispatcher = getGlobalTaskDispatcher(TaskPriority.DEFAULT);
    //是异步执行,根据执行的时间来决定
    globalTaskDispatcher.asyncDispatch(new Runnable() {

        @Override
        public void run() {

            LogUtils.logInfo("sync task1 run");
        }
    });
    LogUtils.logInfo("after sync task1");
}

// 执行结果可能如下:
// after async task1
// async task1 run
- delayDispatch
异步延迟派发任务:异步执行,函数立即返回,内部会在延时指定时间后将任务派发到相应队列中。延时时间参数仅代表在这段时间以后任务分发器会将任务加入到队列中,任务的实际执行时间可能晚于这个时间。具体比这个数值晚多久,取决于队列及内部线程池的繁忙情况。
    private void do_delayDispatch() {

        final long  callTime = System.currentTimeMillis();
        final long delayTime = 2000l;
        TaskDispatcher globalTaskDispatcher = getGlobalTaskDispatcher(TaskPriority.DEFAULT);
        Revocable revocable = globalTaskDispatcher.delayDispatch(new Runnable() {

            @Override
            public void run() {

                LogUtils.logInfo("delayDispatch task1 run");
                final long actualDelay = System.currentTimeMillis() - callTime;
                LogUtils.logInfo("actualDelay:"+actualDelay);
            }
        },delayTime);
        LogUtils.logInfo("after delayDispatch task1");
    }

// 执行结果可能如下:
// after delayDispatch task1
// delayDispatch task1 run
// actualDelayTime >= delayTime : true
- Group
任务组:表示一组任务,且该组任务之间有一定的联系,由TaskDispatcher执行createDispatchGroup创建并返回。将任务加入任务组,返回一个用于取消任务的接口。
String dispatcherName = "parallelTaskDispatcher";
TaskDispatcher dispatcher = createParallelTaskDispatcher(dispatcherName, TaskPriority.DEFAULT);
// 创建任务组。
Group group = dispatcher.createDispatchGroup();
// 将任务1加入任务组,返回一个用于取消任务的接口。
dispatcher.asyncGroupDispatch(group, new Runnable() {

    @Override
    public void run() {

        HiLog.info(LABEL_LOG, "download task1 is running");
    }
});
// 将与任务1相关联的任务2加入任务组。
dispatcher.asyncGroupDispatch(group, new Runnable() {

    @Override
    public void run() {

        HiLog.info(LABEL_LOG, "download task2 is running");
    }
});
// 在任务组中的所有任务执行完成后执行指定任务。
dispatcher.groupDispatchNotify(group, new Runnable() {

    @Override
    public void run() {

        HiLog.info(LABEL_LOG, "the close task is running after all tasks in the group are completed");
    }
});

// 可能的执行结果:
// download task1 is running
// download task2 is running
// the close task is running after all tasks in the group are completed

// 另外一种可能的执行结果:
// download task2 is running
// download task1 is running
// the close task is running after all tasks in the group are completed
- Revocable
取消任务:Revocable是取消一个异步任务的接口。异步任务包括通过 asyncDispatch、delayDispatch、asyncGroupDispatch 派发的任务。如果任务已经在执行中或执行完成,则会返回取消失败。
TaskDispatcher dispatcher = getUITaskDispatcher();
Revocable revocable = dispatcher.delayDispatch(new Runnable() {

    @Override
    public void run() {

        HiLog.info(LABEL_LOG, "delay dispatch");
    }
}, 10);
boolean revoked = revocable.revoke();
HiLog.info(LABEL_LOG, "%{public}b", revoked);

// 一种可能的结果如下 :
// true
- syncDispatchBarrier
同步设置屏障任务:在任务组上设立任务执行屏障,同步等待任务组中的所有任务执行完成,再执行指定任务。
注意的是:在全局并发任务分发器(GlobalTaskDispatcher)上同步设置任务屏障,将不会起到屏障作用。
String dispatcherName = "parallelTaskDispatcher";
TaskDispatcher dispatcher = createParallelTaskDispatcher(dispatcherName, TaskPriority.DEFAULT);
// 创建任务组。
Group group = dispatcher.createDispatchGroup();
// 将任务加入任务组,返回一个用于取消任务的接口。
dispatcher.asyncGroupDispatch(group, new Runnable() {
@Override
public void run() {
HiLog.info(LABEL_LOG, "task1 is running"); // 1
}
});
dispatcher.asyncGroupDispatch(group, new Runnable() {
@Override
public void run() {
HiLog.info(LABEL_LOG, "task2 is running"); // 2
}
});
dispatcher.syncDispatchBarrier(new Runnable() {
@Override
public void run() {
HiLog.info(LABEL_LOG, "barrier"); // 3
}
});
HiLog.info(LABEL_LOG, "after syncDispatchBarrier"); // 4
// 1和2的执行顺序不定;3和4总是在1和2之后按顺序执行。
// 可能的执行结果:
// task1 is running
// task2 is running
// barrier
// after syncDispatchBarrier
// 另外一种执行结果:
// task2 is running
// task1 is running
// barrier
// after syncDispatchBarrier
- asyncDispatchBarrier
异步设置屏障任务:在任务组上设立任务执行屏障后直接返回,指定任务将在任务组中的所有任务执行完成后再执行。
在全局并发任务分发器(GlobalTaskDispatcher)上异步设置任务屏障,将不会起到屏障作用。可以使用并发任务分发器(ParallelTaskDispatcher)分离不同的任务组,达到微观并行、宏观串行的行为。
TaskDispatcher dispatcher = createParallelTaskDispatcher("dispatcherName", TaskPriority.DEFAULT);
// 创建任务组。
Group group = dispatcher.createDispatchGroup();
// 将任务加入任务组,返回一个用于取消任务的接口。
dispatcher.asyncGroupDispatch(group, new Runnable() {

    @Override
    public void run() {

        HiLog.info(LABEL_LOG, "task1 is running");  // 1
    }
});
dispatcher.asyncGroupDispatch(group, new Runnable() {

    @Override
    public void run() {

        HiLog.info(LABEL_LOG, "task2 is running");  // 2
    }
});

dispatcher.asyncDispatchBarrier(new Runnable() {

    @Override
    public void run() {

        HiLog.info(LABEL_LOG, "barrier");  // 3
    }
});
HiLog.info(LABEL_LOG, "after asyncDispatchBarrier");  // 4
// 1和2的执行顺序不定,但总在3之前执行;4不需要等待1、2、3执行完成。

// 可能的执行结果:
// task1 is running
// task2 is running
// after asyncDispatchBarrier
// barrier
- applyDispatch
执行多次任务:对指定任务执行多次。
如下代码示例展示了如何执行多次任务:
final int total = 10;
final CountDownLatch latch = new CountDownLatch(total);
final List<Long> indexList = new ArrayList<>(total);
TaskDispatcher dispatcher = getGlobalTaskDispatcher(TaskPriority.DEFAULT);

// 执行任务 total 次。
dispatcher.applyDispatch((index) -> {

    indexList.add(index);
    latch.countDown();
}, total);
// 设置任务超时。
try {

    latch.await();
} catch (InterruptedException exception) {

   HiLog.error(LABEL_LOG, "latch exception");
}
HiLog.info(LABEL_LOG, "list size matches, %{public}b", (total == indexList.size()));
// 执行结果:
// list size matches, true
6.4、综合案例一
使用线程下载网络数据
第一步:配置config.json文件
"deviceConfig": {

 "default": {

 "network": {

 "cleartextTraffic": true
 }
 }
 },

 ------- ------- ------- ------- ------- ------- ------- ------- ------- -----
-- ------- ------- ------- ------- ------- ------
 "reqPermissions": [
 {

 "name": "ohos.permission.INTERNET"
 }
 ],
第⼆步:配置Button背景颜⾊button_bg.xml
<?xml version="1.0" encoding="utf-8"?>
<shape xmlns:ohos="http://schemas.huawei.com/res/ohos"
 ohos:shape="rectangle">
 <corners
 ohos:radius="75"/>
 <solid
 ohos:color="gray"/>
</shape>
第三步:编写HTTP访问⼯具类
package com.sudojava.mydownloadhtml.http;

import java.io.BufferedReader;
import java.io.IOException;
import java.io.InputStream;
import java.io.InputStreamReader;
import java.net.HttpURLConnection;
import java.net.MalformedURLException;
import java.net.URL;

public class HTTPManager {

    private static HTTPManager instance;
    private HTTPManager(){


    }

    public static HTTPManager getInstance(){

        if (instance==null){

            synchronized (HTTPManager.class){

                if (instance==null){

                    instance = new HTTPManager();
                }
            }
        }
        return  instance;
    }

    /**
     * 封装一个下载网络资源的方法
     * @param path 请求的url路径
     * @return
     */
    public String download(String path){

        URL url = null;
        HttpURLConnection connection = null;
        InputStream inputStream = null;
        BufferedReader reader = null;
        try {

            url = new URL(path);
            connection = (HttpURLConnection)url.openConnection();
            connection.setDoInput(true);
            connection.setDoOutput(true);
            connection.setConnectTimeout(50000);
            connection.setReadTimeout(15000);
            connection.connect();
            if (connection.getResponseCode()==200){

                inputStream = connection.getInputStream();
                reader = new BufferedReader(new InputStreamReader(inputStream));
                StringBuffer buffer = new StringBuffer();
                String temp = "";
                while ((temp=reader.readLine())!=null){

                    buffer.append(temp);
                    buffer.append("\r\n");
                }
                return  buffer.toString();
            }
        } catch (MalformedURLException e) {

            e.printStackTrace();
        } catch (IOException e) {

            e.printStackTrace();
        }finally {

            if (null!=reader){

                try {

                    reader.close();
                } catch (IOException e) {

                    e.printStackTrace();
                }
            }
            if (null!=inputStream){

                try {

                    inputStream.close();
                } catch (IOException e) {

                    e.printStackTrace();
                }
            }
            connection.disconnect();//释放资源
        }
        return "";
    }
}
第四步:编写MainAbilitySlice类
package com.sudojava.mydownloadhtml.slice;

import com.sudojava.mydownloadhtml.ResourceTable;
import com.sudojava.mydownloadhtml.http.HTTPManager;
import ohos.aafwk.ability.AbilitySlice;
import ohos.aafwk.content.Intent;
import ohos.agp.components.Button;
import ohos.agp.components.Component;
import ohos.app.dispatcher.TaskDispatcher;
import ohos.app.dispatcher.task.TaskPriority;
import ohos.hiviewdfx.HiLog;
import ohos.hiviewdfx.HiLogLabel;

public class MainAbilitySlice extends AbilitySlice {

    private static final HiLogLabel LOG_LABEL = new HiLogLabel(HiLog.LOG_APP,0x00201,"MainAbilitySlice");
    private String path="https://www.baidu.com";
    private Button button;
    @Override
    public void onStart(Intent intent) {

        super.onStart(intent);
        super.setUIContent(ResourceTable.Layout_ability_main);
        button = (Button)findComponentById(ResourceTable.Id_download);
        button.setClickedListener(new Component.ClickedListener() {

            @Override
            public void onClick(Component component) {

                doget();
            }
        });
    }

    private void doget() {

        TaskDispatcher dispatcher = getGlobalTaskDispatcher(TaskPriority.DEFAULT);
        dispatcher.asyncDispatch(new Runnable() {

            @Override
            public void run() {

                String result = HTTPManager.getInstance().download(path);
                HiLog.info(LOG_LABEL,"->>"+result);
            }
        });
    }

    @Override
    public void onActive() {

        super.onActive();
    }

    @Override
    public void onForeground(Intent intent) {

        super.onForeground(intent);
    }
}
6.5、四种任务分发器的使⽤
TaskDispatcher具有多种实现,每种实现对应不同的任务分发器。在分发任务时可以指定任务的优先级,由同⼀个任务分发器分发出的任务具有相同的优先级。系统提供的任务分发器有GlobalTaskDispatcher、ParallelTaskDispatcher、SerialTaskDispatcher 、SpecTaskDispatcher。
- GlobalTaskDispatcher
全局并发任务分发器,由Ability执⾏getGlobalTaskDispatcher()获取。适⽤于任务之间没有联系的情况。⼀个应⽤只有⼀个GlobalTaskDispatcher,它在程序结束时才被销毁。
TaskDispatcher globalTaskDispatcher =getGlobalTaskDispatcher(TaskPriority.DEFAULT);
参考代码:
button_bg.xml
<?xml version="1.0" encoding="utf-8"?>
<shape xmlns:ohos="http://schemas.huawei.com/res/ohos"
       ohos:shape="rectangle">
    <corners
        ohos:radius="75"/>
    <solid
        ohos:color="gray"/>
</shape>
布局文件
<?xml version="1.0" encoding="utf-8"?>
<DirectionalLayout
    xmlns:ohos="http://schemas.huawei.com/res/ohos"
    ohos:height="match_parent"
    ohos:width="match_parent"
    ohos:alignment="center"
    ohos:orientation="vertical">


    <Button
        ohos:id="$+id:button"
        ohos:text="GlobalTaskDispatcher"
        ohos:text_size="25fp"
        ohos:height="match_content"
        ohos:background_element="$graphic:button_bg"
        ohos:width="300vp"/>

    <Component
        ohos:height="20vp"
        ohos:width="match_parent"/>

    <Button
        ohos:id="$+id:button2"
        ohos:text="ParallelTaskDispatcher"
        ohos:text_size="25fp"
        ohos:height="match_content"
        ohos:background_element="$graphic:button_bg"
        ohos:width="300vp"/>

    <Component
        ohos:height="20vp"
        ohos:width="match_parent"/>

    <Button
        ohos:id="$+id:button3"
        ohos:text="SerialTaskDispatcher"
        ohos:text_size="25fp"
        ohos:height="match_content"
        ohos:background_element="$graphic:button_bg"
        ohos:width="300vp"/>

    <Component
        ohos:height="20vp"
        ohos:width="match_parent"/>

    <Button
        ohos:id="$+id:button4"
        ohos:text="SpecTaskDispatcher"
        ohos:text_size="25fp"
        ohos:height="match_content"
        ohos:background_element="$graphic:button_bg"
        ohos:width="300vp"/>


</DirectionalLayout>
private void testThread1() {

    TaskDispatcher dispatcher = getGlobalTaskDispatcher(TaskPriority.DEFAULT);
    Group group =  dispatcher.createDispatchGroup();
    dispatcher.asyncGroupDispatch(group, new Runnable() {

        @Override
        public void run() {

            HiLog.info(LOG_LABEL,"任务一执行");
        }
    });
    dispatcher.asyncGroupDispatch(group, new Runnable() {

        @Override
        public void run() {

            HiLog.info(LOG_LABEL,"任务二执行");
        }
    });
    dispatcher.groupDispatchNotify(group, new Runnable() {

        @Override
        public void run() {

            HiLog.info(LOG_LABEL,"任务组执行完毕!!");
        }
    });
}
- ParallelTaskDispatcher
并发任务分发器,由Ability执⾏createParallelTaskDispatcher()创建并返回。与GlobalTaskDispatcher不同的是,ParallelTaskDispatcher不具有全局唯⼀性,可以创建多个。开发者在创建或销毁dispatcher时,需要持有对应的对象引⽤ 。
String dispatcherName = "parallelTaskDispatcher";TaskDispatcher parallelTaskDispatcher = createParallelTaskDispatcher
private void testThread2() {

    TaskDispatcher dispatcher = createParallelTaskDispatcher("download", TaskPriority.DEFAULT);
    Group group = dispatcher.createDispatchGroup();
    dispatcher.asyncGroupDispatch(group, new Runnable() {

        @Override
        public void run() {

            HiLog.info(LOG_LABEL,"任务1加入任务组");
        }
    });
    dispatcher.asyncGroupDispatch(group, new Runnable() {

        @Override
        public void run() {

            HiLog.info(LOG_LABEL,"任务2加入任务组");
        }
    });
    dispatcher.groupDispatchNotify(group, new Runnable() {

        @Override
        public void run() {

            HiLog.info(LOG_LABEL,"任务组执行完毕!!");
        }
    });
}
- SerialTaskDispatcher
串⾏任务分发器,由Ability执⾏createSerialTaskDispatcher()创建并返回。由该分发器分发的所有的任务都是按顺序执⾏,但是执⾏这些任务的线程并不是固定的。如果要执⾏并⾏任务,应使⽤ParallelTaskDispatcher或者GlobalTaskDispatcher,⽽不是创建多个SerialTaskDispatcher。如果任务之间没有依赖,应使⽤GlobalTaskDispatcher来实现。它的创建和销毁由开发者⾃⼰管理,开发者在使⽤期间需要持有该对象引⽤。
String dispatcherName = "serialTaskDispatcher";TaskDispatcher serialTaskDispatcher = createSerialTaskDispatcher(dispatcherName,
TaskPriority.DEFAULT);
private void testThread3() {

    TaskDispatcher dispatcher = createSerialTaskDispatcher("download",TaskPriority.DEFAULT);
    Group group = dispatcher.createDispatchGroup();
    dispatcher.asyncGroupDispatch(group, new Runnable() {

        @Override
        public void run() {

            HiLog.info(LOG_LABEL,"执行第一个任务");
        }
    });
    dispatcher.asyncGroupDispatch(group, new Runnable() {

        @Override
        public void run() {

            HiLog.info(LOG_LABEL,"执行第二个任务");
        }
    });
    dispatcher.groupDispatchNotify(group, new Runnable() {

        @Override
        public void run() {

            HiLog.info(LOG_LABEL,"执行任务完毕");
        }
    });
}
- SpecTaskDispatcher
专有任务分发器,绑定到专有线程上的任务分发器。⽬前已有的专有线程为UI线程,通过
UITaskDispatcher进⾏任务分发。UITaskDispatcher:绑定到应⽤主线程的专有任务分发器, 由Ability执⾏getUITaskDispatcher()创建并返回。 由该分发器分发的所有的任务都是在主线程上按顺序执⾏,它在应⽤程序结束时被销毁。
  private void testThread4() {

        TaskDispatcher dispatcher = getUITaskDispatcher();
        dispatcher.asyncDispatch(new Runnable() {

            @Override
            public void run() {

                HiLog.info(LOG_LABEL,"通常做更新UI操作!!");
            }
        });
    }
6.6、任务分发器各种操作
- Revocable
取消任务:Revocable是取消⼀个异步任务的接⼝。异步任务包括通过 asyncDispatch、delayDispatch、asyncGroupDispatch 派发的任务。如果任务已经在执⾏中或执⾏完成,则会返回取消失败。
配置布局⽂件
button_bg.xml
<?xml version="1.0" encoding="utf-8"?>
<shape xmlns:ohos="http://schemas.huawei.com/res/ohos"
       ohos:shape="rectangle">
    <corners
        ohos:radius="75"/>
    <solid
        ohos:color="gray"/>
</shape>
ability_main.xml布局文件
<?xml version="1.0" encoding="utf-8"?>
<DirectionalLayout
    xmlns:ohos="http://schemas.huawei.com/res/ohos"
    ohos:height="match_parent"
    ohos:width="match_parent"
    ohos:alignment="center"
    ohos:orientation="vertical">


    <Button
        ohos:id="$+id:button"
        ohos:text="Revocable"
        ohos:text_size="25fp"
        ohos:height="match_content"
        ohos:background_element="$graphic:button_bg"
        ohos:width="300vp"/>

    <Component
        ohos:height="20vp"
        ohos:width="match_parent"/>

    <Button
        ohos:id="$+id:button2"
        ohos:text="SyncDispatchBarrier"
        ohos:text_size="25fp"
        ohos:height="match_content"
        ohos:background_element="$graphic:button_bg"
        ohos:width="300vp"/>

    <Component
        ohos:height="20vp"
        ohos:width="match_parent"/>

    <Button
        ohos:id="$+id:button3"
        ohos:text="AsyncDispatchBarrier"
        ohos:text_size="25fp"
        ohos:height="match_content"
        ohos:background_element="$graphic:button_bg"
        ohos:width="300vp"/>

    <Component
        ohos:height="20vp"
        ohos:width="match_parent"/>

    <Button
        ohos:id="$+id:button4"
        ohos:text="ApplyDispatch"
        ohos:text_size="25fp"
        ohos:height="match_content"
        ohos:background_element="$graphic:button_bg"
        ohos:width="300vp"/>
</DirectionalLayout>
案例代码
package com.sudojava.threadoptions.slice;

import com.sudojava.threadoptions.ResourceTable;
import ohos.aafwk.ability.AbilitySlice;
import ohos.aafwk.content.Intent;
import ohos.agp.components.Button;
import ohos.agp.components.Component;
import ohos.app.dispatcher.Group;
import ohos.app.dispatcher.TaskDispatcher;
import ohos.app.dispatcher.task.Revocable;
import ohos.app.dispatcher.task.TaskPriority;
import ohos.hiviewdfx.HiLog;
import ohos.hiviewdfx.HiLogLabel;

import java.util.ArrayList;
import java.util.concurrent.CountDownLatch;
import java.util.function.Consumer;

public class MainAbilitySlice extends AbilitySlice implements Component.ClickedListener {

    private static final HiLogLabel LOG_LABEL = new HiLogLabel(HiLog.LOG_APP,0x00201,"todo");

    @Override
    public void onStart(Intent intent) {

        super.onStart(intent);
        super.setUIContent(ResourceTable.Layout_ability_main);
        ((Button)findComponentById(ResourceTable.Id_button)).setClickedListener(this::onClick);
        ((Button)findComponentById(ResourceTable.Id_button2)).setClickedListener(this::onClick);
        ((Button)findComponentById(ResourceTable.Id_button3)).setClickedListener(this::onClick);
        ((Button)findComponentById(ResourceTable.Id_button4)).setClickedListener(this::onClick);
    }

    @Override
    public void onActive() {

        super.onActive();
    }

    @Override
    public void onForeground(Intent intent) {

        super.onForeground(intent);
    }

    @Override
    public void onClick(Component component) {

        switch (component.getId()){

            case ResourceTable.Id_button:
                todo1();
                break;
            case ResourceTable.Id_button2:
                todo2();
                break;
            case ResourceTable.Id_button3:
                todo3();
                break;
            case ResourceTable.Id_button4:
                todo4();
                break;
        }
    }
    private void todo1() {

        TaskDispatcher dispatcher = getGlobalTaskDispatcher(TaskPriority.DEFAULT);
        Revocable revocable =  dispatcher.asyncDispatch(new Runnable() {

            @Override
            public void run() {

                try {

                    Thread.sleep(3000);
                } catch (InterruptedException e) {

                    e.printStackTrace();
                }
                HiLog.info(LOG_LABEL,"执行任务中。。。。。。");
            }
        });

       boolean flag =  revocable.revoke();
       HiLog.info(LOG_LABEL,"任务是否撤销:"+flag);

    }
}
- syncDispatchBarrier
同步设置屏障任务:在任务组上设⽴任务执⾏屏障,同步等待任务组中的所有任务执⾏完成,再执⾏指定任务。注意的是:在全局并发任务分发器(GlobalTaskDispatcher)上同步设置任务屏障,将不会起到屏障作⽤。
private void todo2() {

    TaskDispatcher dispatcher = createParallelTaskDispatcher("test",TaskPriority.DEFAULT);
    Group group = dispatcher.createDispatchGroup();
    dispatcher.asyncGroupDispatch(group, new Runnable() {

        @Override
        public void run() {

            HiLog.info(LOG_LABEL,"异步执行任务1");
        }
    });
    dispatcher.asyncGroupDispatch(group, new Runnable() {

        @Override
        public void run() {

           HiLog.info(LOG_LABEL,"异步执行任务2");
        }
    });
    dispatcher.syncDispatchBarrier(new Runnable() {

        @Override
        public void run() {

            HiLog.info(LOG_LABEL,"任务组执行完毕,然后执行后置同步任务");
        }
    });
    HiLog.info(LOG_LABEL,"任务组执行完毕,后置同步任务执行完毕");

}
- asyncDispatchBarrier
异步设置屏障任务:在任务组上设⽴任务执⾏屏障后直接返回,指定任务将在任务组中的所有任务
执⾏完成后再执⾏。在全局并发任务分发器(GlobalTaskDispatcher)上异步设置任务屏障,将不会起到屏障作⽤。可以使⽤并发任务分发器(ParallelTaskDispatcher)分离不同的任务组,达到微观并⾏、宏观串⾏的⾏为。
    private void todo3() {

        TaskDispatcher dispatcher = createParallelTaskDispatcher("dispatcherName", TaskPriority.DEFAULT);
// 创建任务组。
        Group group = dispatcher.createDispatchGroup();
// 将任务加入任务组,返回一个用于取消任务的接口。
        dispatcher.asyncGroupDispatch(group, new Runnable() {

            @Override
            public void run() {

                HiLog.info(LOG_LABEL, "任务一在执行");  // 1
            }
        });
        dispatcher.asyncGroupDispatch(group, new Runnable() {

            @Override
            public void run() {

                HiLog.info(LOG_LABEL, "任务二在执行");  // 2
            }
        });

        dispatcher.asyncDispatchBarrier(new Runnable() {

            @Override
            public void run() {

                HiLog.info(LOG_LABEL, "后置异步任务在执行");  // 3
            }
        });
        HiLog.info(LOG_LABEL, "外部任务执行");  // 4
    }
- applyDispatch
执⾏多次任务:对指定任务执⾏多次。如下代码示例展示了如何执⾏多次任务:
private void todo4() {

    //执行线程次数
   final int total = 10;
    //倒计时计算器
   final CountDownLatch latch = new CountDownLatch(total);
    //定义一个长整型列表数组
   final ArrayList<Long> indexList = new ArrayList<>(total);
    //执行多次任务
   TaskDispatcher dispatcher = getGlobalTaskDispatcher(TaskPriority.DEFAULT);
   dispatcher.applyDispatch((index)->{

       indexList.add(index);
       latch.countDown();
   },total);
    //设置任务超时
    try {

        //使用当前线程等待,直到倒计时计数为0为止
        latch.wait();
    } catch (InterruptedException e) {

        e.printStackTrace();
        HiLog.error(LOG_LABEL,"任务超时");
    }
    HiLog.info(LOG_LABEL,"执行了 "+ indexList.size()+ "次");
}
6.7、线程间的通信
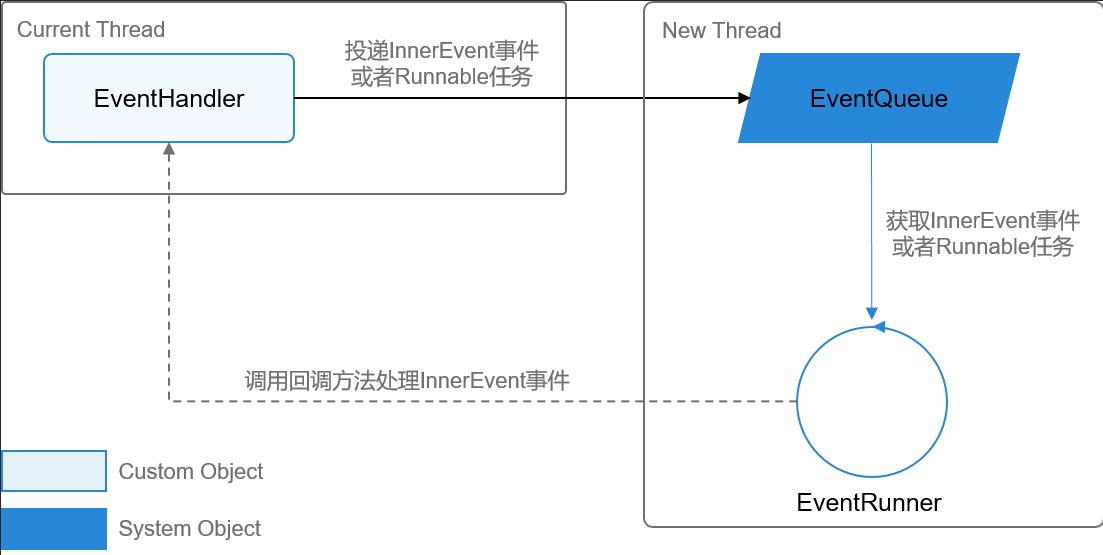
下面我们来讲解HarmonyOS中的线程,在开发过程中,开发者经常需要在当前线程中处理下载文件或者访问数据库的耗时操作,但是又不想希望当前的线程受到阻塞。这个时候我们可以使用EventHandler的机制,EventHandler是HarmonyOS用于处理线程间通信的一种机制,可以通过EventRunner创建新线程,将耗时的操作放到新线程上执行。这样既不阻塞原来的线程,任务又可以得到合理的处理。比如:主线程使用EventHandler创建子线程,子线程做耗时的下载图片操作,下载完成后,子线程通过EventHandler通知主线程,主线程再更新UI。
EventHandler开发场景
EventHandler的主要功能是将InnerEvent事件或者Runnable任务投递到其他的线程进行处理,其使用的场景包括:
- InnerEvent事件:开发者需要将InnerEvent事件投递到新的线程,按照优先级和延时进行处理。投递时,EventHandler的优先级可在IMMEDIATE、HIGH、LOW、IDLE中选择,并设置合适的delayTime。
- Runnable任务:开发者需要将Runnable任务投递到新的线程,并按照优先级和延时进行处理。投递时,EventHandler的优先级可在IMMEDIATE、HIGH、LOW、IDLE中选择,并设置合适的delayTime。
- 开发者需要在新创建的线程里投递事件到原线程进行处理。
EventRunner工作模式
EventRunner的工作模式可以分为托管模式和手动模式。两种模式是在调用EventRunner的create()方法时,通过选择不同的参数来实现的,详见API参考。默认为托管模式。
- 托管模式:不需要开发者调用run()和stop()方法去启动和停止EventRunner。当EventRunner实例化时,系统调用run()来启动EventRunner;当EventRunner不被引用时,系统调用stop()来停止EventRunner。
- 手动模式:需要开发者自行调用EventRunner的run()方法和stop()方法来确保线程的启动和停止。
关于EventRunner的详细描述:EventRunner是一种事件循环器,循环处理从该EventRunner创建的新线程的事件队列中获取InnerEvent事件或者Runnable任务。InnerEvent是EventHandler投递的事件。EventHandler是一种用户在当前线程上投递InnerEvent事件或者Runnable任务到异步线程上处理的机制。每一个EventHandler和指定的EventRunner所创建的新线程绑定,并且该新线程内部有一个事件队列。EventHandler可以投递指定的InnerEvent事件或Runnable任务到这个事件队列。EventRunner从事件队列里循环地取出事件,如果取出的事件是InnerEvent事件,将在EventRunner所在线程执行processEvent回调;如果取出的事件是Runnable任务,将在EventRunner所在线程执行Runnable的run回调。
6.8、线程的相关接口说明
EventHandler
-
EventHandler的属性Priority(优先级)介绍:
EventRunner将根据优先级的高低从事件队列中获取事件或者Runnable任务进行处理。
表1 EventRunner的属性
属性 描述 Priority.IMMEDIATE 表示事件被立即投递 Priority.HIGH 表示事件先于LOW优先级投递 Priority.LOW 表示事件优于IDLE优先级投递,事件的默认优先级是LOW Priority.IDLE 表示在没有其他事件的情况下,才投递该事件
EventHandler的主要接口介绍:
表2 EventHandler的主要接口
| 接口名 | 描述 |
|---|---|
| EventHandler(EventRunner runner) | 利用已有的EventRunner来创建EventHandler |
| current() | 在processEvent回调中,获取当前的EventHandler |
| processEvent(InnerEvent event) | 回调处理事件,由开发者实现 |
| sendEvent(InnerEvent event) | 发送一个事件到事件队列,延时为0ms, 优先级为LOW |
| sendEvent(InnerEvent event, long delayTime) | 发送一个延时事件到事件队列,优先级为LOW |
| sendEvent(InnerEvent event, long delayTime, EventHandler.Priority priority) | 发送一个指定优先级的延时事件到事件队列 |
| sendEvent(InnerEvent event, EventHandler.Priority priority) | 发送一个指定优先级的事件到事件队列,延时为0ms |
| sendSyncEvent(InnerEvent event) | 发送一个同步事件到事件队列,延时为0ms,优先级为LOW |
| sendSyncEvent(InnerEvent event, EventHandler.Priority priority) | 发送一个指定优先级的同步事件到事件队列,延时为0ms,优先级不可以是IDLE |
| postSyncTask(Runnable task) | 发送一个Runnable同步任务到事件队列,延时为0ms, 优先级为LOW |
| postSyncTask(Runnable task, EventHandler.Priority priority) | 发送一个指定优先级的Runnable同步任务到事件队列,延时为0ms |
| postTask(Runnable task) | 发送一个Runnable任务到事件队列,延时为0ms,优先级为LOW |
| postTask(Runnable task, long delayTime) | 发送一个Runnable延时任务到事件队列,优先级为LOW |
| postTask(Runnable task, long delayTime, EventHandler.Priority priority) | 发送一个指定优先级的Runnable延时任务到事件队列 |
| postTask(Runnable task, EventHandler.Priority priority) | 发送一个指定优先级的Runnable任务到事件队列,延时为0ms |
| sendTimingEvent(InnerEvent event, long taskTime) | 发送一个定时事件到队列,在taskTime时间执行,如果taskTime小于当前时间,立即执行,优先级为LOW |
| sendTimingEvent(InnerEvent event, long taskTime, EventHandler.Priority priority) | 发送一个带优先级的事件到队列,在taskTime时间执行,如果taskTime小于当前时间,立即执行 |
| postTimingTask(Runnable task, long taskTime) | 发送一个Runnable任务到队列,在taskTime时间执行,如果taskTime小于当前时间,立即执行,优先级为LOW |
| postTimingTask(Runnable task, long taskTime, EventHandler.Priority priority) | 发送一个带优先级的Runnable任务到队列,在taskTime时间执行,如果taskTime小于当前时间,立即执行 |
| removeEvent(int eventId) | 删除指定id的事件 |
| removeEvent(int eventId, long param) | 删除指定id和param的事件 |
| removeEvent(int eventId, long param, Object object) | 删除指定id、param和object的事件 |
| removeAllEvent() | 删除该EventHandler的所有事件 |
| getEventName(InnerEvent event) | 获取事件的名字 |
| getEventRunner() | 获取该EventHandler绑定的EventRunner |
| isIdle() | 判断队列是否为空 |
| hasInnerEvent(Runnable runnable) | 根据指定的runnable参数,检查是否有还未被处理的任务。可以根据不同的入参进行检查,详见EventHandler |
EventRunner
- EventRunner的主要接口介绍:
表3 EventHandler主要接口
| 接口名 | 描述 |
|---|---|
| create() | 创建一个拥有新线程的EventRunner |
| create(boolean inNewThread) | 创建一个拥有新线程的EventRunner,inNewThread为true时,EventRunner为托管模式,系统将自动管理该EventRunner;inNewThread为false时,EventRunner为手动模式 |
| create(String newThreadName) | 创建一个拥有新线程的EventRunner, 新线程的名字是 newThreadName |
| current() | 获取当前线程的EventRunner |
| run() | EventRunner为手动模式时,调用该方法启动新的线程 |
| stop() | EventRunner为手动模式时,调用该方法停止新的线程 |
InnerEvent
- InnerEvent的属性介绍:
表4 InnerEvent的属性
| 属性 | 描述 |
|---|---|
| eventId | 事件的ID, 由开发者定义用来辨别事件 |
| object | 事件携带的Object信息 |
| param | 事件携带的long型数据 |
InnerEvent的主要接口介绍:
表5 InnerEvent的接口
| 接口名 | 描述 |
|---|---|
| drop() | 释放一个事件实例 |
| get() | 获得一个事件实例 |
| get(int eventId) | 获得一个指定的eventId的事件实例 |
| get(int eventId, long param) | 获得一个指定的eventId和param的事件实例 |
| get(int eventId, long param, Object object) | 获得一个指定的eventId,param和object的事件实例 |
| get(int eventId, Object object) | 获得一个指定的eventId和object的事件实例 |
| PacMap getPacMap() | 获取PacMap,如果没有,会新建一个 |
| Runnable getTask() | 获取Runnable任务 |
| PacMap peekPacMap() | 获取PacMap |
| void setPacMap(PacMap pacMap) | 设置PacMap |
6.9、线程动态更新ProgressBar
下面我们用EventHandler结合EventRunner实现对ProgressBar进行动态更新。模拟网络的下载进度。
第一步:编写Button按钮的背景颜色
<?xml version="1.0" encoding="UTF-8" ?>
<shape xmlns:ohos="http://schemas.huawei.com/res/ohos"
       ohos:shape="rectangle">
    <solid
        ohos:color="gray"/>
    <corners ohos:radius="5vp"/>

</shape>
第二步:编写ability_main.xml布局文件
<?xml version="1.0" encoding="utf-8"?>
<DirectionalLayout
    xmlns:ohos="http://schemas.huawei.com/res/ohos"
    ohos:height="match_parent"
    ohos:width="match_parent"
    ohos:alignment="horizontal_center">


    <ProgressBar
        ohos:id="$+id:probar"
        ohos:height="10vp"
        ohos:width="match_parent"
        ohos:top_margin="90vp"
        ohos:max="100"
        />

    <Component
        ohos:height="70vp"
        ohos:width="match_parent"/>

    <Button
        ohos:id="$+id:button1"
        ohos:height="match_content"
        ohos:text_alignment="horizontal_center"
        ohos:text="Handler Demo1"
        ohos:text_size="25fp"
        ohos:background_element="$graphic:button_background"
        ohos:width="200vp"/>

</DirectionalLayout>
第三步:编写MainAbilitySlice主程序
package com.sudojava.hmhandlerdemo2.slice;

import com.sudojava.hmhandlerdemo2.ResourceTable;
import ohos.aafwk.ability.AbilitySlice;
import ohos.aafwk.content.Intent;
import ohos.agp.components.Button;
import ohos.agp.components.Component;
import ohos.agp.components.ProgressBar;
import ohos.eventhandler.EventHandler;
import ohos.eventhandler.EventRunner;
import ohos.eventhandler.InnerEvent;
import ohos.net.NetManager;

public class MainAbilitySlice extends AbilitySlice implements Component.ClickedListener {

    private static final HiLogLabel LABEL_LOG = new HiLogLabel(HiLog.LOG_APP, 0xD001100, "MainAbilitySlice");
    private Button button;
    private ProgressBar progressBar;
    private int max;
    private int currentValue;

    @Override
    public void onStart(Intent intent) {

        super.onStart(intent);
        super.setUIContent(ResourceTable.Layout_ability_main);
        button = (Button)findComponentById(ResourceTable.Id_button1);
        progressBar = (ProgressBar)findComponentById(ResourceTable.Id_probar);
        max= progressBar.getMax();
        button.setClickedListener(this::onClick);

    }

    EventHandler handler = new EventHandler(EventRunner.current()){

        @Override
        protected void processEvent(InnerEvent event) {

            super.processEvent(event);
            if (event==null){

                return;
            }
            if (event.eventId==1001){

                int value = (int)event.param;
                progressBar.setProgressValue(value);
            }
        }
    };

    @Override
    public void onClick(Component component) {

        switch (component.getId()){

            case ResourceTable.Id_button1:
                begin();
                break;
        }
    }

    private void begin() {

         new Thread(new Runnable() {

            @Override
            public void run() {

               while (currentValue<max){

                   currentValue+=1;
                   handler.sendEvent(InnerEvent.get(1001,currentValue));
                   try {

                       Thread.sleep(500);
                   } catch (InterruptedException e) {

                       e.printStackTrace();
                   }
               }
            }
        }).start();
    }
}
6.10、EventHandler投递InnerEvent事件
重要链接鸿蒙尝试(二) - 简书 (jianshu.com)
EventHandler投递InnerEvent事件,并按照优先级和延时进行处理,开发步骤如下:
第一步:设置按钮背景和布局背景
<?xml version="1.0" encoding="utf-8"?>
<shape xmlns:ohos="http://schemas.huawei.com/res/ohos"
       ohos:shape="rectangle">
    <corners
        ohos:radius="75"/>
    <solid
        ohos:color="#0d000000"/>
</shape>
<?xml version="1.0" encoding="utf-8"?>
<DirectionalLayout
    xmlns:ohos="http://schemas.huawei.com/res/ohos"
    ohos:height="match_parent"
    ohos:width="match_parent"
    ohos:alignment="horizontal_center"
    ohos:padding="5vp"
    ohos:orientation="vertical">

    <Button
        ohos:id="$+id:send_event_button"
        ohos:height="match_content"
        ohos:width="300vp"
        ohos:background_element="$graphic:button_bg"
        ohos:padding="5vp"
        ohos:text="EventHandler投递InnerEvent事件"
        ohos:text_alignment="center"
        ohos:text_size="16fp"
        ohos:top_margin="50vp"/>

    <Text
        ohos:id="$+id:result_text"
        ohos:height="120vp"
        ohos:width="match_parent"
        ohos:max_text_lines="50"
        ohos:background_element="gray"
        ohos:margin="20vp"
        ohos:multiple_lines="true"
        ohos:padding="10vp"
        ohos:text_size="16fp"/>

</DirectionalLayout>
编写MainAbilitySlice主入口程序
package com.sudojava.uitask.slice;

import com.sudojava.uitask.ResourceTable;
import ohos.aafwk.ability.AbilitySlice;
import ohos.aafwk.content.Intent;
import ohos.agp.components.Button;
import ohos.agp.components.Component;
import ohos.agp.components.Text;
import ohos.eventhandler.EventHandler;
import ohos.eventhandler.EventRunner;
import ohos.eventhandler.InnerEvent;
import ohos.hiviewdfx.HiLog;
import ohos.hiviewdfx.HiLogLabel;
import ohos.utils.PacMap;

public class MainAbilitySlice extends AbilitySlice  {

    private static final HiLogLabel LABEL_LOG = new HiLogLabel(HiLog.LOG_APP, 0xD001100, "MainAbilitySlice");
    private static final int EVENT_MESSAGE_NORMAL = 1;
    private static final int EVENT_MESSAGE_DELAY = 2;
    private static final int EVENT_MESSAGE_NORMAL_OBJECT = 3;
    private static final int EVENT_MESSAGE_NORMAL_MAP = 4;
    private Text resultText;
    private MyEventHandler handler;
    private StringBuffer buffer = new StringBuffer();

    @Override
    public void onStart(Intent intent) {

        super.onStart(intent);
        super.setUIContent(ResourceTable.Layout_ability_main);
        Component sendEventButton = findComponentById(ResourceTable.Id_send_event_button);
        Component postTaskButton = findComponentById(ResourceTable.Id_post_task_button);
        Component sendToMainButton = findComponentById(ResourceTable.Id_send_to_main_button);
        resultText = (Text) findComponentById(ResourceTable.Id_result_text);
        sendEventButton.setClickedListener(this::sendInnerEvent);
        initHandler();//初始化线程
    }

    private void initHandler() {

        //create()参数是true,则为托管模式,否则为手动模式,需要执行run和stop方法
//        EventRunner eventRunner = EventRunner.create(false);
        handler = new MyEventHandler(EventRunner.create(true));
    }

    private void sendInnerEvent(Component component) {

        InnerEvent normal_event = InnerEvent.get(EVENT_MESSAGE_NORMAL,1001l);
        //发送延时消息
        InnerEvent delay_event = InnerEvent.get(EVENT_MESSAGE_DELAY,1002l);
        InnerEvent normal_object = InnerEvent.get(EVENT_MESSAGE_NORMAL_OBJECT,1003l,"hello world!!");
        InnerEvent normal_map = InnerEvent.get(EVENT_MESSAGE_NORMAL_MAP);
        PacMap map = new PacMap();
        map.putString("name","jack");
        map.putIntValue("age",23);
        normal_map.setPacMap(map);
        handler.sendEvent(normal_event,EventHandler.Priority.IMMEDIATE);
        handler.sendEvent(delay_event,2000,EventHandler.Priority.IMMEDIATE);
        handler.sendEvent(normal_object, EventHandler.Priority.IMMEDIATE);
        handler.sendEvent(normal_map, EventHandler.Priority.IMMEDIATE);

    }

    //定义EventHandler对象
    private class MyEventHandler extends EventHandler{


        public MyEventHandler(EventRunner runner) throws IllegalArgumentException {

            super(runner);
        }

        @Override
        protected void processEvent(InnerEvent event) {

            super.processEvent(event);
            switch (event.eventId){

                case EVENT_MESSAGE_NORMAL:
                    buffer.append("从innerEvent接收到消息:"+ event.param).append(System.lineSeparator());
                    getUITaskDispatcher().asyncDispatch(()-> resultText.setText(buffer.toString()));
                    break;
                case EVENT_MESSAGE_DELAY:
                    buffer.append("从innerEvent延时接收到消息:"+ event.param).append(System.lineSeparator());
                    getUITaskDispatcher().asyncDispatch(()->resultText.setText(buffer.toString()));
                    break;
                case EVENT_MESSAGE_NORMAL_OBJECT:
                    buffer.append("从innerEvent接收到消息:"+ event.param+":"+event.object).append(System.lineSeparator());
                    getUITaskDispatcher().asyncDispatch(()->resultText.setText(buffer.toString()));
                    break;
                case EVENT_MESSAGE_NORMAL_MAP:
                    PacMap map = event.getPacMap();
                    buffer.append("从innerEvent接收到消息:name :"+ map.getString("name")+" age:"+map.getIntValue("age")).append(System.lineSeparator());
                    getUITaskDispatcher().asyncDispatch(()->resultText.setText(buffer.toString()));
                    break;
            }
        }
    }


    @Override
    public void onActive() {

        super.onActive();
    }

    @Override
    public void onForeground(Intent intent) {

        super.onForeground(intent);
    }


}
6.11、EventHandler投递Runnable任务
EventHandler投递Runnable任务,并按照优先级和延时进行处理,开发步骤如下:
第一步:编写布局文件
<?xml version="1.0" encoding="utf-8"?>
<DirectionalLayout
    xmlns:ohos="http://schemas.huawei.com/res/ohos"
    ohos:height="match_parent"
    ohos:width="match_parent"
    ohos:alignment="horizontal_center"
    ohos:padding="5vp"
    ohos:orientation="vertical">


    <Button
        ohos:id="$+id:post_task_button"
        ohos:height="match_content"
        ohos:width="300vp"
        ohos:background_element="$graphic:button_bg"
        ohos:padding="5vp"
        ohos:text="EventHandler投递Runnable任务"
        ohos:text_alignment="center"
        ohos:text_size="16fp"
        ohos:top_margin="10vp"/>


    <Text
        ohos:id="$+id:result_text"
        ohos:height="120vp"
        ohos:width="match_parent"
        ohos:max_text_lines="50"
        ohos:background_element="gray"
        ohos:margin="20vp"
        ohos:multiple_lines="true"
        ohos:padding="10vp"
        ohos:text_size="16fp"/>

</DirectionalLayout>
第二步:编写MainAbilitySlice主程序
package com.sudojava.uitask2.slice;

import com.sudojava.uitask2.ResourceTable;
import ohos.aafwk.ability.AbilitySlice;
import ohos.aafwk.content.Intent;
import ohos.agp.components.Component;
import ohos.agp.components.Text;
import ohos.eventhandler.EventHandler;
import ohos.eventhandler.EventRunner;
import ohos.eventhandler.InnerEvent;
import ohos.hiviewdfx.HiLog;
import ohos.hiviewdfx.HiLogLabel;
import ohos.utils.PacMap;

public class MainAbilitySlice extends AbilitySlice {

    private static final HiLogLabel LABEL_LOG = new HiLogLabel(HiLog.LOG_APP, 0xD001100, "MainAbilitySlice");
    private Text resultText;
    private StringBuffer buffer = new StringBuffer();
    private  EventRunner runner;
    private MyEventHandler handler;
    @Override
    public void onStart(Intent intent) {

        super.onStart(intent);
        super.setUIContent(ResourceTable.Layout_ability_main);
        Component postTaskButton = findComponentById(ResourceTable.Id_post_task_button);
        postTaskButton.setClickedListener(this::postInnerEventTask);
        resultText = (Text) findComponentById(ResourceTable.Id_result_text);
        initHandler();
    }

    private void initHandler() {

        runner = EventRunner.create("initHandler");
        if (runner==null){

            return;
        }
        handler = new MyEventHandler(runner);
    }

    private void postInnerEventTask(Component component) {

        handler.postTask(new Runnable() {

            @Override
            public void run() {

                PacMap map = new PacMap();
                map.putString("name","jack");
                map.putString("greeting","hello");
                InnerEvent event = InnerEvent.get(1001);
                event.setPacMap(map);
                handler.sendEvent(event);
            }
        });
        handler.postTask(new Runnable() {

            @Override
            public void run() {

                InnerEvent event = InnerEvent.get(1002,"finish");
                handler.sendEvent(event);
            }
        },3000);


    }

    private class MyEventHandler extends EventHandler{


        public MyEventHandler(EventRunner runner) throws IllegalArgumentException {

            super(runner);
        }

        @Override
        protected void processEvent(InnerEvent event) {

            super.processEvent(event);
            if (event.eventId==1001){

                PacMap map = event.getPacMap();
                buffer.append("从innerEvent接收到消息:"+ map.getString("greeting")+" "+map.getString("name")).append(System.lineSeparator());
                getUITaskDispatcher().asyncDispatch(() -> {

                    resultText.setText(buffer.toString());
                });
            }
            if (event.eventId==1002){

                buffer.append("end msg is :"+event.object);
                getUITaskDispatcher().asyncDispatch(()->{

                   resultText.append(buffer.toString());
                });
            }
        }
    }
    @Override
    public void onActive() {

        super.onActive();
    }

    @Override
    public void onForeground(Intent intent) {

        super.onForeground(intent);
    }
}
6.12、EventHandler下载网络图片
我们使用EventHandler+EventRunner,在结合NetManager来下载网络图片,顺便更新一下进度条的操作。配置步骤如下:
第一步:配置网络请求
 "reqPermissions": [
      {

        "name": "ohos.permission.GET_NETWORK_INFO"
      },
      {

        "name": "ohos.permission.INTERNET"
      },
      {

        "name": "ohos.permission.SET_NETWORK_INFO"
      }
    ],

    --------------------------------------------------------------------------------------------------------------------------

    "deviceConfig": {

    "default": {

      "network": {

        "cleartextTraffic": true
      }
    }
  },
第二步:编写布局文件
<?xml version="1.0" encoding="utf-8"?>
<DirectionalLayout
    xmlns:ohos="http://schemas.huawei.com/res/ohos"
    ohos:height="match_parent"
    ohos:width="match_parent"
    ohos:alignment="center"
    ohos:orientation="vertical">

    <Image
        ohos:id="$+id:image"
        ohos:height="match_content"
        ohos:width="match_content"/>

    <ProgressBar
        ohos:id="$+id:progress"
        ohos:height="10vp"
        ohos:max="100"
        ohos:width="match_parent"/>

    <Component
        ohos:height="90vp"
        ohos:width="match_parent"/>

    <Button
        ohos:id="$+id:button"
        ohos:text="下载网络图片"
        ohos:text_size="25fp"
        ohos:background_element="gray"
        ohos:height="match_content"
        ohos:width="match_parent"/>
</DirectionalLayout>
第三步:编写MainAbilitySlice主入口程序
package com.sudojava.imagedownload.slice;

import com.sudojava.imagedownload.ResourceTable;
import ohos.aafwk.ability.AbilitySlice;
import ohos.aafwk.content.Intent;
import ohos.agp.components.Button;
import ohos.agp.components.Component;
import ohos.agp.components.Image;
import ohos.agp.components.ProgressBar;
import ohos.app.dispatcher.task.TaskPriority;
import ohos.eventhandler.EventHandler;
import ohos.eventhandler.EventRunner;
import ohos.eventhandler.InnerEvent;
import ohos.hiviewdfx.HiLog;
import ohos.hiviewdfx.HiLogLabel;
import ohos.media.image.ImageSource;
import ohos.media.image.PixelMap;
import ohos.net.NetHandle;
import ohos.net.NetManager;
import ohos.net.NetStatusCallback;

import java.io.ByteArrayInputStream;
import java.io.ByteArrayOutputStream;
import java.io.IOException;
import java.io.InputStream;
import java.net.HttpURLConnection;
import java.net.MalformedURLException;
import java.net.Proxy;
import java.net.URL;

public class MainAbilitySlice extends AbilitySlice {

    private static final HiLogLabel LABEL_LOG = new HiLogLabel(HiLog.LOG_APP, 0xD001100, "MainAbilitySlice");
    private Button button;
    private Image image;
    private ProgressBar progressBar;
    private String path="https://www.baidu.com/img/PCtm_d9c8750bed0b3c7d089fa7d55720d6cf.png";

    private MyEventHandler handler;
    @Override
    public void onStart(Intent intent) {

        super.onStart(intent);
        super.setUIContent(ResourceTable.Layout_ability_main);
        image = (Image) findComponentById(ResourceTable.Id_image);
        progressBar = (ProgressBar)findComponentById(ResourceTable.Id_progress);
        button = (Button)findComponentById(ResourceTable.Id_button);
        initHandler();
        button.setClickedListener(new Component.ClickedListener() {

            @Override
            public void onClick(Component component) {

                new Thread(new Runnable() {

                    @Override
                    public void run() {

                        download(path);
                    }
                }).start();
            }
        });
    }

    private void initHandler() {

        handler = new MyEventHandler(EventRunner.current());
    }

    private class MyEventHandler extends EventHandler{


        public MyEventHandler(EventRunner runner) throws IllegalArgumentException {

            super(runner);
        }

        @Override
        protected void processEvent(InnerEvent event) {

            super.processEvent(event);
            if (event==null){

                return;
            }
           // HiLog.info(LABEL_LOG,"--event->>"+event.eventId);
            if (event.eventId==1001){

                //HiLog.info(LABEL_LOG,"--param->>"+event.param);
                progressBar.setProgressValue((int) event.param);
            }
            if (event.eventId==1002){

                byte[] data = (byte[])event.object;
                ImageSource imageSource = ImageSource.create(data,new ImageSource.SourceOptions());
                PixelMap pixelMap = imageSource.createPixelmap(null);
                image.setPixelMap(pixelMap);
                pixelMap.release();
            }
        }
    }

    public void download(String path){

        NetManager manager = NetManager.getInstance(this);
        if (!manager.hasDefaultNet()){

            return;
        }
        NetHandle netHandle = manager.getDefaultNet();
        manager.addDefaultNetStatusCallback(new NetStatusCallback(){

            @Override
            public void onAvailable(NetHandle handle) {

                super.onAvailable(handle);
                HiLog.info(LABEL_LOG,"网络状况正常");
            }

            @Override
            public void onBlockedStatusChanged(NetHandle handle, boolean blocked) {

                super.onBlockedStatusChanged(handle, blocked);
                HiLog.info(LABEL_LOG,"网络状况阻塞");
            }
        });
        HttpURLConnection connection = null;
        URL url = null;
        InputStream inputStream = null;
       ByteArrayOutputStream todo = new ByteArrayOutputStream();
        try {

            url = new URL(path);
            connection = (HttpURLConnection) netHandle.openConnection(url);
            connection.setRequestMethod("GET");
            connection.setDoOutput(true);
            connection.setDoInput(true);
            connection.setConnectTimeout(40000);
            connection.setReadTimeout(30000);
            connection.connect();
            if (connection.getResponseCode()==200){

                HiLog.info(LABEL_LOG,"-->>"+connection.getResponseCode());
                inputStream = connection.getInputStream();
                long file_length = connection.getContentLength();
                HiLog.info(LABEL_LOG,"-->>"+file_length);
                int len = 0;
                byte[] data = new byte[10];
                int total_length = 0;
                while ((len = inputStream.read(data))!=-1){

                    total_length+=len;
                    int value = (int)((total_length/(float)file_length)*100);
                    todo.write(data,0,len);
                    handler.sendEvent(InnerEvent.get(1001,value));
                }
                handler.sendEvent(InnerEvent.get(1002,todo.toByteArray()));
            }

        } catch (MalformedURLException e) {

            e.printStackTrace();
        } catch (IOException e) {

            e.printStackTrace();
        }finally {

            if (null!=inputStream){

                try {

                    inputStream.close();
                } catch (IOException e) {

                    e.printStackTrace();
                }
            }
            if (null!=connection){

                connection.disconnect();
            }
        }

    }

    @Override
    public void onActive() {

        super.onActive();
    }

    @Override
    public void onForeground(Intent intent) {

        super.onForeground(intent);
    }
}
智能推荐
oracle 12c 集群安装后的检查_12c查看crs状态-程序员宅基地
文章浏览阅读1.6k次。安装配置gi、安装数据库软件、dbca建库见下:http://blog.csdn.net/kadwf123/article/details/784299611、检查集群节点及状态:[root@rac2 ~]# olsnodes -srac1 Activerac2 Activerac3 Activerac4 Active[root@rac2 ~]_12c查看crs状态
解决jupyter notebook无法找到虚拟环境的问题_jupyter没有pytorch环境-程序员宅基地
文章浏览阅读1.3w次,点赞45次,收藏99次。我个人用的是anaconda3的一个python集成环境,自带jupyter notebook,但在我打开jupyter notebook界面后,却找不到对应的虚拟环境,原来是jupyter notebook只是通用于下载anaconda时自带的环境,其他环境要想使用必须手动下载一些库:1.首先进入到自己创建的虚拟环境(pytorch是虚拟环境的名字)activate pytorch2.在该环境下下载这个库conda install ipykernelconda install nb__jupyter没有pytorch环境
国内安装scoop的保姆教程_scoop-cn-程序员宅基地
文章浏览阅读5.2k次,点赞19次,收藏28次。选择scoop纯属意外,也是无奈,因为电脑用户被锁了管理员权限,所有exe安装程序都无法安装,只可以用绿色软件,最后被我发现scoop,省去了到处下载XXX绿色版的烦恼,当然scoop里需要管理员权限的软件也跟我无缘了(譬如everything)。推荐添加dorado这个bucket镜像,里面很多中文软件,但是部分国外的软件下载地址在github,可能无法下载。以上两个是官方bucket的国内镜像,所有软件建议优先从这里下载。上面可以看到很多bucket以及软件数。如果官网登陆不了可以试一下以下方式。_scoop-cn
Element ui colorpicker在Vue中的使用_vue el-color-picker-程序员宅基地
文章浏览阅读4.5k次,点赞2次,收藏3次。首先要有一个color-picker组件 <el-color-picker v-model="headcolor"></el-color-picker>在data里面data() { return {headcolor: ’ #278add ’ //这里可以选择一个默认的颜色} }然后在你想要改变颜色的地方用v-bind绑定就好了,例如:这里的:sty..._vue el-color-picker
迅为iTOP-4412精英版之烧写内核移植后的镜像_exynos 4412 刷机-程序员宅基地
文章浏览阅读640次。基于芯片日益增长的问题,所以内核开发者们引入了新的方法,就是在内核中只保留函数,而数据则不包含,由用户(应用程序员)自己把数据按照规定的格式编写,并放在约定的地方,为了不占用过多的内存,还要求数据以根精简的方式编写。boot启动时,传参给内核,告诉内核设备树文件和kernel的位置,内核启动时根据地址去找到设备树文件,再利用专用的编译器去反编译dtb文件,将dtb还原成数据结构,以供驱动的函数去调用。firmware是三星的一个固件的设备信息,因为找不到固件,所以内核启动不成功。_exynos 4412 刷机
Linux系统配置jdk_linux配置jdk-程序员宅基地
文章浏览阅读2w次,点赞24次,收藏42次。Linux系统配置jdkLinux学习教程,Linux入门教程(超详细)_linux配置jdk
随便推点
matlab(4):特殊符号的输入_matlab微米怎么输入-程序员宅基地
文章浏览阅读3.3k次,点赞5次,收藏19次。xlabel('\delta');ylabel('AUC');具体符号的对照表参照下图:_matlab微米怎么输入
C语言程序设计-文件(打开与关闭、顺序、二进制读写)-程序员宅基地
文章浏览阅读119次。顺序读写指的是按照文件中数据的顺序进行读取或写入。对于文本文件,可以使用fgets、fputs、fscanf、fprintf等函数进行顺序读写。在C语言中,对文件的操作通常涉及文件的打开、读写以及关闭。文件的打开使用fopen函数,而关闭则使用fclose函数。在C语言中,可以使用fread和fwrite函数进行二进制读写。 Biaoge 于2024-03-09 23:51发布 阅读量:7 ️文章类型:【 C语言程序设计 】在C语言中,用于打开文件的函数是____,用于关闭文件的函数是____。
Touchdesigner自学笔记之三_touchdesigner怎么让一个模型跟着鼠标移动-程序员宅基地
文章浏览阅读3.4k次,点赞2次,收藏13次。跟随鼠标移动的粒子以grid(SOP)为partical(SOP)的资源模板,调整后连接【Geo组合+point spirit(MAT)】,在连接【feedback组合】适当调整。影响粒子动态的节点【metaball(SOP)+force(SOP)】添加mouse in(CHOP)鼠标位置到metaball的坐标,实现鼠标影响。..._touchdesigner怎么让一个模型跟着鼠标移动
【附源码】基于java的校园停车场管理系统的设计与实现61m0e9计算机毕设SSM_基于java技术的停车场管理系统实现与设计-程序员宅基地
文章浏览阅读178次。项目运行环境配置:Jdk1.8 + Tomcat7.0 + Mysql + HBuilderX(Webstorm也行)+ Eclispe(IntelliJ IDEA,Eclispe,MyEclispe,Sts都支持)。项目技术:Springboot + mybatis + Maven +mysql5.7或8.0+html+css+js等等组成,B/S模式 + Maven管理等等。环境需要1.运行环境:最好是java jdk 1.8,我们在这个平台上运行的。其他版本理论上也可以。_基于java技术的停车场管理系统实现与设计
Android系统播放器MediaPlayer源码分析_android多媒体播放源码分析 时序图-程序员宅基地
文章浏览阅读3.5k次。前言对于MediaPlayer播放器的源码分析内容相对来说比较多,会从Java-&amp;gt;Jni-&amp;gt;C/C++慢慢分析,后面会慢慢更新。另外,博客只作为自己学习记录的一种方式,对于其他的不过多的评论。MediaPlayerDemopublic class MainActivity extends AppCompatActivity implements SurfaceHolder.Cal..._android多媒体播放源码分析 时序图
java 数据结构与算法 ——快速排序法-程序员宅基地
文章浏览阅读2.4k次,点赞41次,收藏13次。java 数据结构与算法 ——快速排序法_快速排序法