【self-instruct方式生成语料代码实战】-程序员宅基地
self-instruct方式生成语料代码实战
本文对 self-instruct 生成语料的流程进行了分析,并尝试使用该代码生成了一定数量的语料。
self-instruct 介绍
2023年3月14日,斯坦福发布了Stanford Alpaca,该模型是对Meta的LLaMA &B进行了微调,且只花费了不到600美元。
其中,微调过程:在8个80GB A100上训练了3个小时,不到100美元;而微调所用数据是使用OpenAI的API,通过self-instruct方式生成的52K指令数据,花费了500美元。
self-instruct是一种将预训练语言模型与指令对齐的方法。可以通过模型自己来生成数据,而不需要大量的人工标注。
self-instruct论文: https://arxiv.org/abs/2212.10560
self-instruct代码:https://github.com/yizhongw/self-instruct
self-instruct 框架
self-instruct 框架如下图所示:
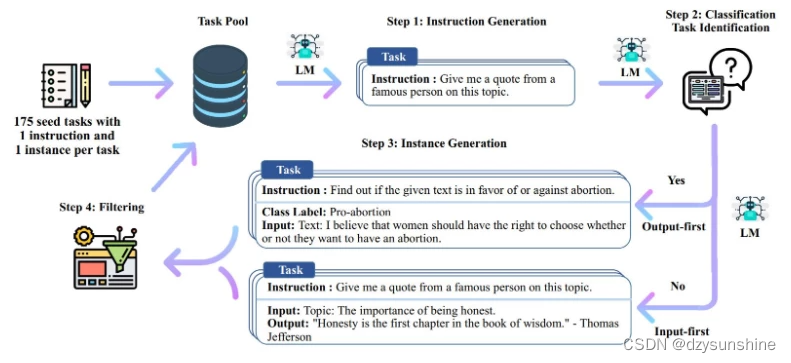
从上图可以看出,整个流程共包含了 4 个步骤。而生成后的数据形式如下:
- instruction: str,描述了模型应该执行的任务,也就是指令描述。
- input: str,任务的可选上下文或输入。
- output: str,由GPT3.5对应的API即 text-davinci-003生成的指令的答案。
Step1:通过模型生成新的指令;
根据人工设计的175个任务,每个任务都有对应的(指令,输入,输出)或(指令,输出);使用模型生成新的指令;
Step2:对模型生成的指令进行判断(指令是否是一个分类任务);
Step3:根据Step2的判断结果,给出不同的输出
如果是分类任务,就通过模型输出 Class_label 和 Input(Output-first);
如果不是分类任务,就通过模型输出 Input 和 Output(Input-first)。
Step4:过滤及后处理
对上述模型生成的数据进行过滤和后处理,将经过过滤和后处理的数据添加到种子池中。
对于以上4个步骤进行不断循环,直到种子池有足够多的数据(通常会设定一个具体的参数,比如:52000),生成过程停止。而对于每一步还需要展开描述下相关细节。
关于 Step1
生成指令时,先从种子池中随机抽取6个人工编写的指令,再随机抽取2个之前步骤中模型生成的指令,总共8个指令。按照指定模版格式组织之后,输入给模型,让模型输出一个新的指令。
需要注意的是,最开始的时候,是没有模型生成的指令,因此是会直接从种子池中随机抽取8条人工编写的指令。
关于 Step2
判断指令是否属于分类任务的操作如下:在种子池中随机挑选12条分类指令和19条非分类指令,然后加上新生成的指令。
关于Step4:过滤及后处理
为了数据的多样性,新生成的指令只有与种子池中的指令的 ROUGE-L 小于0.7时才会添加进入种子池;
排除一些无法被语言模型处理的指令,比如涉及图像、图片、图形的指令;
在给指令生成实例时,会过滤掉输入相同但是输出不同的实例。
生成语料代码实现过程
下面我们从代码部分来看详细的步骤。整个过程是要依次运行 4 个代码文件,对应前文中描述的 4 个步骤。
# 1. Generate instructions from the seed tasks
./scripts/generate_instructions.sh

# 2. Identify whether the instruction represents a classification task or not
./scripts/is_clf_or_not.sh

# 3. Generate instances for each instruction
./scripts/generate_instances.sh

# 4. Filtering, processing, and reformatting
./scripts/prepare_for_finetuning.sh
本次实验在本地的pytorch环境下进行。
1、首先将代码下载到本地,下面两种方式均可。
- 使用 Download 下载zip文件
- git clone https://github.com/yizhongw/self-instruct.git
我这里是在我的windows上操作的,所以无法执行bash命令,我这里直接用python命令运行。
2、进入conda环境(我这里用的pytorch这个环境) ,安装相关的包
cd self-instruct-main
pip install -r requirements.txt
Step1 通过模型生成新的指令
先看下原始人工标注的175种子数据的样式,共包含4个部分,id,name,instruction,is_classification。
{

	"id": "seed_task_0",
	"name": "breakfast_suggestion",
	"instruction": "Is there anything I can eat for a breakfast that doesn't include eggs, yet includes protein, and has roughly 700-1000 calories?", "instances": [{
    "input": "", "output": "Yes, you can have 1 oatmeal banana protein shake and 4 strips of bacon. The oatmeal banana protein shake may contain 1/2 cup oatmeal, 60 grams whey protein powder, 1/2 medium banana, 1tbsp flaxseed oil and 1/2 cup watter, totalling about 550 calories. The 4 strips of bacon contains about 200 calories."}],
	"is_classification": false
	}
本次只是实验,故将scripts/generate_instructions.sh中的50000改为100(这样产生的费用也较少)
运行命令如下:
python self_instruct/bootstrap_instructions.py --batch_dir data/ceshi --num_instructions_to_generate 100 --seed_tasks_path data/seed_tasks.jsonl --engine "davinci" --api_key "自己的openai API"
大概需要4分半的时间,生成100条数据。会写入data/ceishi/machine_generated_instructions.jsonl中,最终生成了122条。这些数据是通过LLM生成了与种子任务关联度比较弱的一些任务描述(一些相似度高的就删除了)。
从下面的代码中可以看出,最后写入文件时,一共包含了以下4个部分:instruction,most_similar,avg_similarity_score,metadata,request_idx。
fout.write(json.dumps({

    "instruction": inst,
    "most_similar": most_similar_instructions,
    "avg_similarity_score": float(np.mean(rouge_scores)),
    "metadata": metadata,
    "request_idx": request_idx
}) + "\n")
生成数据的核心代码如下:
# load the LM-generated instructions,使用生成模型得到新的100条 instruction 提示
    machine_instructions = []
# 开始生成 100 条 instruction 提示数据
    with open(os.path.join(args.batch_dir, "machine_generated_instructions.jsonl"), "a") as fout:
        while len(machine_instructions) < args.num_instructions_to_generate:
            batch_inputs = []
            # args.request_batch_size为5
            for _ in range(args.request_batch_size):
                # sample machine instructions from the pool(从生成模型中选,n表示最少的条数。这里为2)
                prompt_instructions = sample_machine_instructions(
                    machine_instructions,
                    similarities=None,
                    n=2)
                # sample human instructions from the pool
                # 从默认的175条中选再选几条,相当于一共选了8条,其中从175条中选6条,使用LLM生成2条(最开始的时候,machine_instructions为空,因此会直接从175条中直接选8条)
                prompt_instructions += random.sample(seed_instructions, args.num_prompt_instructions - len(prompt_instructions))
                random.shuffle(prompt_instructions)
                prompt = encode_prompt(prompt_instructions, classification=args.use_clf_seed_tasks_only)
                batch_inputs.append(prompt)
            results = make_gpt3_requests(
                engine=args.engine,
                prompts=batch_inputs,
                max_tokens=1024,
                temperature=0.7,
                top_p=0.5,
                frequency_penalty=0,
                presence_penalty=2,
                stop_sequences=["\n\n", "\n16", "16.", "16 ."],
                logprobs=1,
                n=1,
                best_of=1,
                api_key=args.api_key,
                organization=args.organization,
            )
其中,对不同类型的数据需要构建不同的 prompt 数据(如:是分类数据,不是分类数据),构建方式在函数 encode_prompt中
# 构建prompt数据,针对是否分类分别构建不同的prompt数据,
# 是否是分类任务, 是=>输出优先,否=>输入优先,对应的 prompt_instructions/prompt_instances 不一样
def encode_prompt(prompt_instructions, classification=False):
    """Encode multiple prompt instructions into a single string."""
    if classification:
        # 源码中prompt
        # prompt = "Come up with a series of classification tasks. Try to specify the possible output labels when possible.\n"
        prompt = "Referring to a series of classification tasks, generate 8 more new tasks. Try to specify the possible output labels when possible.\n"
    else:
        # 源码中prompt
        # prompt = "Come up with a series of tasks:\n"
        prompt = "Referring to these eight tasks, generate 8 more new tasks:\n"
    for idx, instruction in enumerate(prompt_instructions):
        instruction = re.sub(r"\s+", " ", instruction).strip().rstrip(":")
        prompt += f"{
      idx+1}. {
      instruction}\n"
        prompt += f"{
      len(prompt_instructions) + 1}."
    return prompt
Step2 对模型生成的指令进行判断
3、判断是否是分类任务。
python self_instruct/identify_clf_or_not.py --batch_dir data/ceshi --engine "davinci" --request_batch_size 5 --api_key "自己的openai API"
会写入data/ceishi/is_clf_or_not_davinci_template_1.jsonl中,最终生成了122条。
内容包括:
{
    "instruction": "Find the largest number in this list.", "is_classification": " Yes"}
{
    "instruction": "What is the first name of your favorite actor?", "is_classification": " No"}
{
    "instruction": "Give me the number of distinct elements in this set.", "is_classification": " Yes"}
{
    "instruction": "Give me the top 5 countries that are exporting tea.", "is_classification": " Yes"}

核心代码如下:
# 执行输出过程
    with open(output_path, "w") as fout:
        for batch_idx in range(0, len(lines), args.request_batch_size):
            batch = [json.loads(line) for line in lines[batch_idx: batch_idx + args.request_batch_size]]
            if all(d["instruction"] in existing_requests for d in batch):
                for d in batch:
                    data = existing_requests[d["instruction"]]
                    data = OrderedDict(
                        (k, data[k]) for k in \
                            ["instruction", "is_classification"]
                        )
                    fout.write(json.dumps(data, ensure_ascii=False) + "\n")
            else:
                # prefix = compose_prompt_prefix(human_written_tasks, batch[0]["instruction"], 8, 2)
                prefix = templates[args.template]
                prompts = [prefix + " " + d["instruction"].strip() + "\n" + "Is it classification?" for d in batch]
                results = make_gpt3_requests(
                    engine=args.engine,
                    prompts=prompts,
                    max_tokens=3,
                    temperature=0,
                    top_p=0,
                    frequency_penalty=0,
                    presence_penalty=0,
                    stop_sequences=["\n", "Task"],
                    logprobs=1,
                    n=1,
                    best_of=1,
                    api_key=args.api_key,
                    organization=args.organization)
                for i in range(len(batch)):
                    data = batch[i]
                    if results[i]["response"] is not None:
                        data["is_classification"] = results[i]["response"]["choices"][0]["text"]
                    else:
                        data["is_classification"] = ""
                    data = {

                        "instruction": data["instruction"],
                        "is_classification": data["is_classification"]
                    }
                    data = OrderedDict(
                        (k, data[k]) for k in \
                            ["instruction", "is_classification"]
                        )
                    fout.write(json.dumps(data, ensure_ascii=False) + "\n")
Step3:根据Step2的判断结果,给出不同的输出
python self_instruct/generate_instances.py --batch_dir data/ceshi --input_file machine_generated_instructions.jsonl --output_file machine_generated_instances.jsonl --max_instances_to_gen 5 --engine "davinci" --request_batch_size 5 --api_key "自己的openai API"
如果遇到以下报错:
UnicodeDecodeError: ‘gbk’ codec can’t decode byte 0x9d in position 6169: illegal multibyte sequence
解决方法:
在open函数中添加encoding='utf-8’即可。
运行后会将结果写入 data/ceishi/machine_generated_instances.jsonl中。每条数据包含5部分:“instruction”, “raw_instances”, “instance_metadata”, “instruction_metadata”, “most_similar”, “avg_similarity_score”。

核心代码如下:
 with open(output_path, "w", encoding='utf-8') as fout:
        for batch_idx in range(0, len(tasks), args.request_batch_size):
            batch = tasks[batch_idx: batch_idx + args.request_batch_size]
            if all(d["instruction"] in existing_requests for d in batch):
                for d in batch:
                    data = existing_requests[d["instruction"]]
                    data = OrderedDict(
                        (k, data[k]) for k in \
                            ["instruction", "raw_instances", "instance_metadata", "instruction_metadata",
                            "most_similar", "avg_similarity_score"]
                        )
                    fout.write(json.dumps(data, ensure_ascii=False) + "\n")
            else:
                prompts = []
                for task in batch:
                    if task_clf_types[task["instruction"]]:
                        prompt = output_first_template_for_clf + " " + task["instruction"].strip() + "\n"
                        prompts.append(prompt)
                    else:
                        prompt = input_first_template_for_gen + " " + task["instruction"].strip() + "\n"
                        prompts.append(prompt)
                results = make_gpt3_requests(
                    engine=args.engine,
                    prompts=prompts,
                    # because the clf template is longer, we need to decrease the max_tokens
                    max_tokens=300 if any(task_clf_types[task["instruction"]] for task in batch) else 350,
                    temperature=0,
                    top_p=0,
                    frequency_penalty=0,
                    presence_penalty=1.5,
                    stop_sequences=[f"Example {
      args.max_instances_to_generate + 1}", "Task:"],
                    logprobs=1,
                    n=1,
                    best_of=1,
                    api_key=args.api_key,
                    organization=args.organization)
                for i in range(len(batch)):
                    data = batch[i]
                    data["instance_metadata"] = results[i]
                    if results[i]["response"] is not None:
                        data["raw_instances"] = results[i]["response"]["choices"][0]["text"]
                    else:
                        data["raw_instances"] = ""
                    data = OrderedDict(
                        (k, data[k]) for k in \
                            ["instruction", "raw_instances", "instance_metadata", "instruction_metadata",
                            "most_similar", "avg_similarity_score"]
                        )
                    fout.write(json.dumps(data, ensure_ascii=False) + "\n")
            progress_bar.update(len(batch))
Step4:过滤及后处理
python self_instruct/prepare_for_finetuning.py --instance_files data/ceshi/machine_generated_instances.jsonl --classification_type_files data/ceshi/is_clf_or_not_davinci_template_1.jsonl --output_dir data/ceshi/finetuning_data --include_seed_tasks --seed_tasks_path data/seed_tasks.jsonl
运行后会生成两个数据文件,均在data/ceshi/finetuning_data目录下:
all_generated_instances.jsonl 和 gpt3_finetuning_data_336.jsonl
其中,all_generated_instances.jsonl中包含的是 instruction,input,output。

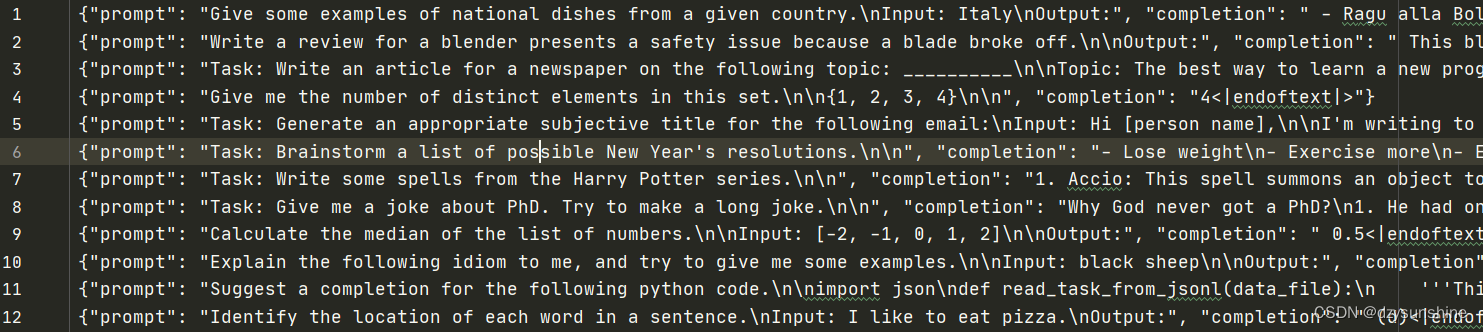
gpt3_finetuning_data_336.jsonl中包含的是prompt,completion。
核心代码如下:
for task in tqdm.tqdm(generated_tasks):
        # get instruction
        instruction = task["instruction"]
        task["is_classification"] = task_clf_types[instruction]

        # get the instances
        if task["is_classification"]:
            task_instances = parse_instances_for_classification_task(task["raw_instances"], instruction, task["instance_metadata"])
        else:
            task_instances = parse_instances_for_generation_task(task["raw_instances"], instruction, task["instance_metadata"])

        # we only allow max 5 instances per task
        task_instances = random.sample(task_instances, min(len(task_instances), 5))

        if not task_instances:
            continue

        training_instances += task_instances
# get the prompt and completion for training gpt3
    gpt3_instances = []
    for instance in training_instances:
        # get input and do preprocessing
        inst_input = instance[1]
        # for some tasks, we check whether the input contains colon, and if so, we remove the part before the colon
        if random.random() < 0.5:
            colon_words = re.findall(r"(\w+):", inst_input)
            # if only one colon is found, we assume the instance only have one input and we remove the field name before the colon
            if len(set(colon_words)) == 1:
                inst_input = inst_input.split(":", 1)[1].strip()
            else:
                inst_input = inst_input.strip()
            # we also replace two consecutive new lines with one new line half of the time
            inst_input = inst_input.replace("\n\n", "\n")

        gpt3_instances.append(encode_instance(instance[0], inst_input, instance[2]))

    # remove duplicates
    filtered_instances = []
    prompt_completion_set = set()
    for instance in gpt3_instances:
        instance_pair = (instance["prompt"], instance["completion"])
        if instance_pair not in prompt_completion_set:
            prompt_completion_set.add((instance["prompt"], instance["completion"]))
            filtered_instances.append(instance)
    gpt3_instances = filtered_instances

    # shuffle
    random.shuffle(gpt3_instances)
    with open(os.path.join(args.output_dir, f"gpt3_finetuning_data_{
      len(gpt3_instances)}.jsonl"), "w") as fout:
        for instance in gpt3_instances:
            fout.write(json.dumps({

                "prompt": instance["prompt"],
                "completion": instance["completion"],
            }) + "\n")
智能推荐
友盟自动集成报错-Could not download common (com.umeng.umsdk:common:2.0.0)_could not find com.umeng.umsdk:common:2.0.2.-程序员宅基地
文章浏览阅读1.2w次。当使用自动集成(非手动集成)友盟的时候在build.gradle里面:implementation 'com.umeng.umsdk:analytics:8.0.0'implementation 'com.umeng.umsdk:common:2.0.0'但是今天一直报错Could not download common (com.umeng.umsdk:common:2.0.0)..._could not find com.umeng.umsdk:common:2.0.2.
Docker 快速上手学习入门教程_docker菜鸟教程-程序员宅基地
文章浏览阅读2.5w次,点赞6次,收藏50次。官方解释是,docker 容器是机器上的沙盒进程,它与主机上的所有其他进程隔离。所以容器只是操作系统中被隔离开来的一个进程,所谓的容器化,其实也只是对操作系统进行欺骗的一种语法糖。_docker菜鸟教程
电脑技巧:Windows系统原版纯净软件必备的两个网站_msdn我告诉你-程序员宅基地
文章浏览阅读5.7k次,点赞3次,收藏14次。该如何避免的,今天小编给大家推荐两个下载Windows系统官方软件的资源网站,可以杜绝软件捆绑等行为。该站提供了丰富的Windows官方技术资源,比较重要的有MSDN技术资源文档库、官方工具和资源、应用程序、开发人员工具(Visual Studio 、SQLServer等等)、系统镜像、设计人员工具等。总的来说,这两个都是非常优秀的Windows系统镜像资源站,提供了丰富的Windows系统镜像资源,并且保证了资源的纯净和安全性,有需要的朋友可以去了解一下。这个非常实用的资源网站的创建者是国内的一个网友。_msdn我告诉你
vue2封装对话框el-dialog组件_<el-dialog 封装成组件 vue2-程序员宅基地
文章浏览阅读1.2k次。vue2封装对话框el-dialog组件_
MFC 文本框换行_c++ mfc同一框内输入二行怎么换行-程序员宅基地
文章浏览阅读4.7k次,点赞5次,收藏6次。MFC 文本框换行 标签: it mfc 文本框1.将Multiline属性设置为True2.换行是使用"\r\n" (宽字符串为L"\r\n")3.如果需要编辑并且按Enter键换行,还要将 Want Return 设置为 True4.如果需要垂直滚动条的话将Vertical Scroll属性设置为True,需要水平滚动条的话将Horizontal Scroll属性设_c++ mfc同一框内输入二行怎么换行
redis-desktop-manager无法连接redis-server的解决方法_redis-server doesn't support auth command or ismis-程序员宅基地
文章浏览阅读832次。检查Linux是否是否开启所需端口,默认为6379,若未打开,将其开启:以root用户执行iptables -I INPUT -p tcp --dport 6379 -j ACCEPT如果还是未能解决,修改redis.conf,修改主机地址:bind 192.168.85.**;然后使用该配置文件,重新启动Redis服务./redis-server redis.conf..._redis-server doesn't support auth command or ismisconfigured. try
随便推点
Debian11系统安装-程序员宅基地
文章浏览阅读4w次,点赞42次,收藏338次。Debian11系统安装1. 启动镜像启动镜像,进入安装界面,默认选择第一个图形化安装界面,回车2. 选择语言这里选择English语言,然后点击Continue3.选择所在位置4. 键盘布局默认American English,然后点击Continue5. 设置主机名默认主机名(hostname)为debian,点击Continue6. 设置域名设置域名(Domain name)为jamysong,这里大家可以根据自己的来设定7. 设置root账户密码这里我设置roo_debian11
Centos7重置root用户密码_centos7更改root密码-程序员宅基地
文章浏览阅读7.5k次,点赞5次,收藏21次。Linux操作系统重置root口令_centos7更改root密码
STM32常用协议之IIC协议详解_正点原子stm32 iic-程序员宅基地
文章浏览阅读3.7k次,点赞9次,收藏39次。提示:文章写完后,目录可以自动生成,如何生成可参考右边的帮助文档IIC协议详解前言一、IIC协议简介1.1 简介1.2 IIC物理层1.3 协议层1.3.1 IIC基本读写过程1.3.2 通信的起始和停止信号1.3.3 数据有效性1.3.4 地址及数据方向1.3.5 响应二、IIC特性2.1 软件模拟协议2.1.1 引言2.1.2 IIC初始化函数2.2 硬件协议二、使用步骤1.引入库2.读入数据总结前言STM32常用协议系列文章一、IIC协议简介1.1 简介IIC(Inter -._正点原子stm32 iic
【视频播放】Jplayer视频播放器的使用_jplayer 播放amr-程序员宅基地
文章浏览阅读7.1k次。如果你正在寻找一个网页上播放视频的插件,或者你原先网页上用的视频插件被墙了(比如jwplayer),那么就来看看下面的介绍吧当楼主得知原先用的视频插件jwplayer所访问到的一个cdn地址失效了,并且通过网上的方法并不能修复jwplayer,使它能正常播放视频,楼主的内心是崩溃的。但是当把Jplayer调试完成后,终于找到了一款好的替代的插件。1、首先Jplayer的官网在这_jplayer 播放amr
灰色预测模型matlab_MATLAB实战|基于灰色预测河南省社会消费品零售总额预测-程序员宅基地
文章浏览阅读236次。1研究内容消费在生产中占据十分重要的地位,是生产的最终目的和动力,是保持省内经济稳定快速发展的核心要素。预测河南省社会消费品零售总额,是进行宏观经济调控和消费体制改变创新的基础,是河南省内人民对美好的全面和谐社会的追求的要求,保持河南省经济稳定和可持续发展具有重要意义。本文建立灰色预测模型,利用MATLAB软件,预测出2019年~2023年河南省社会消费品零售总额预测值分别为21881...._灰色预测模型用什么软件
log4qt-程序员宅基地
文章浏览阅读1.2k次。12.4-在Qt中使用Log4Qt输出Log文件,看这一篇就足够了一、为啥要使用第三方Log库,而不用平台自带的Log库二、Log4j系列库的功能介绍与基本概念三、Log4Qt库的基本介绍四、将Log4qt组装成为一个单独模块五、使用配置文件的方式配置Log4Qt六、使用代码的方式配置Log4Qt七、在Qt工程中引入Log4Qt库模块的方法八、获取示例中的源代码一、为啥要使用第三方Log库,而不用平台自带的Log库首先要说明的是,在平时开发和调试中开发平台自带的“打印输出”已经足够了。但_log4qt