机器学习KNN-应用:手写数字识别(手撕+sklearn实现)_手写数字模型sklearn显示模型一百张数字-程序员宅基地
技术标签: 机器学习 python数据分析总结
参考链接
导入数据集
import pandas as pd
import numpy as np
import matplotlib.pyplot as plt
# 数据集的导入
from sklearn.datasets import load_digits
load_digits()
{'data': array([[ 0.,  0.,  5., ...,  0.,  0.,  0.],
        [ 0.,  0.,  0., ..., 10.,  0.,  0.],
        [ 0.,  0.,  0., ..., 16.,  9.,  0.],
        ...,
        [ 0.,  0.,  1., ...,  6.,  0.,  0.],
        [ 0.,  0.,  2., ..., 12.,  0.,  0.],
        [ 0.,  0., 10., ..., 12.,  1.,  0.]]),
 'target': array([0, 1, 2, ..., 8, 9, 8]),
 'frame': None,
 'feature_names': ['pixel_0_0',
  'pixel_0_1',
  'pixel_0_2',
  'pixel_0_3',
  'pixel_0_4',
  'pixel_0_5',
  'pixel_0_6',
  'pixel_0_7',
  'pixel_1_0',
  'pixel_1_1',
  'pixel_1_2',
  'pixel_1_3',
  'pixel_1_4',
  'pixel_1_5',
  'pixel_1_6',
  'pixel_1_7',
  'pixel_2_0',
  'pixel_2_1',
  'pixel_2_2',
  'pixel_2_3',
  'pixel_2_4',
  'pixel_2_5',
  'pixel_2_6',
  'pixel_2_7',
  'pixel_3_0',
  'pixel_3_1',
  'pixel_3_2',
  'pixel_3_3',
  'pixel_3_4',
  'pixel_3_5',
  'pixel_3_6',
  'pixel_3_7',
  'pixel_4_0',
  'pixel_4_1',
  'pixel_4_2',
  'pixel_4_3',
  'pixel_4_4',
  'pixel_4_5',
  'pixel_4_6',
  'pixel_4_7',
  'pixel_5_0',
  'pixel_5_1',
  'pixel_5_2',
  'pixel_5_3',
  'pixel_5_4',
  'pixel_5_5',
  'pixel_5_6',
  'pixel_5_7',
  'pixel_6_0',
  'pixel_6_1',
  'pixel_6_2',
  'pixel_6_3',
  'pixel_6_4',
  'pixel_6_5',
  'pixel_6_6',
  'pixel_6_7',
  'pixel_7_0',
  'pixel_7_1',
  'pixel_7_2',
  'pixel_7_3',
  'pixel_7_4',
  'pixel_7_5',
  'pixel_7_6',
  'pixel_7_7'],
 'target_names': array([0, 1, 2, 3, 4, 5, 6, 7, 8, 9]),
 'images': array([[[ 0.,  0.,  5., ...,  1.,  0.,  0.],
         [ 0.,  0., 13., ..., 15.,  5.,  0.],
         [ 0.,  3., 15., ..., 11.,  8.,  0.],
         ...,
         [ 0.,  4., 11., ..., 12.,  7.,  0.],
         [ 0.,  2., 14., ..., 12.,  0.,  0.],
         [ 0.,  0.,  6., ...,  0.,  0.,  0.]],

        [[ 0.,  0.,  0., ...,  5.,  0.,  0.],
         [ 0.,  0.,  0., ...,  9.,  0.,  0.],
         [ 0.,  0.,  3., ...,  6.,  0.,  0.],
         ...,
         [ 0.,  0.,  1., ...,  6.,  0.,  0.],
         [ 0.,  0.,  1., ...,  6.,  0.,  0.],
         [ 0.,  0.,  0., ..., 10.,  0.,  0.]],

        [[ 0.,  0.,  0., ..., 12.,  0.,  0.],
         [ 0.,  0.,  3., ..., 14.,  0.,  0.],
         [ 0.,  0.,  8., ..., 16.,  0.,  0.],
         ...,
         [ 0.,  9., 16., ...,  0.,  0.,  0.],
         [ 0.,  3., 13., ..., 11.,  5.,  0.],
         [ 0.,  0.,  0., ..., 16.,  9.,  0.]],

        ...,

        [[ 0.,  0.,  1., ...,  1.,  0.,  0.],
         [ 0.,  0., 13., ...,  2.,  1.,  0.],
         [ 0.,  0., 16., ..., 16.,  5.,  0.],
         ...,
         [ 0.,  0., 16., ..., 15.,  0.,  0.],
         [ 0.,  0., 15., ..., 16.,  0.,  0.],
         [ 0.,  0.,  2., ...,  6.,  0.,  0.]],

        [[ 0.,  0.,  2., ...,  0.,  0.,  0.],
         [ 0.,  0., 14., ..., 15.,  1.,  0.],
         [ 0.,  4., 16., ..., 16.,  7.,  0.],
         ...,
         [ 0.,  0.,  0., ..., 16.,  2.,  0.],
         [ 0.,  0.,  4., ..., 16.,  2.,  0.],
         [ 0.,  0.,  5., ..., 12.,  0.,  0.]],

        [[ 0.,  0., 10., ...,  1.,  0.,  0.],
         [ 0.,  2., 16., ...,  1.,  0.,  0.],
         [ 0.,  0., 15., ..., 15.,  0.,  0.],
         ...,
         [ 0.,  4., 16., ..., 16.,  6.,  0.],
         [ 0.,  8., 16., ..., 16.,  8.,  0.],
         [ 0.,  1.,  8., ..., 12.,  1.,  0.]]]),
 'DESCR': ".. _digits_dataset:\n\nOptical recognition of handwritten digits dataset\n--------------------------------------------------\n\n**Data Set Characteristics:**\n\n    :Number of Instances: 1797\n    :Number of Attributes: 64\n    :Attribute Information: 8x8 image of integer pixels in the range 0..16.\n    :Missing Attribute Values: None\n    :Creator: E. Alpaydin (alpaydin '@' boun.edu.tr)\n    :Date: July; 1998\n\nThis is a copy of the test set of the UCI ML hand-written digits datasets\nhttps://archive.ics.uci.edu/ml/datasets/Optical+Recognition+of+Handwritten+Digits\n\nThe data set contains images of hand-written digits: 10 classes where\neach class refers to a digit.\n\nPreprocessing programs made available by NIST were used to extract\nnormalized bitmaps of handwritten digits from a preprinted form. From a\ntotal of 43 people, 30 contributed to the training set and different 13\nto the test set. 32x32 bitmaps are divided into nonoverlapping blocks of\n4x4 and the number of on pixels are counted in each block. This generates\nan input matrix of 8x8 where each element is an integer in the range\n0..16. This reduces dimensionality and gives invariance to small\ndistortions.\n\nFor info on NIST preprocessing routines, see M. D. Garris, J. L. Blue, G.\nT. Candela, D. L. Dimmick, J. Geist, P. J. Grother, S. A. Janet, and C.\nL. Wilson, NIST Form-Based Handprint Recognition System, NISTIR 5469,\n1994.\n\n.. topic:: References\n\n  - C. Kaynak (1995) Methods of Combining Multiple Classifiers and Their\n    Applications to Handwritten Digit Recognition, MSc Thesis, Institute of\n    Graduate Studies in Science and Engineering, Bogazici University.\n  - E. Alpaydin, C. Kaynak (1998) Cascading Classifiers, Kybernetika.\n  - Ken Tang and Ponnuthurai N. Suganthan and Xi Yao and A. Kai Qin.\n    Linear dimensionalityreduction using relevance weighted LDA. School of\n    Electrical and Electronic Engineering Nanyang Technological University.\n    2005.\n  - Claudio Gentile. A New Approximate Maximal Margin Classification\n    Algorithm. NIPS. 2000.\n"}
X = load_digits().data
y = load_digits().target
pics = load_digits().images
X[0].shape
(64,)
y.shape
(1797,)
pd.Series(y).value_counts()
3    183
5    182
1    182
6    181
4    181
9    180
7    179
0    178
2    177
8    174
dtype: int64
pics[7]
array([[ 0.,  0.,  7.,  8., 13., 16., 15.,  1.],
       [ 0.,  0.,  7.,  7.,  4., 11., 12.,  0.],
       [ 0.,  0.,  0.,  0.,  8., 13.,  1.,  0.],
       [ 0.,  4.,  8.,  8., 15., 15.,  6.,  0.],
       [ 0.,  2., 11., 15., 15.,  4.,  0.,  0.],
       [ 0.,  0.,  0., 16.,  5.,  0.,  0.,  0.],
       [ 0.,  0.,  9., 15.,  1.,  0.,  0.,  0.],
       [ 0.,  0., 13.,  5.,  0.,  0.,  0.,  0.]])
X[7]
array([ 0.,  0.,  7.,  8., 13., 16., 15.,  1.,  0.,  0.,  7.,  7.,  4.,
       11., 12.,  0.,  0.,  0.,  0.,  0.,  8., 13.,  1.,  0.,  0.,  4.,
        8.,  8., 15., 15.,  6.,  0.,  0.,  2., 11., 15., 15.,  4.,  0.,
        0.,  0.,  0.,  0., 16.,  5.,  0.,  0.,  0.,  0.,  0.,  9., 15.,
        1.,  0.,  0.,  0.,  0.,  0., 13.,  5.,  0.,  0.,  0.,  0.])
plt.imshow(pics[7],cmap='gray')
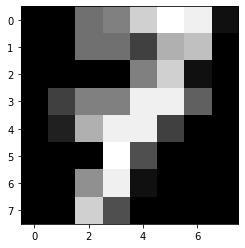
y[7]
7
划分数据集
# 划分数据集
from sklearn.model_selection import train_test_split
xtrain,xtest,ytrain,ytest = train_test_split(X,y,random_state=5)
xtrain.shape,ytrain.shape,xtest.shape,ytest.shape
((1347, 64), (1347,), (450, 64), (450,))
使用sklearn库中的KNN 模型解决问题
# 使用sklearn库中的KNN 模型解决问题
from sklearn.neighbors import KNeighborsClassifier
knn1 = KNeighborsClassifier(n_neighbors=5).fit(xtrain,ytrain)
%%time
# 预测
res = knn1.predict(xtest)
res
Wall time: 82 ms


array([5, 2, 5, 5, 5, 3, 2, 2, 3, 5, 9, 8, 7, 7, 1, 1, 5, 7, 0, 4, 5, 9,
       0, 2, 1, 3, 4, 7, 5, 2, 1, 1, 2, 9, 8, 1, 4, 5, 7, 9, 5, 5, 6, 0,
       1, 7, 2, 9, 7, 7, 3, 9, 5, 1, 8, 6, 7, 7, 8, 1, 6, 1, 3, 6, 1, 3,
       2, 6, 8, 1, 4, 7, 1, 6, 0, 0, 5, 1, 3, 5, 1, 6, 4, 0, 4, 7, 5, 7,
       8, 3, 7, 8, 5, 1, 1, 7, 5, 9, 7, 9, 3, 0, 7, 8, 7, 4, 8, 3, 2, 8,
       5, 2, 7, 4, 4, 8, 9, 7, 4, 5, 0, 5, 9, 8, 2, 3, 2, 4, 4, 8, 0, 5,
       2, 9, 4, 8, 6, 5, 9, 9, 8, 0, 9, 4, 3, 8, 7, 5, 5, 3, 3, 5, 1, 0,
       8, 7, 2, 8, 4, 1, 0, 0, 3, 6, 4, 7, 7, 0, 4, 9, 2, 8, 7, 9, 7, 2,
       0, 3, 3, 8, 5, 7, 5, 6, 8, 4, 1, 5, 1, 1, 6, 9, 9, 9, 8, 6, 4, 6,
       0, 1, 6, 5, 3, 5, 0, 2, 7, 8, 8, 7, 3, 8, 3, 9, 3, 0, 9, 6, 0, 4,
       0, 3, 5, 0, 4, 3, 5, 8, 8, 9, 2, 5, 0, 8, 3, 7, 4, 3, 7, 9, 2, 6,
       1, 2, 1, 7, 0, 7, 5, 0, 6, 4, 1, 8, 3, 0, 8, 9, 2, 2, 5, 2, 6, 6,
       3, 4, 0, 7, 1, 5, 3, 8, 7, 3, 4, 2, 5, 1, 3, 0, 0, 9, 3, 8, 8, 3,
       5, 8, 6, 6, 2, 6, 7, 5, 3, 1, 5, 7, 5, 4, 5, 2, 6, 2, 0, 6, 0, 7,
       2, 5, 8, 8, 7, 1, 4, 7, 2, 0, 0, 3, 7, 4, 2, 5, 2, 6, 1, 0, 5, 7,
       2, 9, 1, 6, 9, 6, 5, 4, 8, 8, 0, 9, 3, 5, 7, 1, 2, 4, 1, 6, 6, 2,
       1, 5, 8, 0, 3, 2, 4, 3, 9, 0, 0, 3, 2, 8, 9, 0, 2, 5, 2, 2, 5, 8,
       3, 6, 7, 2, 5, 9, 0, 5, 9, 0, 1, 3, 9, 1, 4, 9, 2, 1, 5, 6, 0, 0,
       9, 6, 7, 9, 9, 3, 1, 4, 3, 4, 7, 2, 5, 2, 6, 0, 3, 4, 9, 3, 1, 0,
       3, 7, 6, 0, 7, 1, 0, 5, 1, 3, 5, 7, 7, 0, 1, 1, 5, 1, 1, 1, 6, 7,
       7, 2, 2, 2, 7, 1, 3, 6, 9, 1])
(ytest == res).mean()
0.9822222222222222
knn1.score(xtest,ytest)
0.9822222222222222
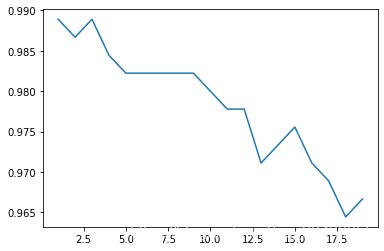
# 学习曲线
def learning_curve():
    krange = range(1,20)
    score = []
    for i in krange:
        clf = KNeighborsClassifier(n_neighbors = i)
        clf = clf.fit(xtrain,ytrain)
        score.append(clf.score(xtest,ytest))
    print(score.index(max(score))+1) # 打印最佳k值
    plt.plot(krange,score)
    plt.show()
learning_curve()
1
knn1_1 = KNeighborsClassifier(n_neighbors = 3).fit(xtrain,ytrain)
knn1_1.score(xtest,ytest)
0.9888888888888889
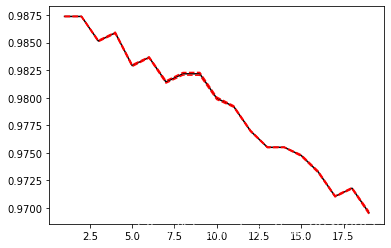
# 此时的k只是在某一特定数据集下的最优,随着测试集的变动,最优的k也会变,所以需要寻找更加稳定最优k:交叉验证法
K折交叉验证:模型稳定性
# K折交叉验证:模型稳定性
from sklearn.model_selection import cross_val_score as CVS

def cross_validation():
    clf = KNeighborsClassifier(n_neighbors = 3)
    cvresult = CVS(clf,X,y,cv=10) # cv折数
    c_mean = cvresult.mean()
    c_std = cvresult.std()
    print('cvresult:',cvresult,'cvresult.mean():',c_mean,'cvresult.std():',c_std)

    # 绘制K折交叉验证曲线
    score = []
    var_ = []
    krange = range(1,20)
    for i in krange:
        clf = KNeighborsClassifier(n_neighbors = i)
        cvresult = CVS(clf,xtrain,ytrain,cv = 5)
        score.append(cvresult.mean())
        var_.append(cvresult.var())
    best_k = score.index(max(score))+1
    print('best_k:',best_k)
    plt.plot(krange,score,color = 'k')
    plt.plot(krange,score,np.array(score)+np.array(var_)*2,c='red',linestyle = '--')
    plt.plot(krange,score,np.array(score)-np.array(var_)*2,c='red',linestyle = '--')
cross_validation()
cvresult: [0.93888889 1.         0.98888889 0.97222222 0.96666667 0.97777778
 0.98333333 0.98324022 0.98324022 0.97206704] cvresult.mean(): 0.9766325263811299 cvresult.std(): 0.015472517471692416
best_k: 1

归一化
# 归一化

x_train = xtrain/255
x_test = xtest/255

score=[]
var_=[]
krange = range(1,20)

for i in krange:
    clf=KNeighborsClassifier(n_neighbors=i,weights = 'distance')
    cvresult = CVS(clf,x_train,ytrain,cv=5)
    score.append(cvresult.mean())
    var_.append(cvresult.var())
plt.plot(krange,score,color='k')
plt.plot(krange,np.array(score)+np.array(var_)*2,c='red',linestyle='--')
plt.plot(krange,np.array(score)-np.array(var_)*2,c='red',linestyle='--')
[<matplotlib.lines.Line2D at 0x295e6cb0e50>]
# 归一化后返回最优的k
best_index = krange[score.index(max(score))]-1
print('best_index',best_index)
print(score[best_index])
best_index 0
0.9873798705768966
使用自己写的KNN模型解决问题
# 使用自己写的KNN模型解决问题
def Knn_C(X,y,X_sample,k):

    d = np.sqrt(np.sum((X-X_sample)**2,axis = 1))
    knn = [*zip(d,y)]
    knn.sort()
    # 少数服从多数,X1的类型与最多的邻居的类型一致,取排序后的前k个值,的第二列(标签值),取第一个众数作为测试数据的预测值
    Y_sample =  pd.Series(np.array(knn[:k])[:,1]).mode()[0]
    return Y_sample
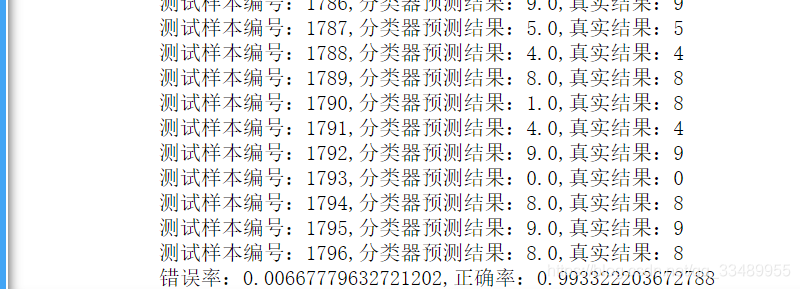
def handwtitingClassTest():
    errorCount = 0.0
    lenth = float(*y.shape)
    for i,item in enumerate(X):
        # 预测
        classifierResult = Knn_C(X,y,item,3)
        # 打印结果
        print(f'测试样本编号:{
      i},分类器预测结果:{
      classifierResult},真实结果:{
      y[i]}')
        # 判断结果是否正确
        if(classifierResult!=y[i]):
            errorCount +=1.0
    # print(y.shape)#(1797,)
    # 打印错误率
    print(f'错误率:{
      errorCount/lenth},正确率:{
      1-errorCount/lenth}')
handwtitingClassTest()
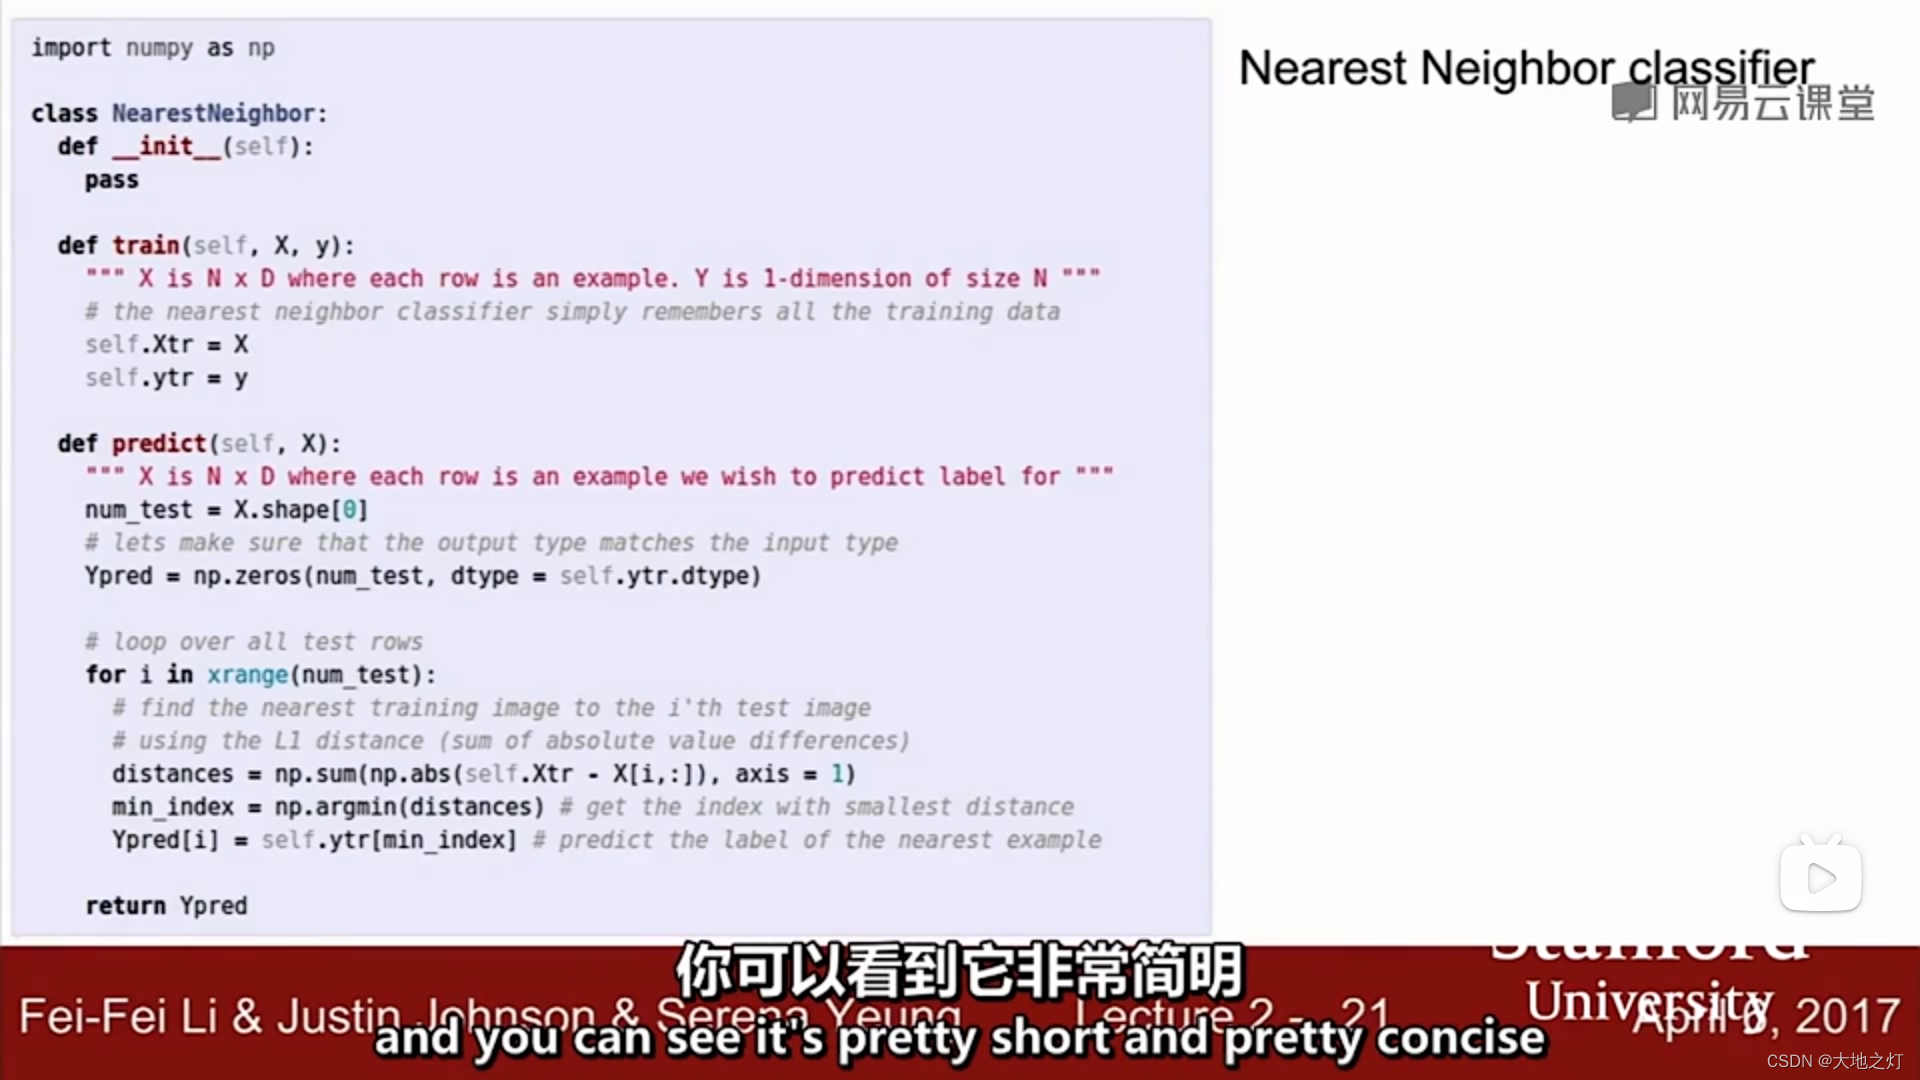
补充:(from cs231n)
视频中给出的knn代码实现
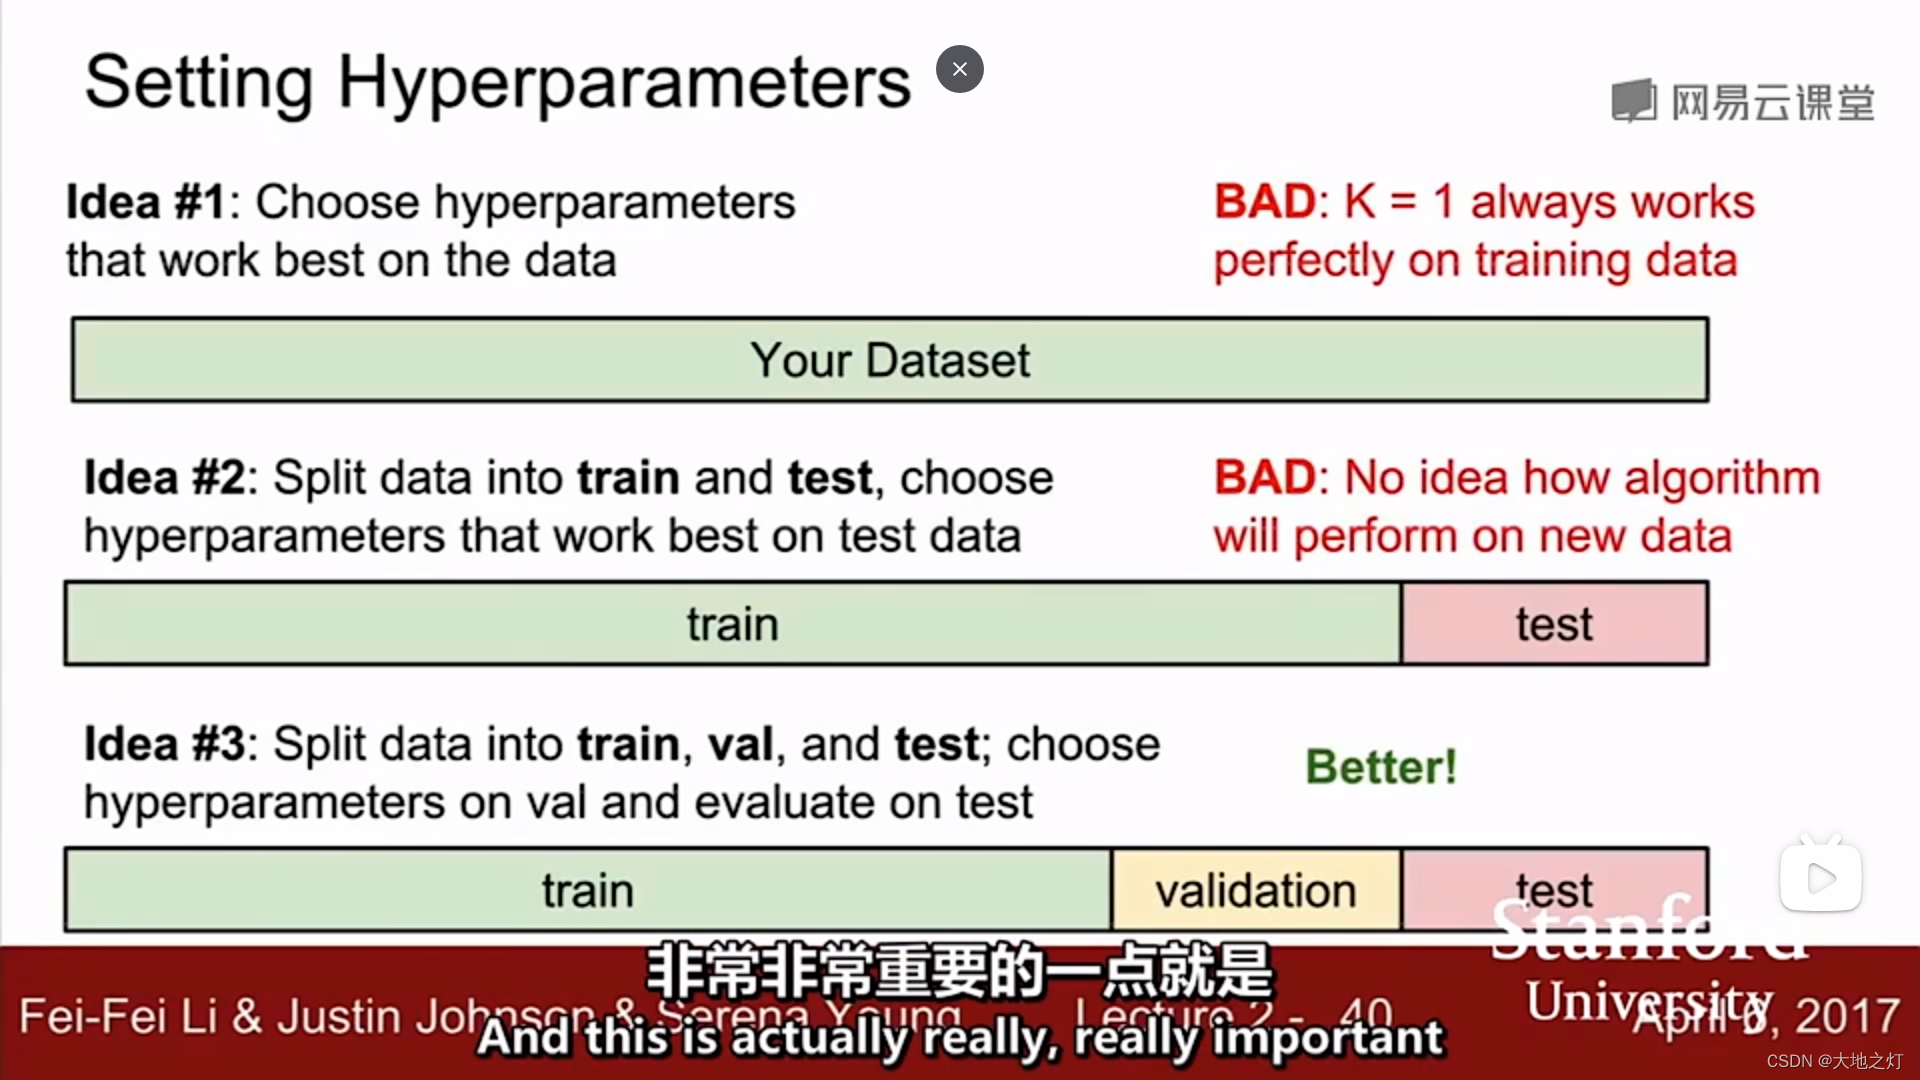
在调整超参数的时候,你不能只选择对于整个数据集有最好效果的那个参数,对于knn来说就是k=1时准确率高,但是不具备泛化性。
在调整超参数的时候,你同样不能选择在测试集上效果最好的超参数,因为这个超参数只对这个测试集有泛化性,想要得到比较准确的结果,可以进行k折交叉验证得到一个均值作为最终结果。
此外,为了避免第二种情况的发生,可以设置验证集,测试集在最终结果(确定好超参数)出来前不参与预测,保证研究的可靠性。
智能推荐
python opencv resize函数_python opencv 等比例调整(缩放)图片分辨率大小代码 cv2.resize()...-程序员宅基地
文章浏览阅读1.3k次。# -*- coding: utf-8 -*-"""@File : 200113_等比例调整图像分辨率大小.py@Time : 2020/1/13 13:38@Author : Dontla@Email : [email protected]@Software: PyCharm"""import cv2def img_resize(image):height, width = image...._opencv小图等比例缩放
【OFDM、OOK、PPM、QAM的BER仿真】绘制不同调制方案的误码率曲线研究(Matlab代码实现)-程序员宅基地
文章浏览阅读42次。对于这些调制技术的误码率(BER)研究是非常重要的,因为它们可以帮助我们了解在不同信道条件下系统的性能表现。通过以上步骤,您可以进行OFDM、OOK、PPM和QAM的误码率仿真研究,并绘制它们的误码率曲线,以便更好地了解它们在不同信道条件下的性能特点。针对这些调制技术的BER研究是非常重要的,可以帮助我们更好地了解这些技术在不同信道条件下的性能表现,从而指导系统设计和优化。6. 分析结果:根据误码率曲线的比较,分析每种调制方案在不同信噪比条件下的性能,包括其容忍的信道条件和适用的应用场景。_ber仿真
【已解决】Vue的Element框架,日期组件(el-date-picker)的@change事件,不会触发。_el-date-picker @change不触发-程序员宅基地
文章浏览阅读2.5w次,点赞3次,收藏3次。1、场景照抄官方的实例,绑定了 myData.Age 这个值。实际选择某个日期后,从 vuetool(开发工具)看,值已经更新了,但视图未更新。2、尝试绑定另一个值: myData,可以正常的触发 @change 方法。可能是:值绑定到子对象时,组件没有侦测到。3、解决使用 @blur 代替 @change 方法。再判断下 “值有没有更新” 即可。如有更好的方法,欢迎评论!..._el-date-picker @change不触发
PCL学习:滤波—Projectlnliers投影滤波_projectinliers-程序员宅基地
文章浏览阅读1.5k次,点赞2次,收藏8次。Projectlnliersclass pcl: : Projectlnliers< PointT >类 Projectlnliers 使用一个模型和一组的内点的索引,将内点投影到模型形成新的一个独立点云。关键成员函数 void setModelType(int model) 通过用户给定的参数设置使用的模型类型 ,参数 Model 为模型类型(见 mo..._projectinliers
未处理System.BadImageFormatException”类型的未经处理的异常在 xxxxxxx.exe 中发生_“system.badimageformatexception”类型的未经处理的异常在 未知模块。 -程序员宅基地
文章浏览阅读2.4k次。“System.BadImageFormatException”类型的未经处理的异常在 xxxx.exe 中发生其他信息: 未能加载文件或程序集“xxxxxxx, Version=xxxxxx,xxxxxxx”或它的某一个依赖项。试图加载格式不正确的程序。此原因是由于 ” 目标程序的目标平台与 依赖项的目标编译平台不一致导致,把所有的项目都修改到同一目标平台下(X86、X64或AnyCPU)进行编译,一般即可解决问题“。若果以上方式不能解决,可采用如下方式:右键选择配置管理器,在这里修改平台。_“system.badimageformatexception”类型的未经处理的异常在 未知模块。 中发生
PC移植安卓---2018/04/26_电脑软件移植安卓-程序员宅基地
文章浏览阅读2.4k次。记录一下碰到的问题:1.Assetbundle加载问题: 原PC打包后的AssetBundle导入安卓工程后,加载会出问题。同时工程打包APK时,StreamingAssets中不能有中文。解决方案: (1).加入PinYinConvert类,用于将中文转换为拼音(多音字可能会出错,例如空调转换为KongDiao||阿拉伯数字不支持,如Ⅰ、Ⅱ、Ⅲ、Ⅳ(IIII)、Ⅴ、Ⅵ、Ⅶ、Ⅷ、Ⅸ、Ⅹ..._电脑软件移植安卓
随便推点
聊聊线程之run方法_start 是同步还是异步-程序员宅基地
文章浏览阅读2.4k次。话不多说参考书籍 汪文君补充知识:start是异步,run是同步,start的执行会经过JNI方法然后被任务执行调度器告知给系统内核分配时间片进行创建线程并执行,而直接调用run不经过本地方法就是普通对象执行实例方法。什么是线程?1.现在几乎百分之百的操作系统都支持多任务的执行,对计算机来说每一个人物就是一个进程(Process),在每一个进程内部至少要有一个线程实在运行中,有时线..._start 是同步还是异步
制作非缘勿扰页面特效----JQuery_单击标题“非缘勿扰”,<dd>元素中有id属性的<span>的文本(主演、导演、标签、剧情-程序员宅基地
文章浏览阅读5.3k次,点赞9次,收藏34次。我主要用了层次选择器和属性选择器可以随意选择,方便简单为主大体CSS格式 大家自行构造网页主体<body> <div class='main' > <div class='left'> <img src="images/pic.gif" /> <br/><br/> <img src="images/col.gif" alt="收藏本片"/&_单击标题“非缘勿扰”,元素中有id属性的的文本(主演、导演、标签、剧情
【Python】No module named ‘win32com‘,最简单的解决方法,适用windows、mac、linux_no module named 'win32com-程序员宅基地
文章浏览阅读2.2k次。完整的解决思路_no module named 'win32com
有了这6款浏览器插件,浏览器居然“活了”?!媳妇儿直呼“大开眼界”_浏览器插件助手-程序员宅基地
文章浏览阅读901次,点赞20次,收藏23次。浏览器是每台电脑的必装软件,去浏览器搜索资源和信息已经成为我们的日常,我媳妇儿原本也以为浏览器就是上网冲浪而已,哪有那么强大,但经过我的演示之后她惊呆了,直接给我竖起大拇指道:“原来浏览器还能这么用?大开眼界!今天来给大家介绍几款实用的浏览器插件,学会之后让你的浏览器“活过来”!_浏览器插件助手
NumPy科学数学库_数学中常用的环境有numpy-程序员宅基地
文章浏览阅读101次。NumPy是Python中最常用的科学数学计算库之一,它提供了高效的多维数组对象以及对这些数组进行操作的函数NumPy的核心是ndarray(N-dimensional array)对象,它是一个用于存储同类型数据的多维数组Numpy通常与SciPy(Scientific Python)和 Matplotlib(绘图库)一起使用,用于替代MatLabSciPy是一个开源的Python算法库和数学工具包;Matplotlib是Python语言及其Numpy的可视化操作界面'''_数学中常用的环境有numpy
dind(docker in docker)学习-程序员宅基地
文章浏览阅读1.1w次。docker in docker说白了,就是在docker容器内启动一个docker daemon,对外提供服务。优点在于:镜像和容器都在一个隔离的环境,保持操作者的干净环境。想到了再补充 :)一:低版本启动及访问启动1.12.6-dinddocker run --privileged -d --name mydocker docker:1.12.6-dind在其他容器访问d..._dind