GitLab CI/CD_gitlab cicd-程序员宅基地
一. GitLab CI/CD 基本介绍
1. GitLab CI/CD 特点
- 多平台:Unix,windows,macOS和任何其他支持Go的平台上执行构建。
- 多语言:构建脚本是命令行驱动的,并且可以与Java,PHP,Ruby,C和任何其他语言一起使用。
- 稳定构建:构建在与GitLab不同的机器上运行。
- 并行构建:GitLab CI/CD在多台机器上拆分构建,以实现快速执行。
- 实时日志记录:合并请求中的链接将您带到动态更新的当前构建日志。
- 灵活的管道:您可以在每个阶段定义多个并行作业,并且可以 触发其他构建。
- 版本管道:一个
.gitlab-ci.yml文件 包舍您的测试,整个过程的步聚,使每个人都能贡献更改,并确保每个分支获得所需的管道。 - 自动缩放: 您可以自动缩放构建机器,以确保立即处理您的构建并将成本降至最低。
- 构建工件: 您可以将二进制文件和其他构建工件上载到 GitLab并浏览和下载它们。
- Docker支持: 可以使用自定义Docker映像, 作为测试的一部分启动 服务, 构建新的Docker映像,甚至可以在Kubernetes上运行。
- 容器注册表: 内置的容器注册表, 用于存储,共享和使用容器映像。
- 受保护的变量: 在部暑期间使用受每个环境保护的变量安全地存储和使用机密。
- 环境:定义多个环境。
2. GitLab CI/CD 组件
- GitLab CI/CD
- GitLab的一部分,GitLab是一个Web应用程序,具有将其状态存储在数据库中的API。
- 除了GitLab的所有功能之外,它还管理项目/构建并提供一个不错的用户界面。
- GitLab Runner
- 是一个处理构建的应用程序。
- 它可以单独部署,并通过API与GitLab CI / CD一起使用。
为了运行测试,至少需要一个 GitLab 实例和一个GitLabRunner。

3. GitLab CI/CD 工作原理
- 将代码托管到Git存储库。
- 在项目根目录创建ci文件
.gitlab-ci.yml,在文件中指定构建,测试和部署脚本。 - GitLab将检测到它并使用名为GitLab Runner的工具运行脚本。
- 脚本被分组为作业,它们共同组成了一个管道。
二. GitLab CI/CD 下载安装
https://docs.gitlab.com/ee/install/
https://blog.csdn.net/summer_fish/article/details/124716205
自己安装gitlab service的话需要好像至少需要四核8G的服务器,可以购买按量计费的云体验一下。
之后我觉得用gitlab.com就可以了,runner也有提供,当然也可以自己安装配置。
这是两个不同的服务,runner相对不需要太大的资源。
三. GitLab Runner
1. GitLab Runner 简介
- GitLab Runner是一个开源项目,用于运行作业并将结果发送回GitLab。
- 与GitLabCI结合使用,GitLabCI是GitLab随附的用于协调作业的开源持续集成服务。
- GitLab Runner是用Go编写的,可以在Linux,macOS和Windows操作系统上运行。
- 容器部署需使用最新Docker版本。GitLab Runner需要最少的Docker vl.13.0。
- GitLab Runner版本应与GitLab版本同步。 (避免版本不一致导致差异化)。
- 可以根据需要配置任意数量的Runner。
2. GitLab Runner 特点
- 作业运行控制:同时执行多个作业。
- 作业运行环境:
- 在本地、使用Docker容器、使用Docker容器并通过SSH执行作业。
- 使用Docker容暴在不同的云和虚拟化管理程序上自动缩放。
- 连接到远程SSH服务器。
- 支持Bash,Windows Batch和Windows PowerShell。
- 允许自定义作业运行环境。
- 自动重新加载配置,无需重启。
- 易于安装,可作为Linux,macOS和Windows的服务。
3. GitLab Runner 类型与状态
- 类型
- shared 共享类型,运行整个平台项目的作业(gitlab)。
- group 项目组类型,运行特定group下的所有项目的作业(group)。
- specific 项目类型,运行指定的项目作业(project)
- 状态
- locked: 锁定状态,无法运行项目作业。
- paused: 暂停状态,暂时不会接受新的作业。
4. GitLab Runner 安装环境
- **系统环境:**可以在Linuk,mac0S,FreeBSD和Windows上安装和使用GitLab Runner。
- **部暑方式:**二进制文件、rpm/deb软件包、Docker、Kubernetes

https://docs.gitlab.com/runner/install/
https://blog.csdn.net/summer_fish/article/details/124716205
5. GitLab Runner 注册
- 注册步骤:
- 获取runner token ->进行注册
- GitLabRunner类型
- shared:运行整个平台项目的作业 (gitlab)
- group:运行特定group下的所有项目的作业(group)
- specific:运行指定的项目作业(project)
- locked:无法运行项目作业locked:
- paused:不会运行作业
执行器功能对比

GitLab Runner Executors - Shell

gitlab-runner register		#默认交互模式下使用,非交互模式添加 --non-interactive
gitlab-runner list			#此命令列出了保存在配置文件中的所有运行程序
gitlab-runner verify		#此命令检查注册的runner是否可以连接,但不验证GitLab服务是否正在使用runner。-delete 删除
gitlab-runner unregister	#该命令使用GitLab取消已注册的runner。

#使用令牌注销
gitlab-runner unregister --url http://gitlab.example.com/ --token tOk3n
#使用名称注销 (同名删除第一个)
qitlab-runner unreqister --name test-runner
#注销所有
gitlab-runner unregister--all-runners

gitlab-runner install --user-gitlab-runner--working-directory=/home/gitlab-runner
# --user指定将用于执行构建的用户
# --working-directory 指定将使用**Shell** executor 运行构建时所有数据将存储在其中的根目录
gitlab-runner uninstall 	#该命令停止运行并从服务中卸数GitLab Runner。
gitlab-runner start			#该命令启动GitLab Runner服务
gitlab-runner stop			#该命令停止GitLab Runner服务
gitlab-runner restart		#该命令将停止,然后启动GitLab Runner服务。
gitlab-runner status 		#此命令显示itLab Runner服务的状态。当服务正在运行时,退出代码为零,而当服务未运行时,退出代码为非零。
# docker 执行器
docker run --rm -v gitlab-runner-config:/etc/gitlab-runner gitlab/gitlab-runner register \
  --non-interactive \
  --executor "docker" \
  --docker-image alpine:latest \
  --url "https://gitlab.com/" \
  --registration-token "glrt-U6ZUDh_qDovp12qXyse6"

 # shell执行器
 docker run --rm -v gitlab-runner-config:/etc/gitlab-runner gitlab/gitlab-runner register \
  --non-interactive \
  --executor "shell" \
  --docker-image alpine:latest \
  --url "https://gitlab.com/" \
  --registration-token "glrt-oEUEBf-krz6YAhG8x_fQ"

 # 执行完有时需要
 docker restart
四. 运行流水线任务

stages:          # List of stages for jobs, and their order of execution
  - build
  - test
  - deploy

build-job:       # This job runs in the build stage, which runs first.
  stage: build
  tags:
    - build
  only:
    - main
  script:
    - echo "Compiling the code..."
    - echo "Compile complete."

unit-test-job:   # This job runs in the test stage.
  stage: test    # It only starts when the job in the build stage completes successfully.
  tags:
    - test
  script:
    - echo "Running unit tests... This will take about 60 seconds."
    - sleep 60
    - echo "Code coverage is 90%"

lint-test-job:   # This job also runs in the test stage.
  stage: test    # It can run at the same time as unit-test-job (in parallel).
  tags:
    - test
  script:
    - echo "Linting code... This will take about 10 seconds."
    - sleep 10
    - echo "No lint issues found."

deploy-job:      # This job runs in the deploy stage.
  stage: deploy  # It only runs when *both* jobs in the test stage complete successfully.
  environment: production
  tags:
    - build
  only:
    - main
  script:
    - echo "Deploying application..."
    - echo "Application successfully deployed."

流水线语法检测
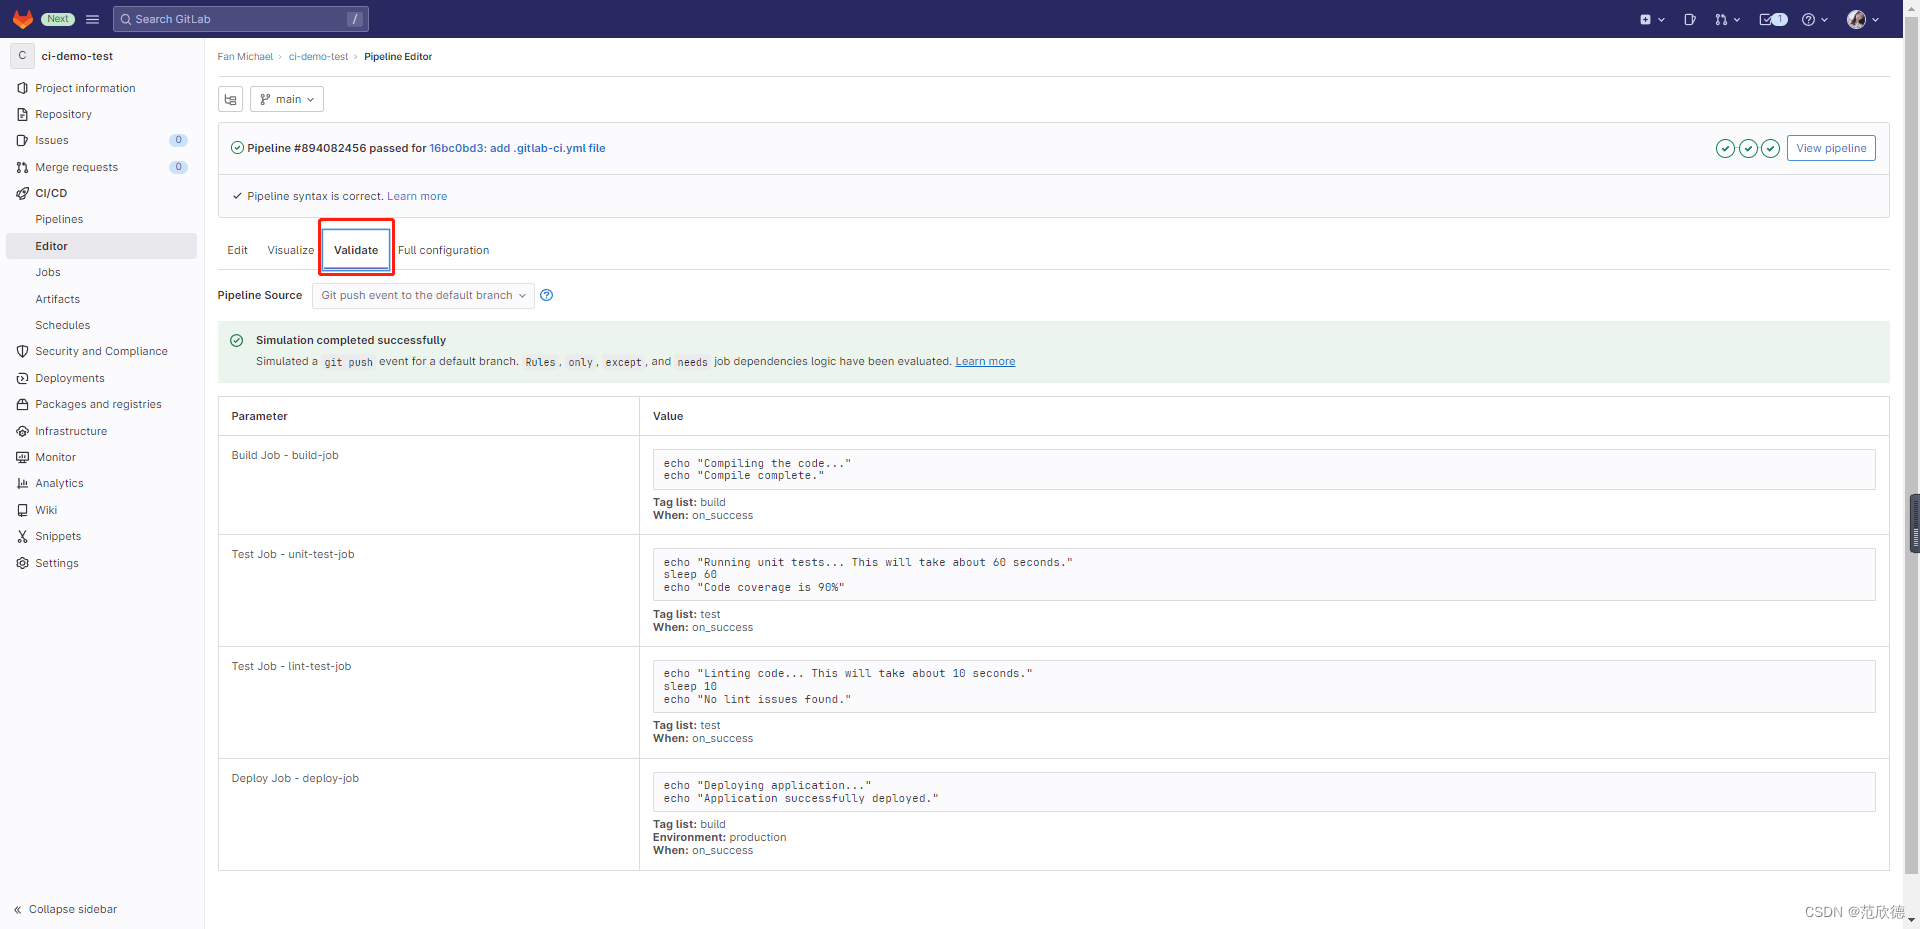
五. Pipeline 语法
1. job/script/before_script/after_script/stages/stage/variables
job
在每个项目中,使用名为gitlab-ci.yml的YAML文件配置GitLab CI / CD 管道。在文件中可以定义一个或多个作业(job)。每个作业必须具有唯一的名称(不能使用关键字),每个作业是独立行的。作业定了在约束条件下进行相关操作,每个作业至少要包含一个script。
job1:
	script: "execute-seript-for-job1"
job2:
	script: "execute-script-for-job2"
这里在pipeline中定义了两个作业,每个作业运行不通的命令。命令可以是shell或脚本。
script
每个作业至少要包含一个script。
job:
  script:
    - uname -a
    - bundle exec rspec
**注意:**有时, script 命令将需要用单引号或双引号引起来.例如,包含冒号命令(:)需要加引号,以便被包裹的YAML解析器知道来解释整个事情作为一个字符串,而不是一个"键: 值”对.使用特殊字符时要小心:,?,[,], *, !,}等。
before_script
用于定义一个命令,该命令在每个作业之前运行。必须是一个数组。指定的script与主脚本中指定的任何脚本串联在一起,并在单个shell中一起执行。
before_script失败导致整个作业失败,其他作业将不再执行。作业失败不会影响after_script运行。

after_script
用于定义将在每个作业(包括失败的作业) 之后运行的命令。
这必须是一个数组。
指定的脚本在新的shel1中执行,与任何before_script或script脚本分开。
after_script失败不会影响作业失败

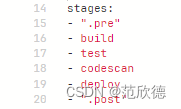
stages
用于定义作业可以使用的阶段,并且是全局淀义的。
同一阶段的作业并行运行,不同阶段按顺序执行。
stages:
  - build
  - test
  - codescan
  - deploy

.pre & .post
.pre终是整个管道的第一个运行阶段,.post始终是个管道的最后一个运行阶段。 用户定义的阶段都在两者之间运行。.pre和.post的顺序无法更改。如果管道仅包含.pre或.post阶段的作业,则不会创建管道。
stage
是按JOB定义的,并且依赖于全局定义的stages 。它允许将作业分为不同的阶段,并且同一stage作业可以并行执行 (取决于特定条件)。

variables
定义变量,pipeline变量、job变量。job变量优先级最大。

综合案例
before_script:
- echo "before-stript!!"
variables:
DOMAIN: example.com
workflow:
rules:
- if: "$DOMAIN == 'example.com'"
when: always
- when: never
cache:
paths:
- target/
stages:
- build
- test
- codescan
- deploy
build:
before_script:
- echo "before-script in job"
stage: build
script:
- echo "mvn clean "
- echo "mvn install"
- echo "$DOMAIN"
- id
# - cat target/text.txt
# - ls target
after_script:
- echo "after script in buildjob"
# cache:
# policy: push # only upload a cache
# rules:
# - exists:
# - Dockerfile
# when: on_success
# allow_failure: true
# - changes:
# - Dockerfile
# when: manual
# - when: on_failure
unittest:
stage: test
script:
- echo "run test"
- mkdir target
- echo "run test" >> target/test.txt
- ls target
# when: delayed
# start_in: '5'
allow_failure: true
retry:
max: 1
when: script_failure
timeout: 1 hours 10 minutes
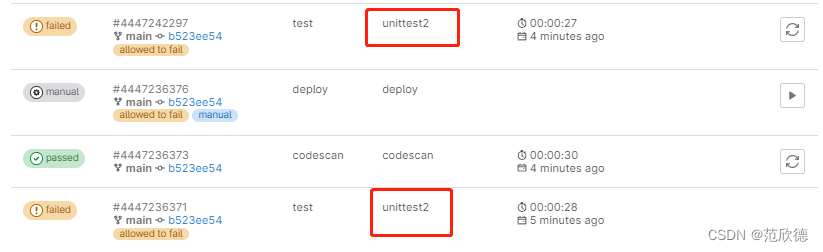
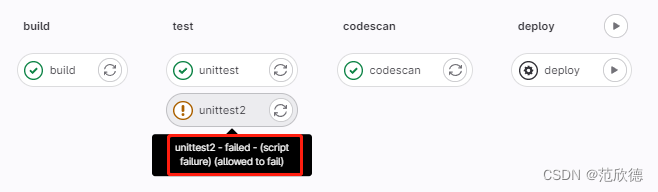
unittest2:
stage: test
script:
- echo "run test"
- mkdir target
- echo "run test" >> target/test.txt
- ls target
# when: delayed
# start_in: '5'
allow_failure: true
retry:
max: 1
when: script_failure
timeout: 1 hours 10 minutes
deploy:
stage: deploy
script:
- echo "hello deploy"
- sleep 2;
# - ls target
when: manual
only:
- main
except:
- develop
codescan:
stage: codescan
script:
- echo "codescan"
- sleep 5;
# parallel: 5
rules:
- if: '$DOMAIN == "sdfexample.com"'
when: manual
- if: '$DOMAIN == "ssexample.com"'
when: delayed
start_in: '5'
- when: on_failure
after_script:
- echo "after-stript!!"
2. tags/allow_failure/when/retry/timeout/parallel
tags-指定runner
用于从允许运行该项目的所有Runner列表中选择特定的Runner,在Runner注册期间,您可以指定Runner的标签。
allow_failure-允许失败
allow_failure允许作业失败,默认值为false 。启用后,如果作业失败,该作业将在用户界面中显示色警告.但是,管道的逻辑流程将认为作业成功/通过,并且不会被阻塞。 假设所有其他作业均成功,则该作业的阶段及其管道将显示相同的橙色警告。但是,关联的提交将被标记为"通过”,而不会发出警告。
when-控制作业运行
- on_success 前面阶段中的所有作业都成功时才执行作业,默认值。
- on_failure 当前面阶段出现失败时执行
- always 总是执行作业。
- manual 手动执行作业。
- delayed 延迟执行作业。


retry-重试
- 配置在失败的情况下重试作业的次数。
- 当作业失败并配置了retry ,将再次处理该作业,直到达到retry关键字指定的次数。
- 如果retry设置为2,并且作业在第二次运行成功(第一次重试),则不会再次重试retry值必须是一个正整数i等于或大于0,但小于或等于2《最多两次重试,总共运行3次)。
retry-重试-精确匹配错误
默认情况下,在失败情况下重试作业。max :最大重试次数 when :重试失败的错误类型
always :在发生任何故障时重试(默认)
unknown_failure :当失败原因未知时。
script_failure :脚本失败时重试。
api_failure:API失败重试。
stuck_or_timeout_failure :作业卡住或超时时
runner_system_failure :运行系统发生故障。
missing_dependency_failure: 如果依赖丢失
runner_unsupported : Runner不受支持。
stale_schedule :无法执行延迟的作业。
job_execution_timeout :脚本超出了为作业设置的最大执行时间。
archived failure:作业已存档且无法运行。
unmet_prerequisites :作业未能完成先决条件任务。
scheduler_failure :调度程序未能将作业分配给运行scheduler_failure。
data_integrity_failure:检测到结构完整性问题。
定义当出现脚本错误重试两次,也就是会运行三次。
unittest2:
  stage: test
  script:
    - echo "run test"
    - mkdir target
    - echo "run test" >> target/test.txt
    - ls targets
  #  when: delayed
#  start_in: '5'
  allow_failure: true
  retry:
    max: 1
    when: script_failure
timeout-超时
作业级别的超时可以超过项目级别超时,但不能超过Runner特定的超时。
unittest2:
  stage: test
  timeout: 1 hours 10 minutes
timeout-超时-runner超
如果小于项目定义超时时间将具有优先权。此功能可用于通过设置大超时(例如一个星期)来防止SharedRunner被项目占用。未配置时,Runner将不会覆盖项目超时。

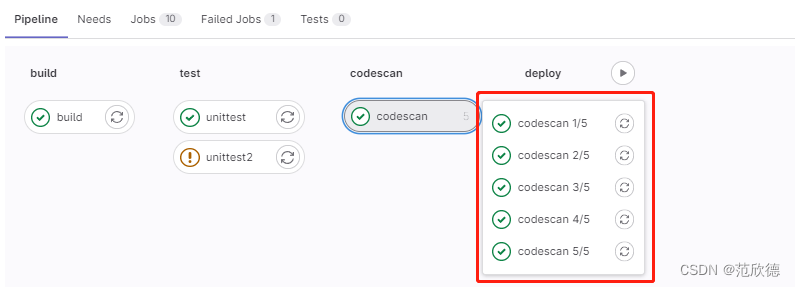
parallel-并行作业
- 配置要并行运行的作业实例数,此值必须大于或等于2并且小于或等于50。
- 这将创建N个并行运行的同一作业实例。它们从job_name 1/N到job_name N/N依次命名。
codescan:
  stage: codescan
  script:
    - echo "codescan"
    - sleep 5;
  parallel: 5
3. only/except/rules/workflow
only&ecxept-限制分支标签
- only和except用分支策略来限制jobs构建:
- only定义哪些分支和标签的git项目将会被job执行。
- except定义哪些分支和标签的git项目将不会被job执行。
job1:
  script: echo
  only:
    - main
    - /^issue-.*$/
    - merge_requests

job2:
  script: echo
  except:
    - main
    - /^stable-branch.*$/
    - schedules
rules-构建规则
https://docs.gitlab.com/ee/ci/yaml/#rules
- rules replaces only/except and they can’t be used together in the same job.
- rules允许按顺序评估单个规则,直到匹配并为作业动态提供属性。
- rules不能与only/except组合使用。
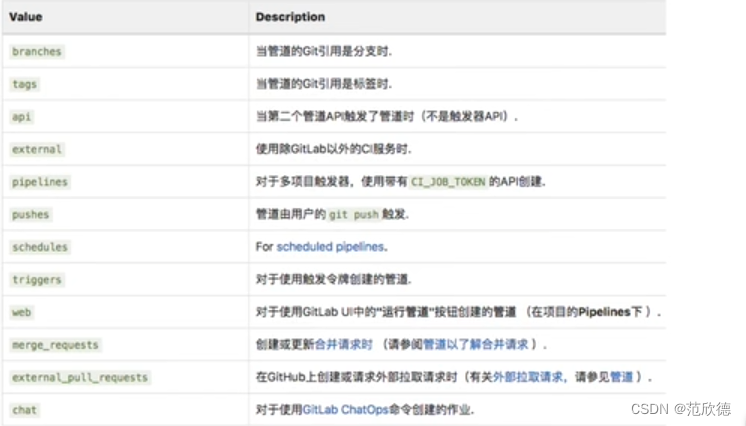
可用的规则:
- if (如果条件匹配)
- changes (指定文件发生变化)
- exists (指定文件存在)
- allow_failure
- variables
- when
Use rules:if clauses to specify when to add a job to a pipeline:

If an if statement is true, add the job to the pipeline.
If an if statement is true, but it’s combined with when: never, do not add the job to the pipeline.
If no if statements are true, do not add the job to the pipeline.
rules-if-条件匹配
- 如果DOMAIN的值匹配,则需要手动运行。
- 不匹配on_success。
- 条件判断从上到下,匹配即停止。
- 多条件匹配可以使用&& ||。
build-dev:
  stage: build
  rules:
    - if: $CI_COMMIT_BRANCH != $CI_DEFAULT_BRANCH
  script: echo "Feature branch, so building dev version..."

build-prod:
  stage: build
  rules:
    - if: $CI_COMMIT_BRANCH == $CI_DEFAULT_BRANCH
  script: echo "Default branch, so building prod version..."

specs:
  stage: test
  needs: ['build-dev']
  rules:
    - if: $CI_COMMIT_REF_NAME == $CI_DEFAULT_BRANCH
      needs: ['build-prod']
    - when: on_success # Run the job in other cases
  script: echo "Running dev specs by default, or prod specs when default branch..."
job:
  variables:
    DEPLOY_VARIABLE: "default-deploy"
  rules:
    - if: $CI_COMMIT_REF_NAME == $CI_DEFAULT_BRANCH
      variables:                              # Override DEPLOY_VARIABLE defined
        DEPLOY_VARIABLE: "deploy-production"  # at the job level.
    - if: $CI_COMMIT_REF_NAME =~ /feature/
      variables:
        IS_A_FEATURE: "true"                  # Define a new variable.
  script:
    - echo "Run script with $DEPLOY_VARIABLE as an argument"
    - echo "Run another script if $IS_A_FEATURE exists"
rules-changes-文件变化
- 接受文件路经数组。
- 如果提交中Jnkinsfile文件发生的变化则为true。
- rules:changes:paths
- rules:changes:compare_to
docker build:
  script: docker build -t my-image:$CI_COMMIT_REF_SLUG .
  rules:
    - if: $CI_PIPELINE_SOURCE == "merge_request_event"
      changes:
        - Dockerfile
      when: manual
      allow_failure: true
"""
If the pipeline is a merge request pipeline, check Dockerfile for changes.
If Dockerfile has changed, add the job to the pipeline as a manual job, and the pipeline continues running even if the job is not triggered (allow_failure: true).
A maximum of 50 patterns or file paths can be defined per rules:changes section.
If Dockerfile has not changed, do not add job to any pipeline (same as when: never).
rules:changes:paths is the same as rules:changes without any subkeys.
"""
docker build:
  script: docker build -t my-image:$CI_COMMIT_REF_SLUG .
  rules:
    - if: $CI_PIPELINE_SOURCE == "merge_request_event"
      changes:
        paths:
          - Dockerfile
        compare_to: 'refs/heads/branch1'
# In this example, the docker build job is only included when the Dockerfile has changed relative to refs/heads/branch1 and the pipeline source is a merge request event.
rules-exists-文件存在
- 接受文件路径数组。
- 当仓岸存存在指定的文件时操作。
job:
  script: docker build -t my-image:$CI_COMMIT_REF_SLUG .
  rules:
    - exists:
        - Dockerfile
rules-allow_failure
- 使用allow_failure: true
- rules:在不停止管道本身的情况下允许作业失败或手动作业等待操作
job:
  script: echo "Hello, Rules!"
  rules:
    - if: $CI_MERGE_REQUEST_TARGET_BRANCH_NAME == $CI_DEFAULT_BRANCH
      when: manual
      allow_failure: true
# If the rule matches, then the job is a manual job with allow_failure: true.

# The rule-level rules:allow_failure overrides the job-level allow_failure, and only applies when the specific rule triggers the job.
rules:needs
build-dev:
  stage: build
  rules:
    - if: $CI_COMMIT_BRANCH != $CI_DEFAULT_BRANCH
  script: echo "Feature branch, so building dev version..."

build-prod:
  stage: build
  rules:
    - if: $CI_COMMIT_BRANCH == $CI_DEFAULT_BRANCH
  script: echo "Default branch, so building prod version..."

specs:
  stage: test
  needs: ['build-dev']
  rules:
    - if: $CI_COMMIT_REF_NAME == $CI_DEFAULT_BRANCH
      needs: ['build-prod']
    - when: on_success # Run the job in other cases
  script: echo "Running dev specs by default, or prod specs when default branch..."
In this example:
- If the pipeline runs on a branch that is not the default branch, the specs job needs the build-dev job (default behavior).
- If the pipeline runs on the default branch, and therefore the rule matches the condition, the specs job needs the build-prod job instead.
rules:variables
job:
  variables:
    DEPLOY_VARIABLE: "default-deploy"
  rules:
    - if: $CI_COMMIT_REF_NAME == $CI_DEFAULT_BRANCH
      variables:                              # Override DEPLOY_VARIABLE defined
        DEPLOY_VARIABLE: "deploy-production"  # at the job level.
    - if: $CI_COMMIT_REF_NAME =~ /feature/
      variables:
        IS_A_FEATURE: "true"                  # Define a new variable.
  script:
    - echo "Run script with $DEPLOY_VARIABLE as an argument"
    - echo "Run another script if $IS_A_FEATURE exists"
workflow-rules-管道创建
- 顶级workflow关键字适用于整个管道,并将确定是否创建管道。
- when:可以设置为always或never, 如果未提供,则默认值always。
workflow:
  rules:
    - if: $CI_COMMIT_TITLE =~ /-draft$/
      when: never
    - if: $CI_PIPELINE_SOURCE == "merge_request_event"
    - if: $CI_COMMIT_BRANCH == $CI_DEFAULT_BRANCH
In this example, pipelines run if the commit title (first line of the commit message) does not end with -draft and the pipeline is for either:
- A merge request
- The default branch.
4. cache/artifacts/dependencies
cache-缓存
- 存储编译项目所需的运行时依赖项,指定项目工作空间中需要在 job之间缓存的文件或目录。
- 全局cache定义在job之外,针对所有job生效。job中cache优先于全局。

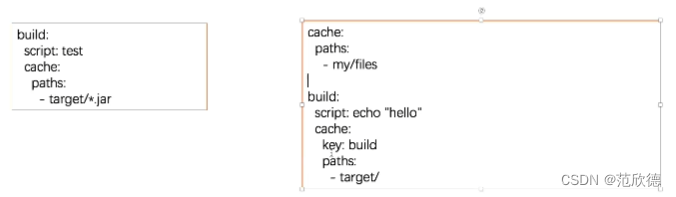
cache:paths
- 在job build中定义缓存,将会缓存target目录下的所有.jar文件。
- 当在全局定义了cache:paths会被job中覆盖。以下实例将缓存target目录。

- 由于缓存是在job之间共享的,如果不同的job使用不同的路径就出现了缓存覆盖的问题。
- 如何让不同的job缓存不同的cache呢? 设置不同的cache: key。
- 如何让不同的job缓存不同的cache呢? 设置不同的cache: key。
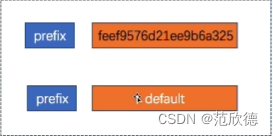
cache: key-缓存标记
- 为缓存做个标记,可以配置job、分支为key来实现分支、作业特定的缓存。
- 为不同 job 定义了不同的 cache:key 时, 会为每 job 分配一个独的 cache。
- cache: key变量可以使用任何预定义变量,默认default。
- 从GitLab 9.0开始,默认情况下所有内容都在管递和作业之间共享。
Possible inputs:
- A string.
- A predefined CI/CD variable.
- A combination of both.
# 按照分支设置缓存
cache-job:
  script:
    - echo "This job uses a cache."
  cache:
    key: binaries-cache-$CI_COMMIT_REF_SLUG
    paths:
      - binaries/
cache: key:files-文件变化自动创建缓存
files: 文件发生变化自动重新生成缓存(files最多指定两个文件),提交的时候检查定的文件根据指定的文件生成密钊计算SHA校验和,如果文件未改变值为default。
cache-job:
  script:
    - echo "This job uses a cache."
  cache:
    key:
      files:
        - Gemfile.lock
        - package.json
    paths:
      - vendor/ruby
      - node_modules
cache: key: prefix-组合生成SHA校验和
prefix:允许给定prefix的值与指定文件生成的密钥组合。
在这里定义了全局的cache如果文件发生变化则值为 rspec-xxxl11111111222222,未发化为rspec-default。
rspec:
  script:
    - echo "This rspec job uses a cache."
  cache:
    key:
      files:
        - Gemfile.lock
      prefix: $CI_JOB_NAME
    paths:
      - vendor/ruby
cache: policy-缓存策略
默认:在执行开始时下载文件,并在结束时重新上传文件
policy: pull 只执行下载步骤 ,policy: push 只执行上传步骤。
To set a job to only download the cache when the job starts, but never upload changes when the job finishes, use cache:policy:pull.
To set a job to only upload a cache when the job finishes, but never download the cache when the job starts, use cache:policy:push.
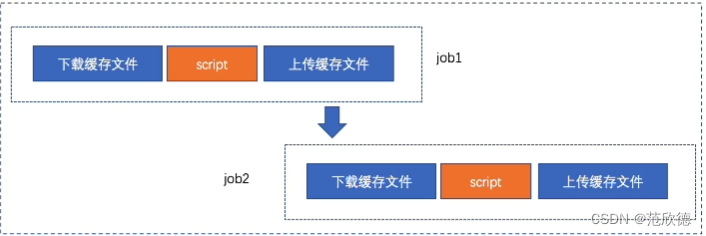
# 示例
prepare-dependencies-job:
  stage: build
  cache:
    key: gems
    paths:
      - vendor/bundle
    policy: push
  script:
    - echo "This job only downloads dependencies and builds the cache."
    - echo "Downloading dependencies..."

faster-test-job:
  stage: test
  cache:
    key: gems
    paths:
      - vendor/bundle
    policy: pull
  script:
    - echo "This job script uses the cache, but does not update it."
    - echo "Running tests..."
使用变量来控制作业的缓存策略
conditional-policy:
  rules:
    - if: $CI_COMMIT_BRANCH == $CI_DEFAULT_BRANCH
      variables:
        POLICY: pull-push
    - if: $CI_COMMIT_BRANCH != $CI_DEFAULT_BRANCH
      variables:
        POLICY: pull
  stage: build
  cache:
    key: gems
    policy: $POLICY
    paths:
      - vendor/bundle
  script:
    - echo "This job pulls and pushes the cache depending on the branch"
    - echo "Downloading dependencies..."
In this example, the job’s cache policy is:
pull-pushfor changes to the default branch.pullfor changes to other branches.
继承全局配置,但覆盖每个作业的特定设置
You can override cache settings without overwriting the global cache by using anchors. For example, if you want to override the policy for one job:
default:
  cache: &global_cache
    key: $CI_COMMIT_REF_SLUG
    paths:
      - node_modules/
      - public/
      - vendor/
    policy: pull-push

job:
  cache:
    # inherit all global cache settings
    <<: *global_cache
    # override the policy
    policy: pull
5. artifacts/dependencies
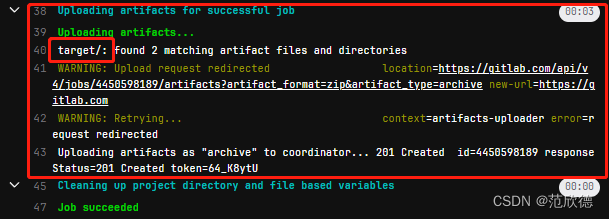
artifacts-制品
用于指定在作业成功或者失败时应附加到作业的文件或目录的列表。作业完成后工件将被发送到GitLab,并可在GitLab UI中下载。
job:
  artifacts:
    paths:
      - target/
artifacts:expose_as-MR展示制品
关键字expose_as可用于在合并请求 UI中公开作业工件
Use the artifacts:expose_as keyword to expose job artifacts in the merge request UI.
每个合并请求最多可以公开10个作业工件。
build:
  script:
    - id
  artifacts:
    expose_as: "artifact 1"
    paths:
      - target/test.txt
artifacts:name-制品名称
通过name指令定义所创建的工件存档的名称。可以为每个档案使用唯一的名称
artifacts:name默认名称是artifacts,下载artifacts改为artifacts.zip。

build:
  script:
    - ls target
  artifacts:
    name: "$CI_COMMIT_REF_NAME"
    paths:
      - target/
artifacts:when-制品创建条件
用于在作业失败时或成功而上传工件。
- on_success仅在作业成功时上载工件 默认值
- on_failure仅在作业失败时上载工件。
- always 上载工件,无论作业状态如何。
artifacts:expire in-制品保留时间
制品的有效期,从上传和存储到GitLab的时间开始算起。如果未定义过期时间,则默认为30天
expire_in的值以秒为单位的经过时间,除非提供了单位。
‘42’
42 seconds
3 mins 4 sec
2 hrs 20 min
2h20min
6 mos 1 day
47 yrs 6 mos and 4d
3 weeks and 2 days
never
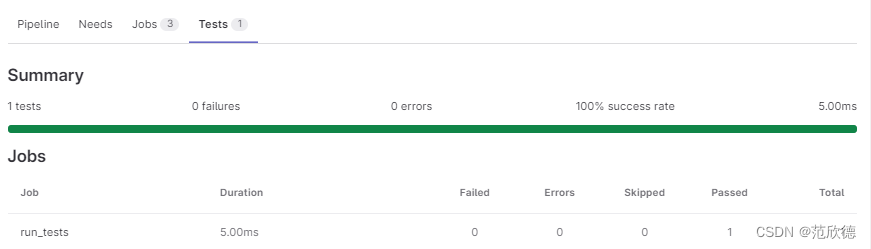
artifacts:reports: junit-单元测试报告
收集junit单元测试报告,收集的JUnit报告将作为工件上传到Gitlab,并将自动显示在合并请求中。
## Use https://github.com/sj26/rspec_junit_formatter to generate a JUnit report format XML file with rspec
ruby:
  stage: test
  script:
    - bundle install
    - bundle exec rspec --format progress --format RspecJunitFormatter --out rspec.xml
  artifacts:
    when: always
    paths:
      - rspec.xml
    reports:
      junit: rspec.xml
# python
run_tests:
    stage: test
    image: python:3.10.8-slim-buster
    before_script:
        - pip install -r requirements.txt
    script:
        - python -m pytest
        - pytest --junitxml=report.xml
    artifacts:
        when: always
        reports:
            junit: report.xml
artifacts:reports:cobertura-覆盖率
https://docs.gitlab.com/ee/ci/testing/test_coverage_visualization.html#python-example
# The following .gitlab-ci.yml example uses pytest-cov to collect test coverage data:
run tests:
  stage: test
  image: python:3
  script:
    - pip install pytest pytest-cov
    - pytest --cov --cov-report term --cov-report xml:coverage.xml
  coverage: '/(?i)total.*? (100(?:\.0+)?\%|[1-9]?\d(?:\.\d+)?\%)$/'
  artifacts:
    reports:
      coverage_report:
        coverage_format: cobertura
        path: coverage.xml
dependencies-获取制品
定义要获取工件的作业列表,只能从当前阶段之前执行的阶段定义作业。定义一个空数组将跳过下载该作业的任何工件不会考虑先前作业的决态,因此,如果它失败或是未运行的手动作业,则不会发生错误。如果设置为依赖项的作业的工件已过期或删除,那么依赖项作业将失败。
build osx:
  stage: build
  script: echo "make build:osx"
  artifacts:
    paths:
      - binaries/

build linux:
  stage: build
  script: echo "make build:linux"
  artifacts:
    paths:
      - binaries/

test osx:
  stage: test
  script: echo "make test:osx"
  dependencies:
    - build osx

test linux:
  stage: test
  script: echo "make test:linux"
  dependencies:
    - build linux

deploy:
  stage: deploy
  script: echo "make deploy"
  environment: production
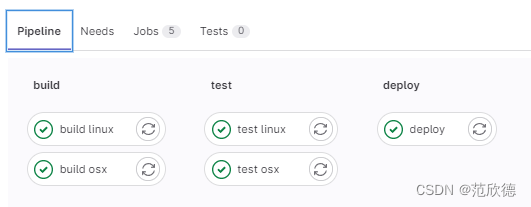

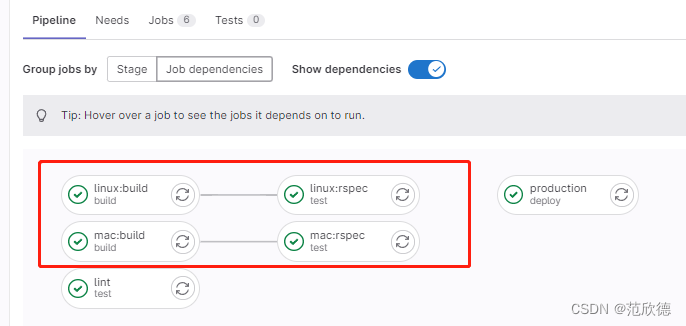
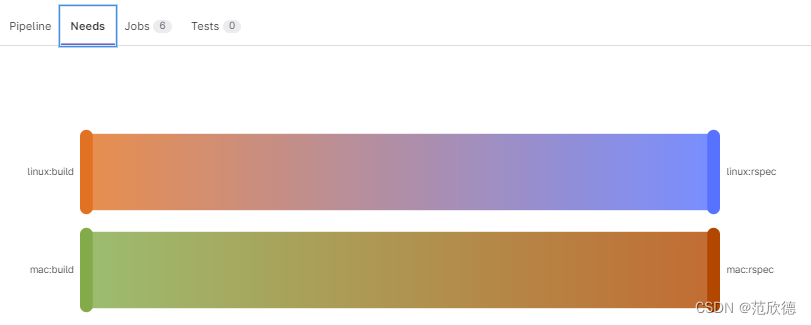
6. needs/include/extends/trigger
needs-阶段并行
可无序执行作业,无需按照阶段顺序运行某些作业,可以让多个阶段同时运行。
如果needs:设置为指向因only/except规则而未实例化的作业,或者不存在,则创建管道时会出现YAML错误。
linux:build:
  stage: build
  script: echo "Building linux..."

mac:build:
  stage: build
  script: echo "Building mac..."

lint:
  stage: test
  needs: []
  script: echo "Linting..."

linux:rspec:
  stage: test
  needs: ["linux:build"]
  script: echo "Running rspec on linux..."

mac:rspec:
  stage: test
  needs: ["mac:build"]
  script: echo "Running rspec on mac..."

production:
  stage: deploy
  script: echo "Running production..."
  environment: production
needs-制品下载
在使用needs,可通过artifacts:true或artifacts: false来控制工件下载。默认指定为true。
test-job1:
  stage: test
  needs:
    - job: build_job1
      artifacts: true

test-job2:
  stage: test
  needs:
    - job: build_job2
      artifacts: false

test-job3:
  needs:
    - job: build_job1
      artifacts: true
    - job: build_job2
    - build_job3
In this example:
- The test-job1 job downloads the build_job1 artifacts
- The test-job2 job does not download the build_job2 artifacts.
- The test-job3 job downloads the artifacts from all three build_jobs, because artifacts is true, or defaults to true, for all three needed jobs.
needs-阶段并行
可无序执行作业,无需按照阶段顺序运行某些作业,可以让多个阶段同时运行。
如果needs:设置为指向only/except规则而未实例化的作业,或者不存在,则创建管道时会出现YAML错误。
include:
可以允许引入外部YAML文件,文件具有扩展名yml或yaml。
使用合并功能可以自定义和覆盖包含本地定义的CI / CD配置。
引入同一存储库中的文件,使用相对于根目录的完整路径进行引用,与配爱文件在同一-分支上使用。
include:local-引入本地配置
# Example of include:local:
include:
  - local: '/templates/.gitlab-ci-template.yml'
# You can also use shorter syntax to define the path:
include: '.gitlab-ci-production.yml'
include:project-引入其他项目配置
# Example of include:project:
include:
  - project: 'my-group/my-project'
    file: '/templates/.gitlab-ci-template.yml'
  - project: 'my-group/my-subgroup/my-project-2'
    file:
      - '/templates/.builds.yml'
      - '/templates/.tests.yml'
# You can also specify a ref:
include:
  - project: 'my-group/my-project'
    ref: main                                      # Git branch
    file: '/templates/.gitlab-ci-template.yml'
  - project: 'my-group/my-project'
    ref: v1.0.0                                    # Git Tag
    file: '/templates/.gitlab-ci-template.yml'
  - project: 'my-group/my-project'
    ref: 787123b47f14b552955ca2786bc9542ae66fee5b  # Git SHA
    file: '/templates/.gitlab-ci-template.yml'
include:remote-引入远程项目配置
include:
  - remote: 'https://gitlab.com/example-project/-/raw/main/.gitlab-ci.yml'
include:template-引入模板项目配置
# File sourced from the GitLab template collection
include:
  - template: Auto-DevOps.gitlab-ci.yml
# Multiple include:template files:
include:
  - template: Android-Fastlane.gitlab-ci.yml
  - template: Auto-DevOps.gitlab-ci.yml
extends-继承作业配置
Use extends to reuse configuration sections. It’s an alternative to YAML anchors and is a little more flexible and readable.
# Example of extends:
.tests:
  script: rake test
  stage: test
  only:
    refs:
      - branches

rspec:
  extends: .tests
  script: rake rspec
  only:
    variables:
      - $RSPEC
In this example, the rspec job uses the configuration from the .tests template job. When creating the pipeline, GitLab:
- Performs a reverse deep merge based on the keys.
- Merges the .tests content with the rspec job.
- Doesn’t merge the values of the keys.
# The result is this rspec job:
rspec:
  script: rake rspec
  stage: test
  only:
    refs:
      - branches
    variables:
      - $RSPEC
Additional details:
In GitLab 12.0 and later, you can use multiple parents for extends.
The extends keyword supports up to eleven levels of inheritance, but you should avoid using more than three levels.
In the example above, .tests is a hidden job, but you can extend configuration from regular jobs as well.
extends&include
这将运行名为 newbuildjob 的作业,该作业运行echo “123” 如template作业中所定义,并使用本地作业中所定义的alpine Docker镜像
# localci.yml
.template:
  stage: build
  script:
    - echo "123"
include:
  local: 'ci/localci.yml'

newbuildjob:
  image: alpine
  extends: .template
trigger
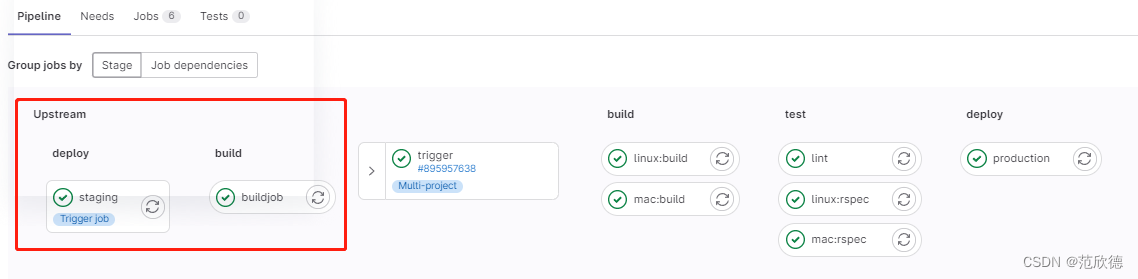
- 当GitLab从trigger定义创建的作业启动时,将创建一个下游管道。
- 允许创建多项目管道和子管道。
- 将trigger与when:manual–起使用会导致错误。
- 多项目管道: 跨多个项目设置流水线,以便一个项目中的管道可以触发另一个项目中的管道。[微服务架构]
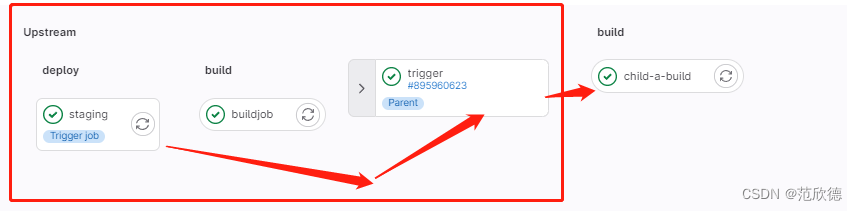
- 父子管道:在同一项目中管道可以触发一组同时运行的子管道,子管道仍然按照阶段顺序执行其每个作业,但是可以自由地继续执行各个阶段,而不必等待父管道中无关的作业完成。
多任务管道
当前面阶段运行完成后,触发 fanxinde/test 项目 main 流水线。创建上游管道的用户需要具有对下游项目的访问权限。如果发现下游项目用户没有访问权限以在其中创建管道,则 staging 作业将被标记为失败。
staging:
  variables:
    ENVIRONMENT: staging
  stage: deploy
  trigger:
    project: fanxinde/test
    branch: main
    strategy: depend
project 关键字,用于指定下游项目的完整路径。该 branch 关键字指定由指定的项目分支的名称。使用 variables 关键字将变量传递到下游管道。全局变量也会传递给下游项目。上游管道优先于下游管道。如果在上游和下游项目中定义了两个具有相同名称的变量,则在上游项目中定义的变量将优先。默认情况下,一旦创建下游管道, trigger 作业就会以 success 状态完成。 strategy: depend 将自身状态从触发的管道合并到源网桥作业
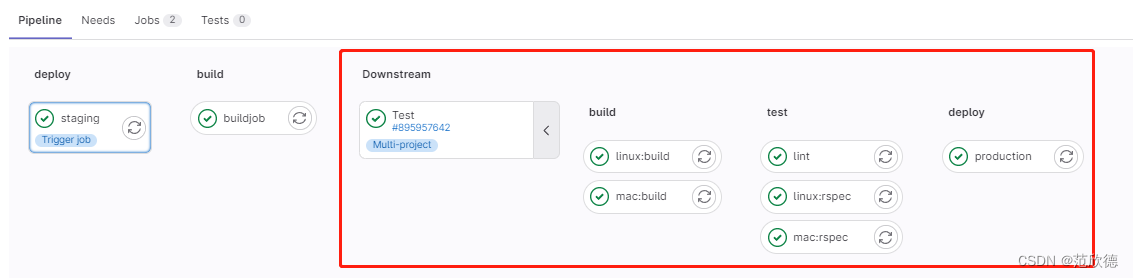
在下游中管道信息
父子管道
创建子管道 ci/child01.yml
stages:
  - build

child-a-build:
  stage: build
  script:
    - echo "hello3a"
    - sleep 10
在父管道触发子管道
stages:
  - deploy
  - build

buildjob:
  stage: build
  script:
    - echo "hellobuild"

staging:
  variables:
    ENVIRONMENT: staging
  stage: deploy
  trigger:
    include: 'ci/child01.yml'
    strategy: depend
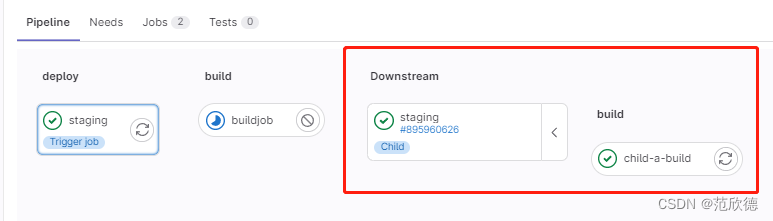
在下游中管道信息
7. image/services/environment/inherit
https://docs.gitlab.com/ee/ci/docker/using_docker_images.html
image
默认在注册runner的时候需要填写一个基础的镜像,请记住一点只要使用执行器为docker类型的runner所有的操作运行都会在容器中运行。如果全局指定了images则所有作业使用此image创建容器并在其中运行。全局未指定image,再次查看job中是否有指定,如果有此job按照指定镜像创建容器并运行,没有则使用注册runner时指定的默认镜像。
job1:
  script: echo "A single pull policy."
  image:
    name: ruby:3.0
    pull_policy: if-not-present

job2:
  script: echo "Multiple pull policies."
  image:
    name: ruby:3.0
    pull_policy: [always, if-not-present]
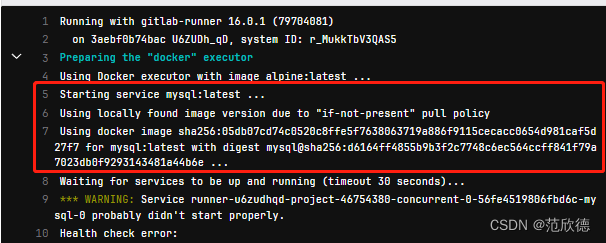
services
工作期间运行的另一个Docker映像,并link到Lmage 关键字定义的Docker映像。这样,您就可以在构建期间访问服务镜像。
服务镜像可以运行任何应用程序,但是最常见的用例是运行数据库容器,例如 mysql 。与每次安装项目时都安装 mysql相比,使用现有镜像并将其作为附加容器运行更容易,更快捷。
# The following variables are automatically passed down to the Postgres container
# as well as the Ruby container and available within each.
variables:
  HTTPS_PROXY: "https://10.1.1.1:8090"
  HTTP_PROXY: "https://10.1.1.1:8090"
  POSTGRES_DB: "my_custom_db"
  POSTGRES_USER: "postgres"
  POSTGRES_PASSWORD: "example"
  PGDATA: "/var/lib/postgresql/data"
  POSTGRES_INITDB_ARGS: "--encoding=UTF8 --data-checksums"

services:
  - name: postgres:11.7
    alias: db
    entrypoint: ["docker-entrypoint.sh"]
    command: ["postgres"]

image:
  name: ruby:2.6
  entrypoint: ["/bin/bash"]

before_script:
  - bundle install

test:
  script:
    - bundle exec rake spec
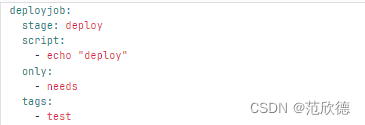
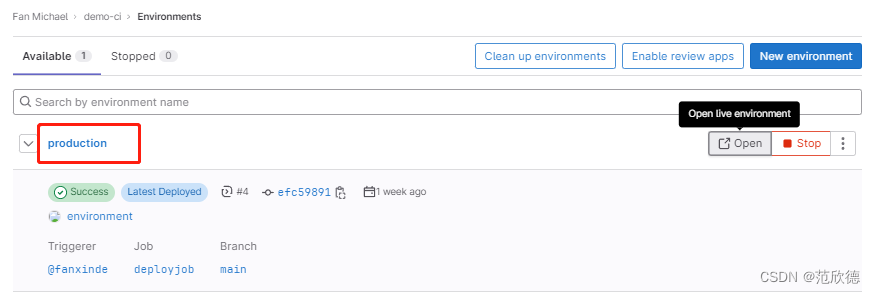
environment
Use environment to define the environment that a job deploys to.
deployjob:
  stage: deploy
  tags:
    - test
  script:
    - echo "deploy"
  environment:
    name: production
    url: https://www.baidu.com
inherit
使用或禁用全局定义的环境变量 (variables)或默认值(default)。默认都是true 。
default:
  retry: 2
  image: ruby:3.0
  interruptible: true

job1:
  script: echo "This job does not inherit any default keywords."
  inherit:
    default: false

job2:
  script: echo "This job inherits only the two listed default keywords. It does not inherit 'interruptible'."
  inherit:
    default:
      - retry
      - image
# You can also list default keywords to inherit on one line: default: [keyword1, keyword2]
variables:
  VARIABLE1: "This is variable 1"
  VARIABLE2: "This is variable 2"
  VARIABLE3: "This is variable 3"

job1:
  script: echo "This job does not inherit any global variables."
  inherit:
    variables: false

job2:
  script: echo "This job inherits only the two listed global variables. It does not inherit 'VARIABLE3'."
  inherit:
    variables:
      - VARIABLE1
      - VARIABLE2
# You can also list global variables to inherit on one line: variables: [VARIABLE1, VARIABLE2]
智能推荐
分布式光纤传感器的全球与中国市场2022-2028年:技术、参与者、趋势、市场规模及占有率研究报告_预计2026年中国分布式传感器市场规模有多大-程序员宅基地
文章浏览阅读3.2k次。本文研究全球与中国市场分布式光纤传感器的发展现状及未来发展趋势,分别从生产和消费的角度分析分布式光纤传感器的主要生产地区、主要消费地区以及主要的生产商。重点分析全球与中国市场的主要厂商产品特点、产品规格、不同规格产品的价格、产量、产值及全球和中国市场主要生产商的市场份额。主要生产商包括:FISO TechnologiesBrugg KabelSensor HighwayOmnisensAFL GlobalQinetiQ GroupLockheed MartinOSENSA Innovati_预计2026年中国分布式传感器市场规模有多大
07_08 常用组合逻辑电路结构——为IC设计的延时估计铺垫_基4布斯算法代码-程序员宅基地
文章浏览阅读1.1k次,点赞2次,收藏12次。常用组合逻辑电路结构——为IC设计的延时估计铺垫学习目的:估计模块间的delay,确保写的代码的timing 综合能给到多少HZ,以满足需求!_基4布斯算法代码
OpenAI Manager助手(基于SpringBoot和Vue)_chatgpt网页版-程序员宅基地
文章浏览阅读3.3k次,点赞3次,收藏5次。OpenAI Manager助手(基于SpringBoot和Vue)_chatgpt网页版
关于美国计算机奥赛USACO,你想知道的都在这_usaco可以多次提交吗-程序员宅基地
文章浏览阅读2.2k次。USACO自1992年举办,到目前为止已经举办了27届,目的是为了帮助美国信息学国家队选拔IOI的队员,目前逐渐发展为全球热门的线上赛事,成为美国大学申请条件下,含金量相当高的官方竞赛。USACO的比赛成绩可以助力计算机专业留学,越来越多的学生进入了康奈尔,麻省理工,普林斯顿,哈佛和耶鲁等大学,这些同学的共同点是他们都参加了美国计算机科学竞赛(USACO),并且取得过非常好的成绩。适合参赛人群USACO适合国内在读学生有意向申请美国大学的或者想锻炼自己编程能力的同学,高三学生也可以参加12月的第_usaco可以多次提交吗
MySQL存储过程和自定义函数_mysql自定义函数和存储过程-程序员宅基地
文章浏览阅读394次。1.1 存储程序1.2 创建存储过程1.3 创建自定义函数1.3.1 示例1.4 自定义函数和存储过程的区别1.5 变量的使用1.6 定义条件和处理程序1.6.1 定义条件1.6.1.1 示例1.6.2 定义处理程序1.6.2.1 示例1.7 光标的使用1.7.1 声明光标1.7.2 打开光标1.7.3 使用光标1.7.4 关闭光标1.8 流程控制的使用1.8.1 IF语句1.8.2 CASE语句1.8.3 LOOP语句1.8.4 LEAVE语句1.8.5 ITERATE语句1.8.6 REPEAT语句。_mysql自定义函数和存储过程
半导体基础知识与PN结_本征半导体电流为0-程序员宅基地
文章浏览阅读188次。半导体二极管——集成电路最小组成单元。_本征半导体电流为0
随便推点
【Unity3d Shader】水面和岩浆效果_unity 岩浆shader-程序员宅基地
文章浏览阅读2.8k次,点赞3次,收藏18次。游戏水面特效实现方式太多。咱们这边介绍的是一最简单的UV动画(无顶点位移),整个mesh由4个顶点构成。实现了水面效果(左图),不动代码稍微修改下参数和贴图可以实现岩浆效果(右图)。有要思路是1,uv按时间去做正弦波移动2,在1的基础上加个凹凸图混合uv3,在1、2的基础上加个水流方向4,加上对雾效的支持,如没必要请自行删除雾效代码(把包含fog的几行代码删除)S..._unity 岩浆shader
广义线性模型——Logistic回归模型(1)_广义线性回归模型-程序员宅基地
文章浏览阅读5k次。广义线性模型是线性模型的扩展,它通过连接函数建立响应变量的数学期望值与线性组合的预测变量之间的关系。广义线性模型拟合的形式为:其中g(μY)是条件均值的函数(称为连接函数)。另外,你可放松Y为正态分布的假设,改为Y 服从指数分布族中的一种分布即可。设定好连接函数和概率分布后,便可以通过最大似然估计的多次迭代推导出各参数值。在大部分情况下,线性模型就可以通过一系列连续型或类别型预测变量来预测正态分布的响应变量的工作。但是,有时候我们要进行非正态因变量的分析,例如:(1)类别型.._广义线性回归模型
HTML+CSS大作业 环境网页设计与实现(垃圾分类) web前端开发技术 web课程设计 网页规划与设计_垃圾分类网页设计目标怎么写-程序员宅基地
文章浏览阅读69次。环境保护、 保护地球、 校园环保、垃圾分类、绿色家园、等网站的设计与制作。 总结了一些学生网页制作的经验:一般的网页需要融入以下知识点:div+css布局、浮动、定位、高级css、表格、表单及验证、js轮播图、音频 视频 Flash的应用、ul li、下拉导航栏、鼠标划过效果等知识点,网页的风格主题也很全面:如爱好、风景、校园、美食、动漫、游戏、咖啡、音乐、家乡、电影、名人、商城以及个人主页等主题,学生、新手可参考下方页面的布局和设计和HTML源码(有用点赞△) 一套A+的网_垃圾分类网页设计目标怎么写
C# .Net 发布后,把dll全部放在一个文件夹中,让软件目录更整洁_.net dll 全局目录-程序员宅基地
文章浏览阅读614次,点赞7次,收藏11次。之前找到一个修改 exe 中 DLL地址 的方法, 不太好使,虽然能正确启动, 但无法改变 exe 的工作目录,这就影响了.Net 中很多获取 exe 执行目录来拼接的地址 ( 相对路径 ),比如 wwwroot 和 代码中相对目录还有一些复制到目录的普通文件 等等,它们的地址都会指向原来 exe 的目录, 而不是自定义的 “lib” 目录,根本原因就是没有修改 exe 的工作目录这次来搞一个启动程序,把 .net 的所有东西都放在一个文件夹,在文件夹同级的目录制作一个 exe._.net dll 全局目录
BRIEF特征点描述算法_breif description calculation 特征点-程序员宅基地
文章浏览阅读1.5k次。本文为转载,原博客地址:http://blog.csdn.net/hujingshuang/article/details/46910259简介 BRIEF是2010年的一篇名为《BRIEF:Binary Robust Independent Elementary Features》的文章中提出,BRIEF是对已检测到的特征点进行描述,它是一种二进制编码的描述子,摈弃了利用区域灰度..._breif description calculation 特征点
房屋租赁管理系统的设计和实现,SpringBoot计算机毕业设计论文_基于spring boot的房屋租赁系统论文-程序员宅基地
文章浏览阅读4.1k次,点赞21次,收藏79次。本文是《基于SpringBoot的房屋租赁管理系统》的配套原创说明文档,可以给应届毕业生提供格式撰写参考,也可以给开发类似系统的朋友们提供功能业务设计思路。_基于spring boot的房屋租赁系统论文